Technology
Apr 19, 2018
How to Deploy Sitecore to Azure Part 3: Creating the Web Deploy Package


This four-part blog series is exploring how to deploy a local Sitecore instance to Azure. We’ve already covered setting up your environment and creating payloads. Now we’ll explore how to create the web deploy package and then unpack it.
CREATING THE WEB DEPLOY PACKAGE FILE
With the payload files created, we are ready to create our web deploy package (WDP) file. This file will contain all files that will eventually end up in our Sitecore instance in the cloud.
1. Adding Unicorn YML Files
Unicorn can use YML files to update the core and master databases from the Content Management (CM) instance. Follow these steps to add your YML files to your local instance so the packaging command can pick up the files automatically. If you are not using Unicorn or not interested in updating your target databases feel free to skip this step.
Locate your local serialization files. Mine were at “C:/code/src/Serialization”.
Copy your files to your local Sitecore instance.
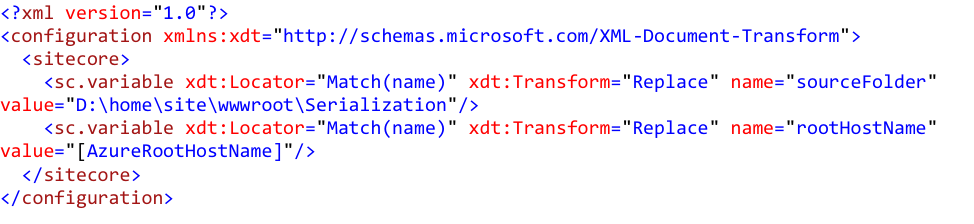
Make sure the location where you paste your serialization folder matches that of your transformed <targetDataStore> from your Unicorn configuration at the target location.
My local webroot is C:\inetpub\wwwroot\MySite\Website, which is equivalent to my remote webroot D:\home\site\wwwroot\.
Add a transformation to all your target payload XDTs to transform <configuration><Sitecore><targetDataStore> values to point to: D:\home\site\wwwroot\Serialization

2. Edit Config Files to Include New Sitecore Cargo Payload (SCCPL) Files
How does the program know how many roles to create WDP files for and which transformation to apply to which role? This is done by the JSON files that are located under the resources/configs directory. Inside this directory you should find files like xp0.packaging.config.json or similarly named. Each one of these corresponds to each type of experience platform available (XP0, XP1, XM1, etc.). In my case I have the XP3 platform, which for our intents and purposes is a modified XP1 platform.
Navigate to \Deployment\resources\8.2.3\Configs.
Notice how there are multiple .config.json files (XP0, XP1, SDB1, etc.).
Pick the file relevant to your platform (mine was XP1).
Copy, paste, and rename this file to PROD.xp1.packaging.config.json.
Edit the new file, adding the created SCCPL file names from the previous step to the “sccpls” array at the end (the SCCPL file order matters).

3. Run the Start-SitecoreAzurePackaging PowerShell Command
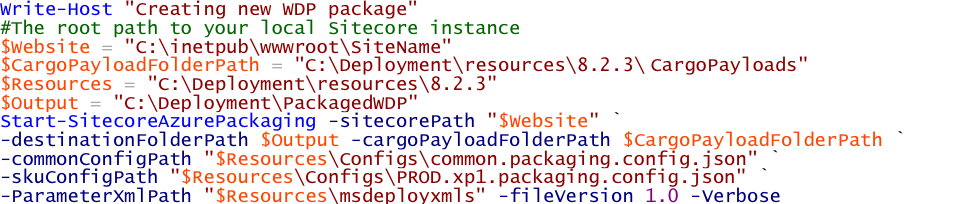
The command will do the following actions:
sitecorePath specifies the Sitecore installation path from which to take Sitecore binaries, views, configurations, custom code, and any other necessary files.
cargoPayloadFolderPath specifies the directory where the SCCPL files are located.
commonConfigPath dictates which SCCPL files to apply to all roles.
Personally, I did not have much need for this argument, as I felt that it was easier to deal with each instance individually, so I just left the common.packaging.config.json file as default.
skuConfigPath dictates which roles to create and which SCCPL to apply to which role.
ParameterXmlPath contains the directory for XML parameter configurations.
These configurations are mostly to be used by MSDeploy.
I found these parameters a bit hard to work with, and since I could achieve all my goals with just SCCPL transformations, I left all the MsDeployXmls files as default.
The command will create a .scwdp.zip file at the output directory (C:\Deployment\PackagedWDP\) for each role (cd, cm, rep, prc) that we have specified.
This .zip file should have all the transformations applied to it.
It includes .dacpac files, which are the contents of your local database instances.
I don’t have the need to copy my local database to my deployment Azure databases but I still have not found a way to skip the .dacpac creation since it is part of the command.
UNPACKAGING THE WDP
Once the package is created, we are almost ready to deploy. When deploying, we don’t want to just copy and paste our files in the target directory. This can lead to trouble because if we have files that we deleted from our local environment but previously uploaded, then those files will remain at the target location. We want a clean slate every time we deploy, which is almost like deleting all files and then copying ours.
4. Unzipping the Sitecore WDP
MSDeploy can use both directories and .zip files when publishing to a target. However, where the files end up can be quite tricky to configure, as I find MSDeploy not the friendliest of tools. Additionally, we don’t want to copy all the files that are generated from the package creation process (like the very large .dacpac files). For this reason, I found it easier to just unzip the contents of the Sitecore WDP.
Unzip the .scwdp.zip file by right clicking it and selecting “Extract all…”
Unzip all four roles.
Copy the license file to the correct location (/Website/App_Data/ by default). Package creation does not copy license files so you must do it manually.
My final directory structure:

Verify that the contents of the unzipped files contain the file structure very similar to your own wwwroot. This is also a good point to verify that your transformations were executed correctly by checking the .config files. Once you are happy with your packages, it’s time for the final step in this series—deploying your files to your Azure web app.
For questions regarding Sitecore or other development topics, reach out to us at marketing@credera.com
Contact Us
Ready to achieve your vision? We're here to help.
We'd love to start a conversation. Fill out the form and we'll connect you with the right person.
Searching for a new career?
View job openings