


Let’s dive straight into part eight of this blog series on Application Lifecycle Management (ALM) using Visual Studio 2012 and Visual Studio Team Foundation Server 2012. In case you haven’t read any of my previous posts, please do so (series overview; part one: Teams without Barriers; part two: TFS Online; part three: Tool Overview; part four: Before You Begin; part five: Backlog Management; part six: Exploratory Testing; and part seven: My Work).
Storyboarding is a mechanism to conceptualize and get feedback on a design during the development of your application. It’s generally quick feedback early in the process from the product owners, stakeholders or the end users of the software.
With storyboarding, you turn your ideas and goals into something visual. Your ideas become easy for other people to understand so they can give you constructive feedback sooner. You will have the opportunity to bring your ideas to life with all the different storyboard shapes, text, animation, and all the other features that PowerPoint Storyboarding provides.
–
Dramatically increase agility and velocity with Microsoft Solutions
Explore Our Microsoft Consulting Services →
–
How to Use Storyboard Shapes and PowerPoint Features
If you don’t have Office PowerPoint 2007 or later, please click here to install it.
If you haven’t installed Visual Studio Premium 2012, Visual Studio Ultimate 2012 or Visual Studio Test Professional 2012, you will need to install one of these versions to create and modify storyboards. Unfortunately, the only way to get the TFS Storyboarding add-in is by installing one of the premium editions of Visual Studio.
Open PowerPoint Storyboarding and start with a blank slide. You should see the Storyboarding ribbon and Storyboarding Shapes library. If you don’t see the storyboarding ribbon, then you probably don’t have one of the premium versions installed on your machine.
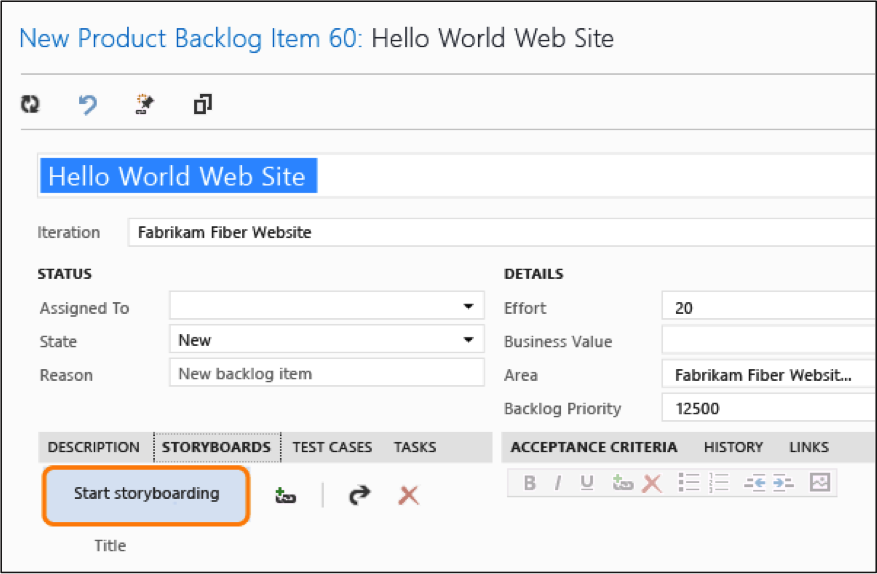
You can also open PowerPoint Storyboarding from the Storyboarding tab of a backlog work item.

You can add background shapes that are appropriate for your application. To add a shape, you just need to drag it onto the slide. You can search for more shapes to complete your design. Visual Studio gallery also has more storyboard shapes if you needed something that is outside of the ones provided in PowerPoint.
Create more slides to show the flow of your application. Share them with the team to get early feedback on the design.
Try using animation to bring your flow to life. Animation really helps if you trying to show how a user navigates in your app or when you are showing a data flow.
Note: Use “=lorem()” when you don’t have the actual text ready.
Link Storyboard to a Work Item in TFS
When you share your storyboards to a shared network location, you can link the storyboards to work items that they support. That way your team members can open the storyboards from the work items and annotate them with their suggestions.
Save and upload your storyboard to a shared location that everyone on your team can access. By default it will give you the option of storing it on Sky Drive (probably the best option to go with). Otherwise, you can also store it on a shared network drive.
If you started PowerPoint Storyboarding from a backlog item, then you are already linked to the initial item and you are done.
Otherwise, open Storyboarding Links in PowerPoint. You should connect to your instance of Team Foundation Service and a team project.
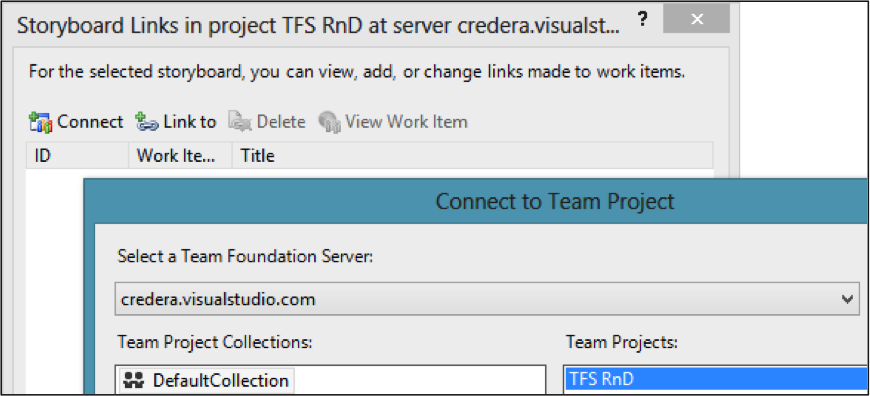
Then link it to a work item. You can do this by using a saved query like Product Backlog. You can also do a simple search on the title, or just provide the ID for the work item.
Now the storyboard is linked to the work item. So everyone who sees the work item can now see the storyboard and your thoughts are communicated more quickly.
With PowerPoint storyboarding you can definitely illustrate a new enhancement or a modified interface very easily with the help of a huge collection of predefined storyboard shapes. Also, you can customize the shapes and create your own set of storyboard shapes for situations where you need to use a lot of branding in the storyboard you design. Finally, by linking the storyboard with the work item, you are automatically sharing it with the team.
Stay tuned for my next post in this series when we’ll talk about customer feedback. Be sure to follow us on Twitter or LinkedIn for more great tips. Have a question related to the blog series or ALM in general? Use the comments section below to join the conversation.
Contact Us
Ready to achieve your vision? We're here to help.
We'd love to start a conversation. Fill out the form and we'll connect you with the right person.
Searching for a new career?
View job openings