


Corporate laptops on Windows 10 can now be more easily managed and secured thanks to mobile device management (MDM). It’s an open-source approach, so there are a number of tools, but we’re exploring how it works with Microsoft’s Intune.
For this blog post, we will assume a scenario with an Office 365 customer who currently manages Windows 10 machines with Group Policy in an Active Directory domain that is syncing to Azure AD. Our Windows 10 MDM implementation needs to meet the following objectives to replace the controls in the current imaging and Group Policy implementation:
Run on any Windows 10 PC out of the box
Add local admin rights for desktop administrators
Require BitLocker encryption and backup BitLocker keys
Manage Windows Updates setting by user group
Upgrade the Windows license to Enterprise
Deploy a SCEP certificate for WiFi access
Deploy Office 365 ProPlus
Deploy a set of custom fonts
Allow users to access several office printers
We’ve already explored the first three in part one, so in part two we will cover how to:
Manage Windows Updates setting by user group
Upgrade the Windows license to Enterprise
Deploy SCEP certificate for WiFi access
Upgrade the Window's License
In order to take advantage of all the enterprise features of Windows 10 ,we need to upgrade the license to Windows 10 Enterprise edition. The enterprise upgrade settings and the settings for getting WiFi access set up can all be found in Device configuration, then Profiles. There are a number of different profile types, and a full review can be found in the Microsoft documentation.
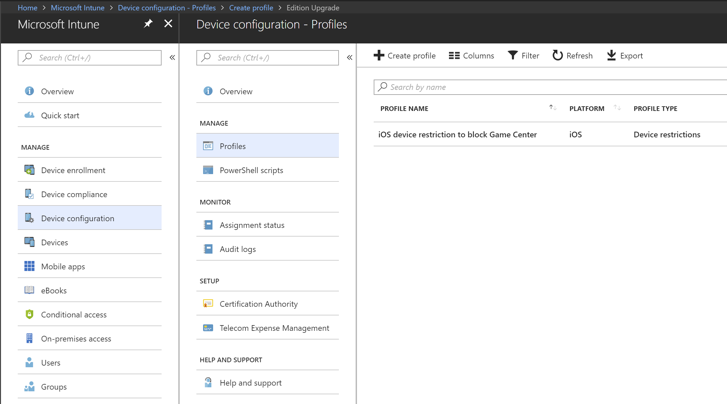

Figure 1. Intune Configuration Profiles
For our edition upgrade profile, we will set the Platform as Windows 10 and later and the Profile type as Edition upgrade, which will let us choose Windows 10 Enterprise as the Edition to upgrade to. This, in turn, reveals the Product Key field where we can enter our Enterprise Volume License Key. Finally, as with all Intune profiles, we need to apply it to a group of users—for our example a test group.
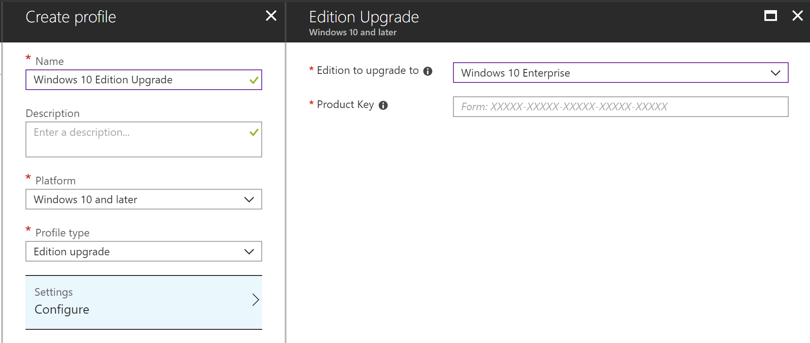
Figure 2. Windows 10 Edition Upgrade
Set Up a SCEP Certificate for WIFI Access
Detailing the entire setup process to create SCEP certificate profiles and deploying them to user populations could be a blog post in itself, so here we will focus on the areas that are unique to getting this set up with Intune. Any Intune WiFi setup will include at least three profiles, one for the trusted certificate of the Enterprise CA, one for the SCEP or PKCS certificate configuration, and one for the WiFi profile itself.
The first step toward getting the SCEP set up to work with Intune is to set up and configure a Network Device Enrollment Service (NDES) server with the Intune Certificate Connector. Microsoft documents that process, so I won’t restate it. One word of caution that is not in Microsoft’s documentation is that you cannot reuse an existing NDES server to connect to Intune. Installing the Intune Certificate Connector on an existing NDES server will cause any certificate enrollment requests not coming from Intune to fail.
Once we finish Step 5 from the documentation above, we need to create the Trusted Certificate Profile so that we can reference it in the Create a SCEP certificate profile section of the documentation. This profile adds the root or intermediate CA to a trusted certificate store on our Windows 10 MDM machines. You can get the .cer file needed for this step from the Certificates snap-in of any machine that currently trusts your Enterprise CA. Simply find the Enterprise CA certificate on a current machine and export it to a .cer file and then upload it in the Trusted Certificate Profile.
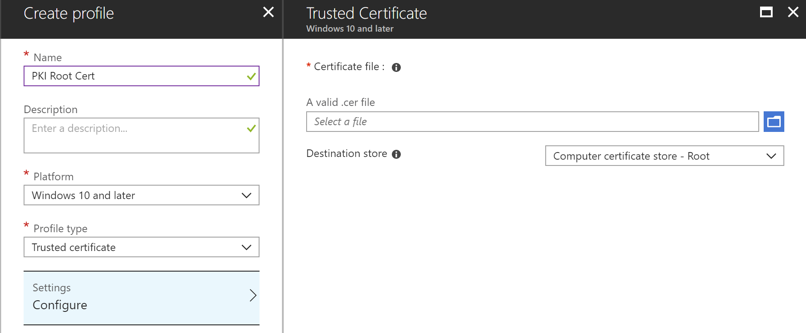
Figure 3. Trusted Certificate Profile
Now go back to Microsoft’s documentation to Create a SCEP certificate profile. As long as you are already on the network with the NDES and SCEP servers, you should be able to receive a certificate for WiFi authentication so you can get on the network. If that seems a bit like a catch 22, it mostly is, but it is also a good place to check to make sure everything is configured correctly so far, so take the time to connect via a wired network to test.
When we know that the Intune SCEP configuration is working as expected we can set up a proxy service to publish the NDES endpoint to the internet so we don’t have to be on the network to get a certificate. We can use any proxy service to publish NDES, so if your team has an existing web proxy service feel free to use it. For our example, we’ll assume we don’t have anything currently set up and we want to take the simplest path forward, so we will set up an Azure AD Application Proxy (AAD App Proxy).
The AAD App Proxy has a connector of its own that needs to be installed in the network environment with NDES and needs to be able to access the internet on ports 80 and 443. The same connector can be used to publish multiple on-premises apps, but since all we are concerned about right now is NDES, we will install the AAD App Proxy Connector directly on the NDES server (see instructions for installing the connector).
Now that the AAD App Proxy Connector is in place, we can publish NDES through Azure AD using these directions. When setting up the app the values should follow this pattern:
Name – Any descriptive name, e.g., “Intune NDES Proxy.”
Internal URL – https://<servername>/certsrv/mscep/mscep.dll/
External URL – https://<appname>-<tenantname>.msappproxy.net/ (You can use a custom domain name here, but you don’t need to—no one but an admin will see this URL.)
Pre Authentication – Passthrough
Connector Group – Default (if you have separate Connector Groups, select the one that has access to NDES).
Leave the Additional Settings set to their defaults.
Once we save our Azure AD app, confirm you can access NDES from outside the network with the external URL. In a browser going to “https://<appname>-<tenantname>.msappproxy.net/” should return the default IIS page, while going to “https://<appname>-<tenantname>.msappproxy.net/certsrv/mscep/mscep.dll/” should return a 403 error. Now go back to our SCEP profile in Intune and add the full External URL to the SCEP Server URLs and remove the internal server URL you added when creating the profile.
The final profile to create is the WiFi configuration profile, which provides the details of the WiFi network we want our users to join. The profile type to accomplish this is called Wi-Fi import and can be found in the Windows 8.1 and later set of profile types. As the name implies, we will be importing an XML configuration file for the WiFi network we want to use. The easiest way to create the XML is to export it from a computer that has already joined the WiFi network. The Microsoft documentation about how to export and import this XML profile into Intune is fairly straightforward, however, you may have to make alterations to the XML in order for it to work on the Intune managed device. In my example, I exported the profile from a computer that was using a computer-based certificate for authentication, whereas our Intune-based SCEP certificate is deployed to the user profile. To adjust for this, I changed the authMode element from machine to user. During my testing, I also found that I needed to add the TrustedRootCA element with the thumbprint of my root CA. These were just the two issues I ran into with the XML for my WiFi network. Individual issues may vary with this XML, so check the WLAN_profile Schema and OneX Schema for details on the schema for this XML.
Finally, don’t forget to deploy all three of these profiles to our test user group.
While it’s not how I did my example, learn from my mistake and deploy the Trusted Certificate and SCEP Certificate profiles to a test account first, then use that account to export the WiFi XML. That should limit the number of changes that need to be made to the XML before deploying it with Intune.
Moving Forward with MDM
The last part of this series will cover how to:
Deploy Office 365 ProPlus
Deploy a set of custom fonts
Allow users to access several office printers
Do you have questions about creating an MDM Windows 10 deployment to meet your needs? Credera has expertise helping clients achieve modern deployment patterns that can streamline the deployment process, freeing up resources from time-consuming image deployment processes. We would love to discuss potential cloud and infrastructure solutions with you—contact us at marketing@credera.com.
Contact Us
Let's talk!
We're ready to help turn your biggest challenges into your biggest advantages.
Searching for a new career?
View job openings