


This four-part blog series is exploring how to deploy a local Sitecore instance to Azure. We’ve already covered setting up your environment. In this section, we’ll explore how to create your payloads.
Creating Your First Payload
Because we are deploying an XP3 instance, we need to create a payload for each individual role. Let’s start by creating the payload for the Content Management (CM) instance. If you want to know more details about what a payload is and how they work, you can read the official Sitecore documentation.
1. Create Folders for the CM Role
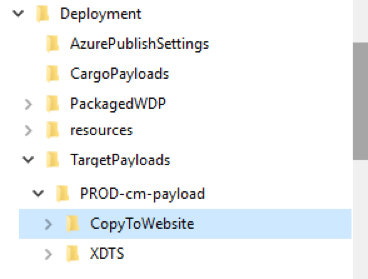
Create a folder called PROD-cm-payload (/…/TargetPayloads/PROD-cm-payload)
Inside the folder, create a new folder called XDTS (/…/PROD-cm-payload/XDTS).
Inside the folder create a new folder called CopyToWebsite ( /…/PROD-cm-payload/CopyToWebsite/).

2. Create the Connection String and Other Transformations
The next step is to update our connection strings with the correct connection string values we will use in production. Remember the rules for naming and location listed in the Sitecore documentation.
Create the following file structure inside the payload:
XDTS\App_Config\
Create a file called ConnectionStrings.config.xdt.
Add the following code in the file:
Create as many transformations as you need for your project.
3. Add Files to Copy To Website
Sometimes you need to add extra files to your final deployment. In my case I needed to add a configuration file called “Sitecore.Xdb.Remote.Client.config” to allow my CM instance to communicate with the REP instance.
Inside CopyToWebsite, create the following structure:
\TargetPayloads\PROD-cm-payload\CopyToWebsite\App_Config\Include
Create a file called Sitecore.Xdb.Remote.Client.config with the appropriate code.
4. Repeat Steps Two and Three for Each Role
What we have done is created the transformations that will change the configs and add any additional files we want to the deployment package of the Content Management (CM) instance only. To have a fully functional XP3 environment we need to create a payload for each role, each with their own connection strings and relevant configurations files. Check Sitecore documentation for how to properly configure each individual role.
For each role, create a payload target directory.
Add relevant XDTS.
Add relevant CopyToWebsite files.
Creating the Sitecore Cargo Payload File
Now that we have created the payload directory with the transformations and extra files that we want, we need to create the .sccpl file. This is done using PowerShell.
1. Open PowerShell:
Navigate to the local home development directory (C:/Deployment/).
Make sure the modules load (check the Sitecore Azure Tools section of our post on Environmental Setup).
2. Run the New-SCCargoPayload command:
$PayloadPath = "C:\Deployment\TargetPayloads\PROD-cm-payload" $OutputDestination = "C:\Deployment\resources\8.2.3\CargoPayloads" Write-Host "Creating new Cargo Payload from $PayloadPath to $OutputDestination" New-SCCargoPayload -Path $PayloadPath -Destination $OutputDestination -Verbose -Force
This command will use the directory we created and take all of the transformations and files and create the .sccpl file.
It will drop the output file into the CargoPayloads directory that we will use later.
We should execute this command for every role (cd, prc, rep).
At the end we should have the following files:

With the payload in hand, we are ready to move to part three of this walkthrough, in which we create the web deploy package files.
For questions regarding Sitecore or other development topics, reach out to us at marketing@credera.com.
Contact Us
Let's talk!
We're ready to help turn your biggest challenges into your biggest advantages.
Searching for a new career?
View job openings