


Microservices are a common solution for data processing since they promote modularity and reusability on top of existing architectures. But like any software component, these services need an ample amount of testing to verify correct functionality. A common challenge behind testing a microservice is that many times the processed data is sent to some other component in your architecture, such as a database, third party, or even another microservice. This makes it hard to find a clean way of evaluating data that is leaving the system. We need a testing solution that can easily hook into the codebase and isolate the microservice from any other components.
One way to test these microservices is to inject a new layer on top of the calls to other system components. A new “Facade” layer will switch functionality between a test mode and the desired production mode in addition to calling other system components.
Before we dive into this solution, this guide assumes you understand the basics of running a Spring Boot application. Here’s a quick refresh if you need to get up to speed.
If you wish to follow along, I have posted a copy of the STS project. This project contains the pom.xml critical for compiling and executing the final project.
The Example
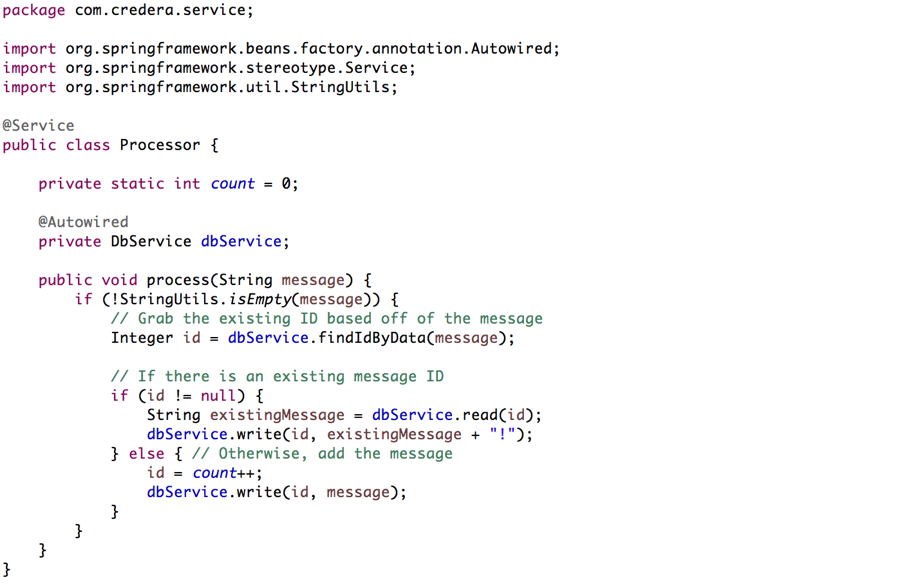
For demonstration purposes, we’ll set up a basic microservice which sends a string to a database service for writing. If the string exists in the database, the microservice will add an exclamation point to the end of it. While this example is contrived, you can easily apply the following strategy to existing microservices.
Processor.java

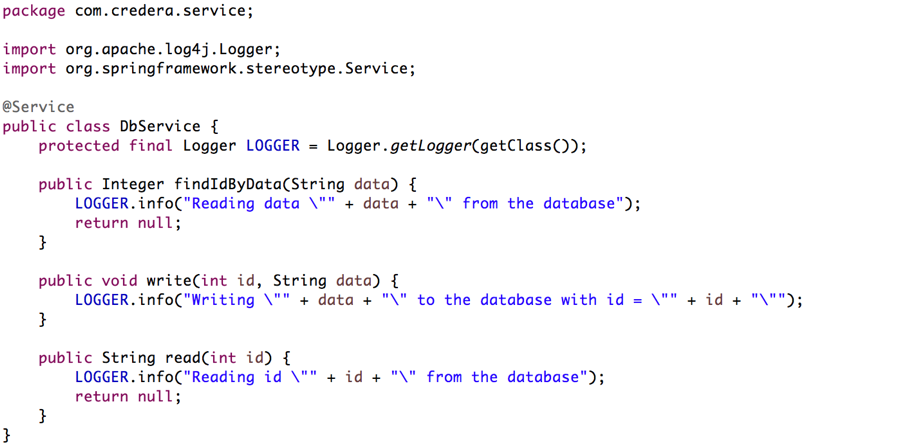
DbService.java
In order to set up our Facade layer, we will create a new interface that abstracts the DbService calls we are making in the Processor class.
Facade.java

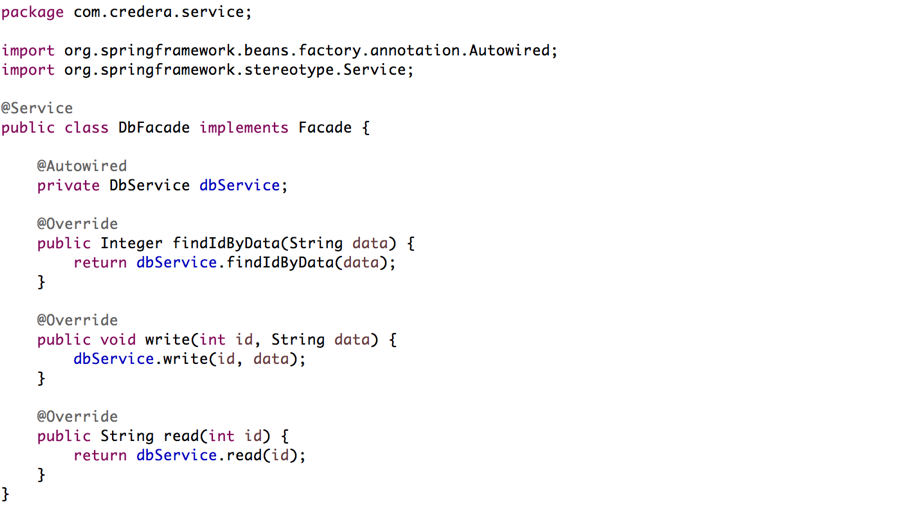
Next, we will create an implementation of the Facade interface that will simply pass through any calls down to the DbService.
DbFacade.java
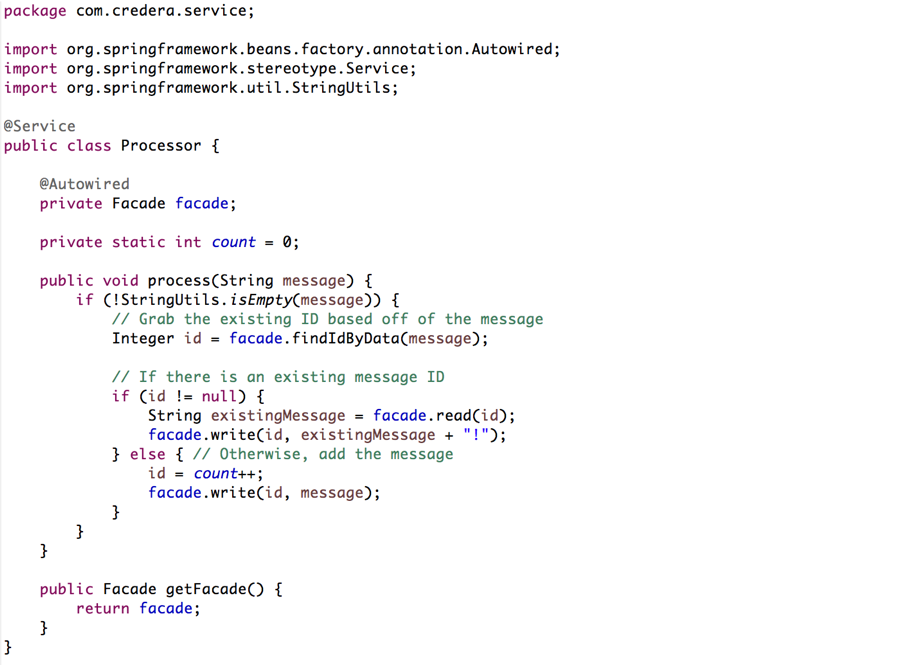
Then, let’s update the Processor class to auto-wire in the new Facade layer and utilize its interface functions. (Ignore the getFacade() function for now, we will be using it later.)
Processor.java
With that new layer in place, the microservice will run as before without an issue.
Setting Up the Testing Environment
To take advantage of the Facade layer for testing our microservice output, we are going to need another implementation of the Facade interface. This new TestFacade will act as a mock database so that it can read and write any input.
TestFacade.java
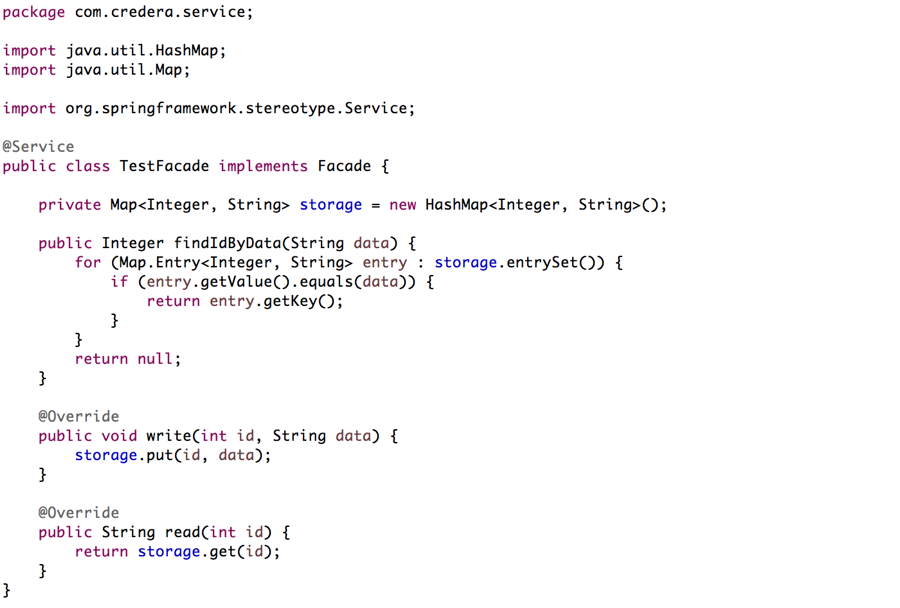
By adding this class, however, the microservice will not deploy correctly even though the project still compiles. This is because we have two implementations of the Facade interface, and Spring is not sure which one to wire in over the other. Fortunately, Spring has a simple profile mechanism for annotating which Beans to use based off of a VM argument.
To configure our facades for profiling, we need to add one line of code to both the DbFacade and TestFacade.
TestFacade.java

DbFacade.java

Essentially, these lines will let Spring know to auto-wire either the TestFacade if the “test” profile is active, or the DbFacade if any other profile is active, hence the “!test”.
With the Spring profiles annotated in our services, we can now run the microservice with the DbFacade. However, to use the TestFacade, you must specify the following VM argument: “-Dspring.profiles.active=test”. We will be using this argument as we begin to test our microservice in the next section.
Creating a Basic Endpoint to Simplify Testing
Now we are going to create a basic endpoint which will allow us to interact with our Processor and TestFacade interface in a clean way for our Spock tests. This endpoint will contain a default GET handler to allow us to ping the controller and make sure it is active before we proceed with our tests. The other two handlers will expose the Processor.process() function and allow us to read values from our storage map in TestFacade to verify our results.
TestController.java

As you can see, this endpoint does nothing more than expose functionality of the microservice for use in test cases. The only complication in the controller was to make sure that results were returned in a JSON format so the Spock tests can evaluate data properly.
Spock Testing, at Last!
We are finally able to write some Spock tests to validate our microservice logic. There has been a lot of setup, but now we have given ourselves some flexible ways of testing our code as you will soon see.
The Spock testing framework features a simple syntax while maintaining an easy to follow format for testing your code. We will set up a Groovy file for our tests, which will contain the following:
A definition of the REST client we will use to hit the endpoint.
A basic test to ensure the endpoint is up and running.
Two helper functions for the process and read handlers.
Two simple tests to validate our code.
Learn more about Spock tests.
ProcessorSpec.groovy
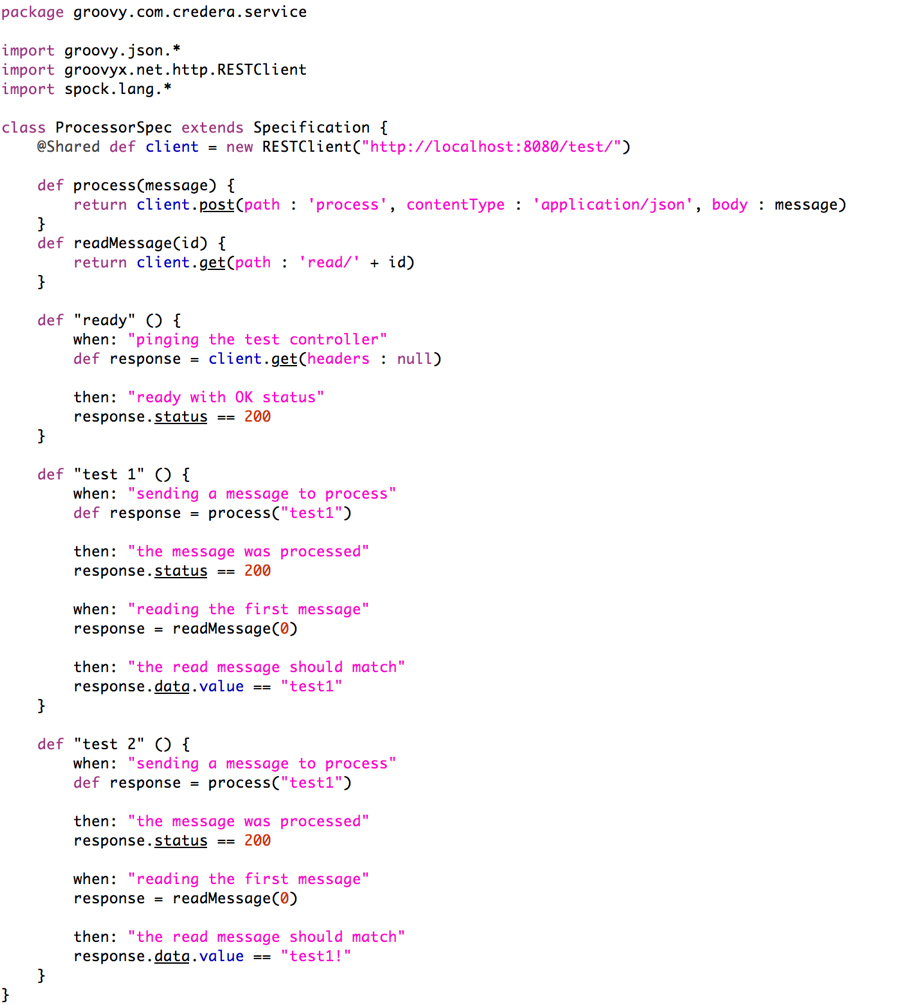
Taking a closer look at the two test cases we defined, it is easy to see the pattern of “when something happens, then a condition must be true.” In our case, when we process the message “test” as the first message, we know that the message with id 0 should read “test”. When we process another “test” message, however, the message with id 0 should be “test!” per our Processor code.
You can easily run these Spock tests by first starting up the microservice with the “test” profile then running the following command from the project root directory: “mvn clean test –Ptest –Dtest=ProcessorSpec”
A few things to note about that command:
The “-Ptest” argument to the Maven test command lets Maven know to execute tests out of a specified directory as configured in the pom.xml file of the project.
The “-Dtest=ProcessorSpec” argument runs only the Groovy file we just created.
And there you have it! Once you are satisfied with your tests, just restart the microservice without the test profile and it’s ready to use!
Final Thoughts
There are several ways you could enhance the architecture presented above in order to allow for easy test configurations and save time.
If you didn’t already notice, the Spock tests will only pass the first time you run them. To fix this, you could configure and call a “reset” handler to clear the storage in the TestFacade from the Spock tests without having to restart the microservice.
You could add some test values before your tests start running through an initializer endpoint. This could save you from having some repetitive Groovy code which calls the process function to add test values.
Taking that last enhancement a step further, you could define the test values in Groovy, and then send those test values to the TestController for initialization before starting your tests. That way, you can easily change your initial test parameters inside Groovy without having to recompile and redeploy the microservice.
Have questions? Let’s talk about it! Leave a comment below and I’ll help you out.
Contact Us
Ready to achieve your vision? We're here to help.
We'd love to start a conversation. Fill out the form and we'll connect you with the right person.
Searching for a new career?
View job openings