


Today, tabular data is used everywhere to deliver meaningful insights to business and engineering problems. A common way of extracting these insights is to apply machine learning (ML) techniques to the data. A normal ML pipeline consists of numerous steps, which can include pre-processing data, feature engineering, or optimizing model hyper-parameters (to name a few). Additionally, you need expert domain knowledge of ML to be efficient and effective at each of these steps, and it can take time for organizations to find these ML experts or grow this expertise in-house.
To save organizations both time and money, Google’s Vertex artificial intelligence (AI) platform is a very helpful solution. Vertex AI enables developers with limited machine learning knowledge and expertise to train, test, and deploy high-quality ML models suited to their business needs. Vertex AI combines data engineering, data science, and ML engineering workflows, enabling your teams to collaborate using a common toolset. In this article, we are going to give an overview of Vertex AI and walk through an example project using Vertex AI.
Before progressing further into this tutorial, ensure you have access to a Google Cloud Platform (GCP) project where you can create the Vertex AI resource and that you have enabled the required application programming interfaces (APIs).
How Vertex AI works
Vertex AI involves supervised learning tasks to achieve a desired outcome. The specifics of the algorithm and training methods change based on the data type and use case. There are many different subcategories of machine learning, all of which solve different problems and work within different constraints. Vertex AI offers the ability to automatically train models on visual (image and video), textual, and structured data.
Vertex AI workflow
Vertex AI uses a standard machine learning workflow:
Gather your data: Determine the data you need for training and testing your model based on the outcome you want to achieve.
Prepare your data: Make sure your data is properly formatted and labeled.
Creating dataset: Import the data for use by the ML model.
Train: Set parameters and build your model.
Evaluate: Review model metrics.
Deploy and predict: Make your model available to use.
Before starting the workflow, you need to think about the problem you want to solve. This will inform your data requirements.
Explore the Vertex AI tutorial
ASSESSING THE USE CASE
This step is not a part of the standard machine learning workflow above but is critical to address what you want to achieve and your desired outcome. For this tutorial, we will be doing regression, which involves predicting a continuous value.
GATHERING DATA
After establishing your use case, you can start gathering your data—a process that can be carried out in several different ways. For this tutorial, we are using California Housing Prices dataset, which has been downloaded from Kaggle.
While gathering your data, it is important to keep the following things in mind:
Selecting relevant features: A feature is an input attribute used for model training. Features are how your model identifies patterns to make predictions, so they need to be relevant to your problem. For example, to build a model that predicts whether a credit card transaction is fraudulent or not, you’ll need to build a dataset that contains transaction details like the buyer, seller, amount, date and time, and items purchased. Other helpful features might include historic information about the buyer and seller, and how often the item purchased has been involved in fraud.
Include enough data: In general, the more training examples you have, the better your outcome. The amount of example data required also scales with the complexity of the problem you’re trying to solve.
PREPARING DATA
Preparing data is all about processing your data to be fed into the ML model. Some common processing steps include filling in missing values, data normalization, data standardization, and so forth. For this tutorial, the data is already prepared to be fed into the ML model.
CREATING A DATASET
Importing a dataset can be done through the GCP console.
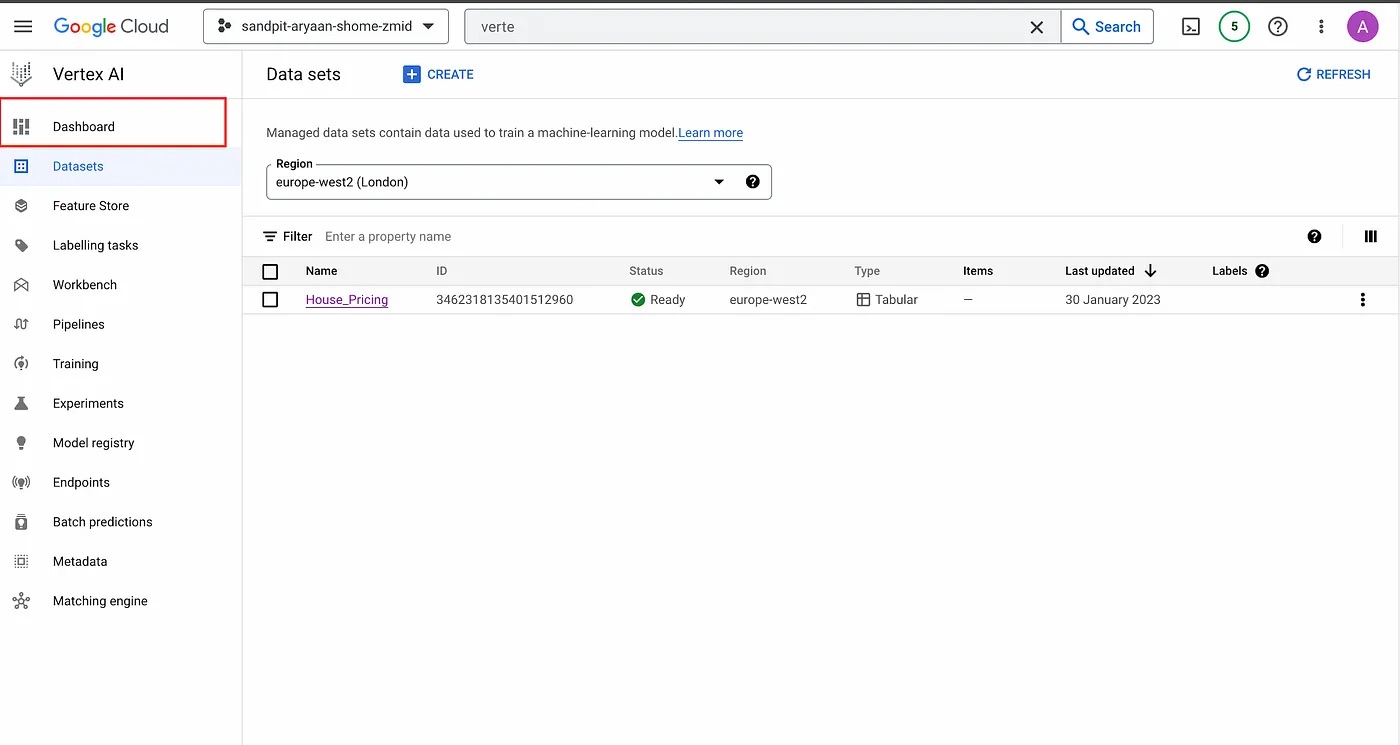
First, navigate to the Vertex AI section in the console.
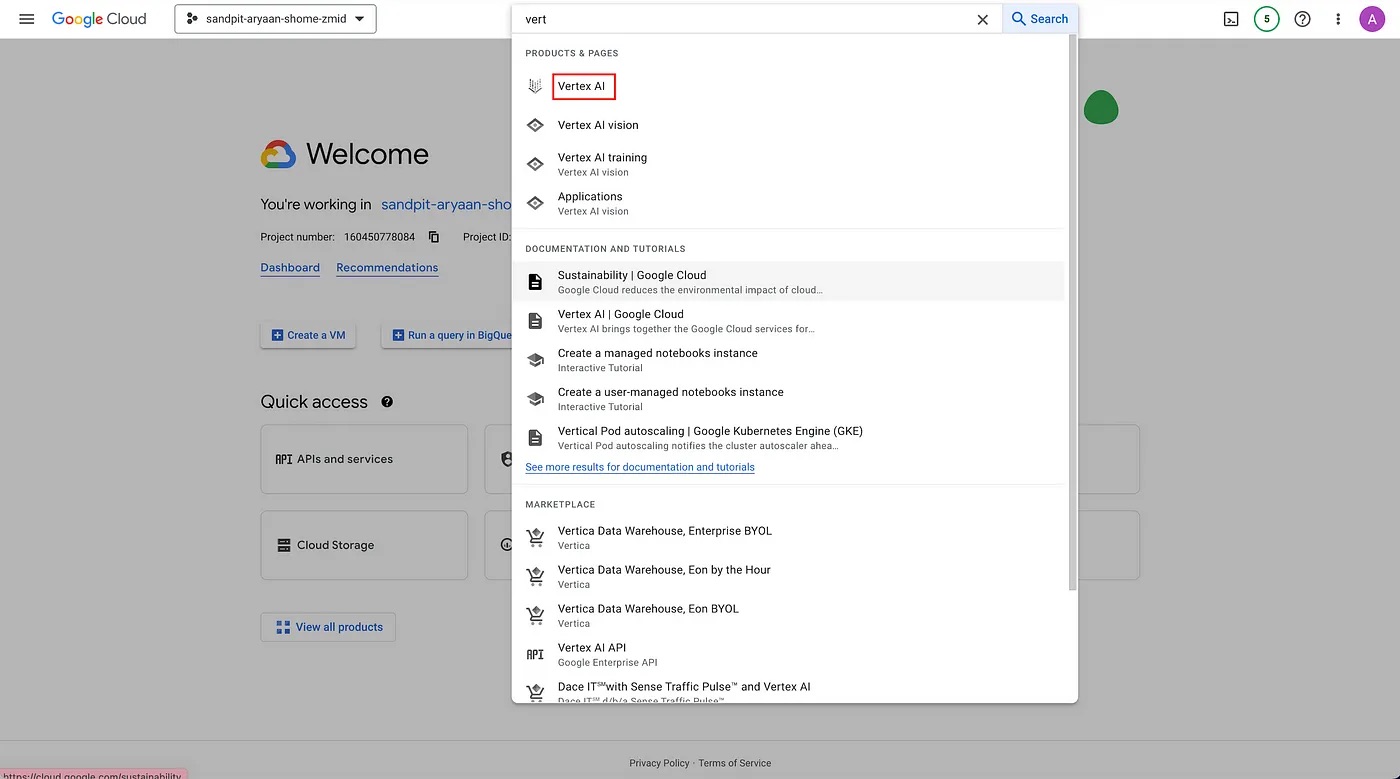
Search for the Vertex AI section in the search bar.

Then, click on “CREATE DATA SET” to start creating a new data set.
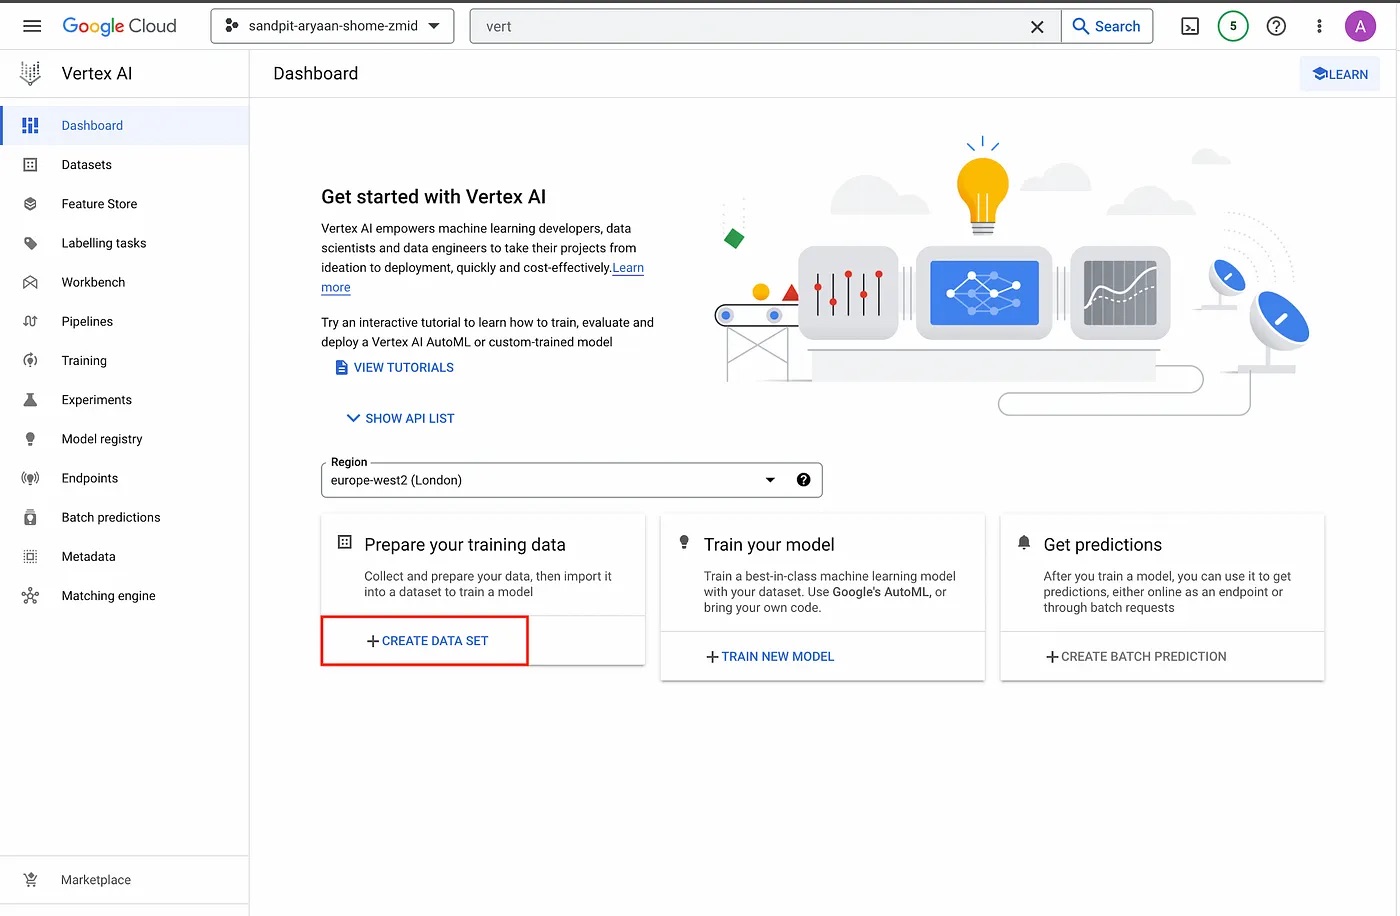
Vertex AI section.
Here, create a name for your dataset and select the data type and objective. You will also need to select the region for your dataset.
For this tutorial, we will set the name as House_Pricing, select tabular as the data type, Regression/classification as the objective, and europe-west2 (London) as the region.
Next, click on “CREATE”.
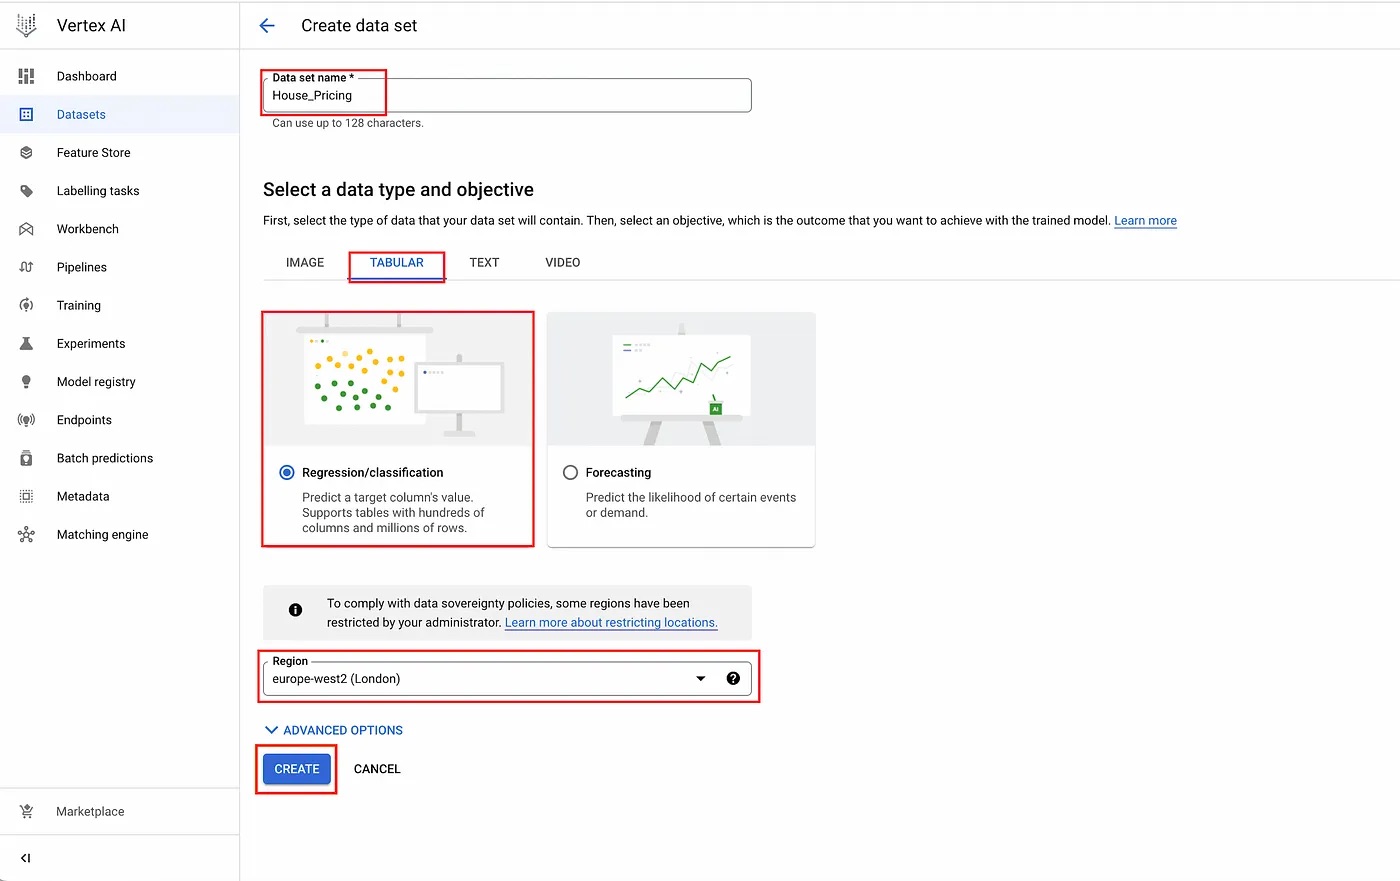
Create data set page.
This will take you to the data source page where you need to specify the source of the data. Here, you can specify your source to be either a comma separated view (CSV) file or a bigQuery table. For this tutorial, we will be using the “housing.csv” file as the data source, which we got from California Housing Prices dataset. You will also need to specify a GCP Cloud Storage Bucket where your CSV file will be uploaded. Once you have followed these steps, click on “CONTINUE” to create the dataset.
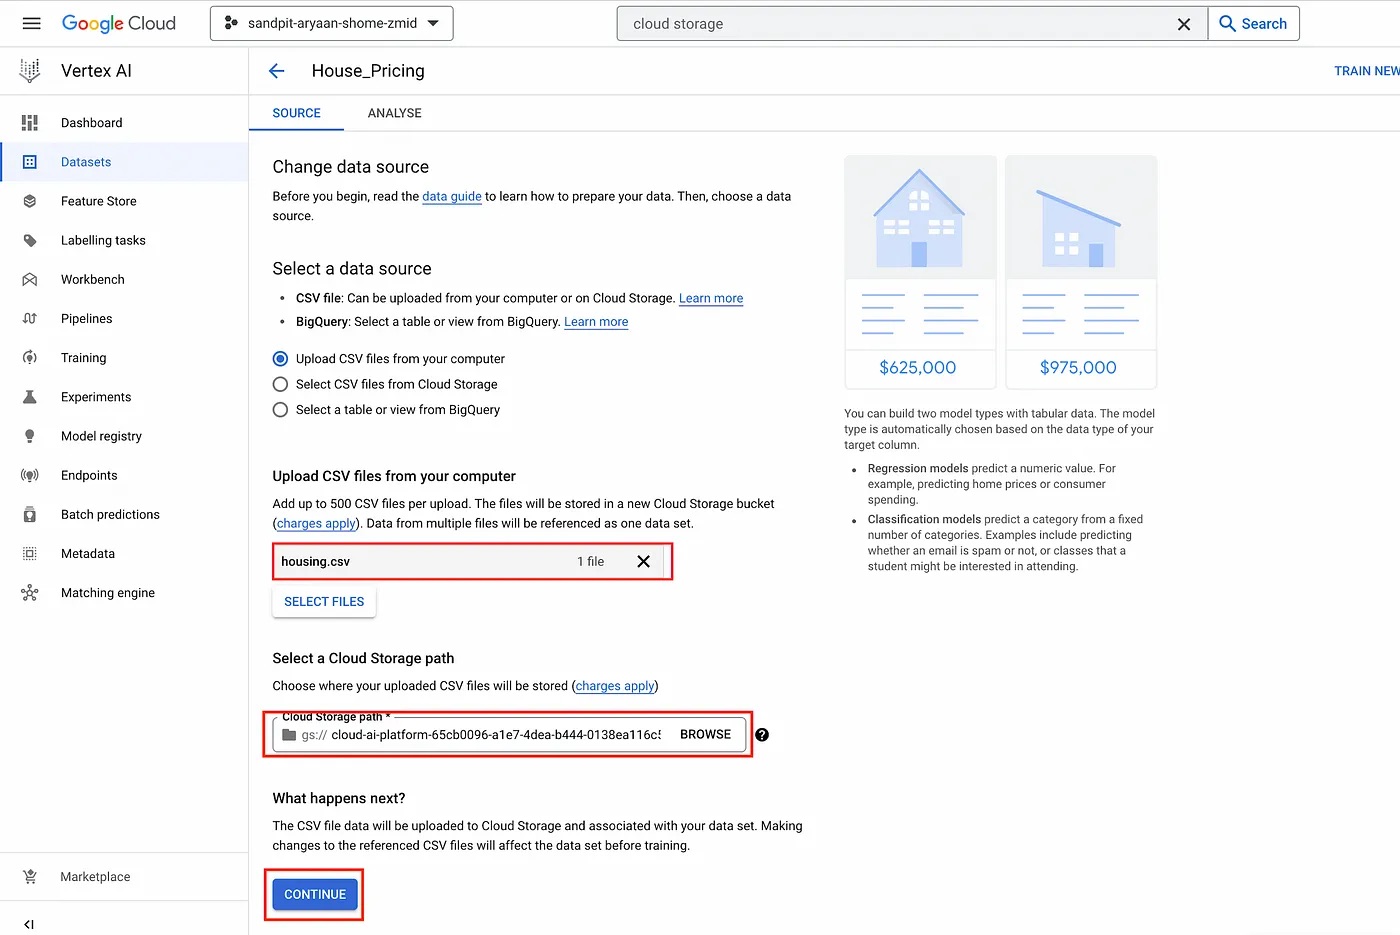
Data source page.
Now your dataset has been created and populated with the data from the source that you specified previously. You also have the option to go to “Analyze” and click on “Generate Statistics” to analyze your data.
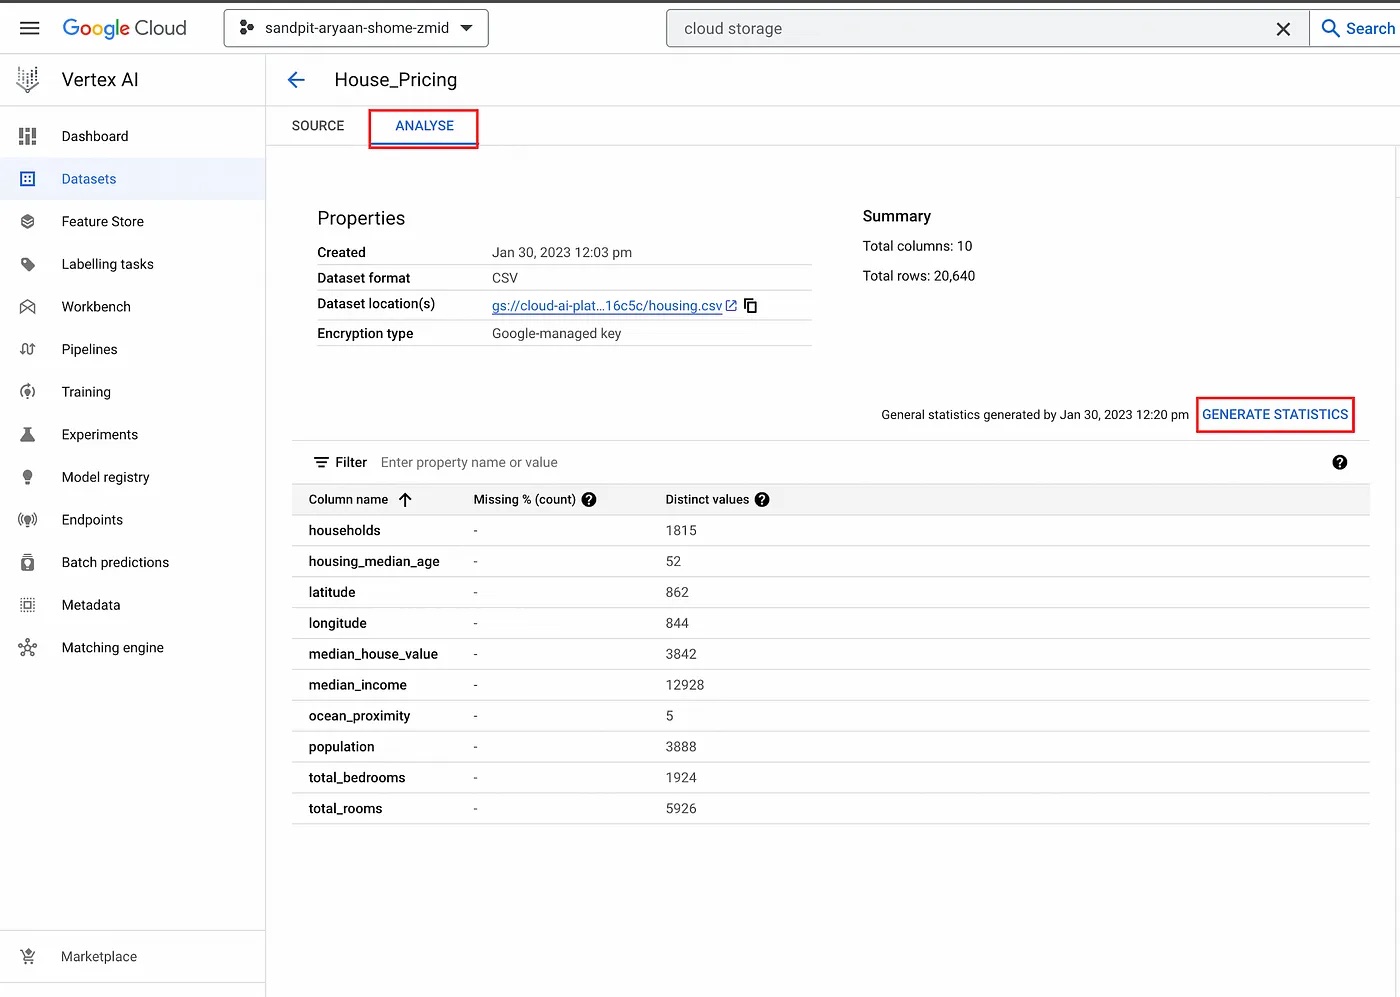
Analyze data.
TRAINING ML MODEL
Now that we have created our dataset, it is time to train the ML model.
For this step, click on “Dashboard” to go to the dashboard.
Then, click on “Train New Model” to start training a new model.
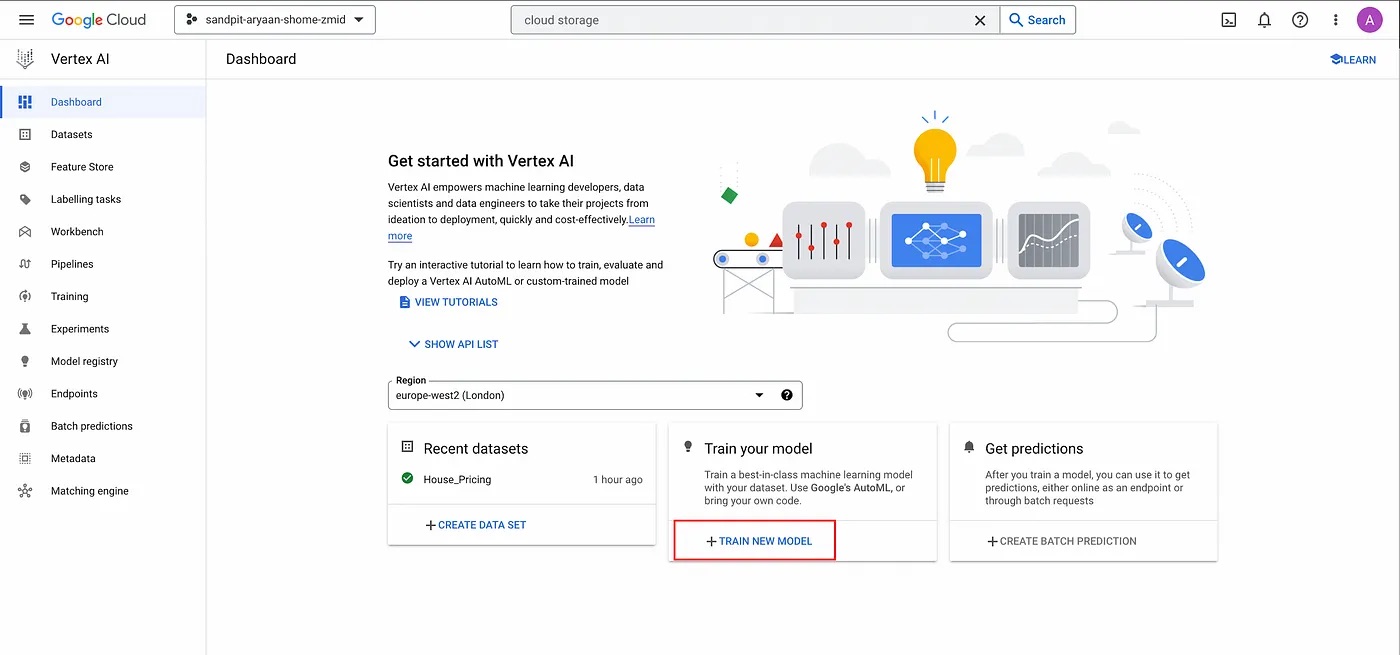
Dashboard.
We are then greeted with a dialogue that allows us to select the training objective whether we’re using AutoML to train the model or a custom training solution. For this tutorial, we will select regression as the training objective and AutoML as the training method.
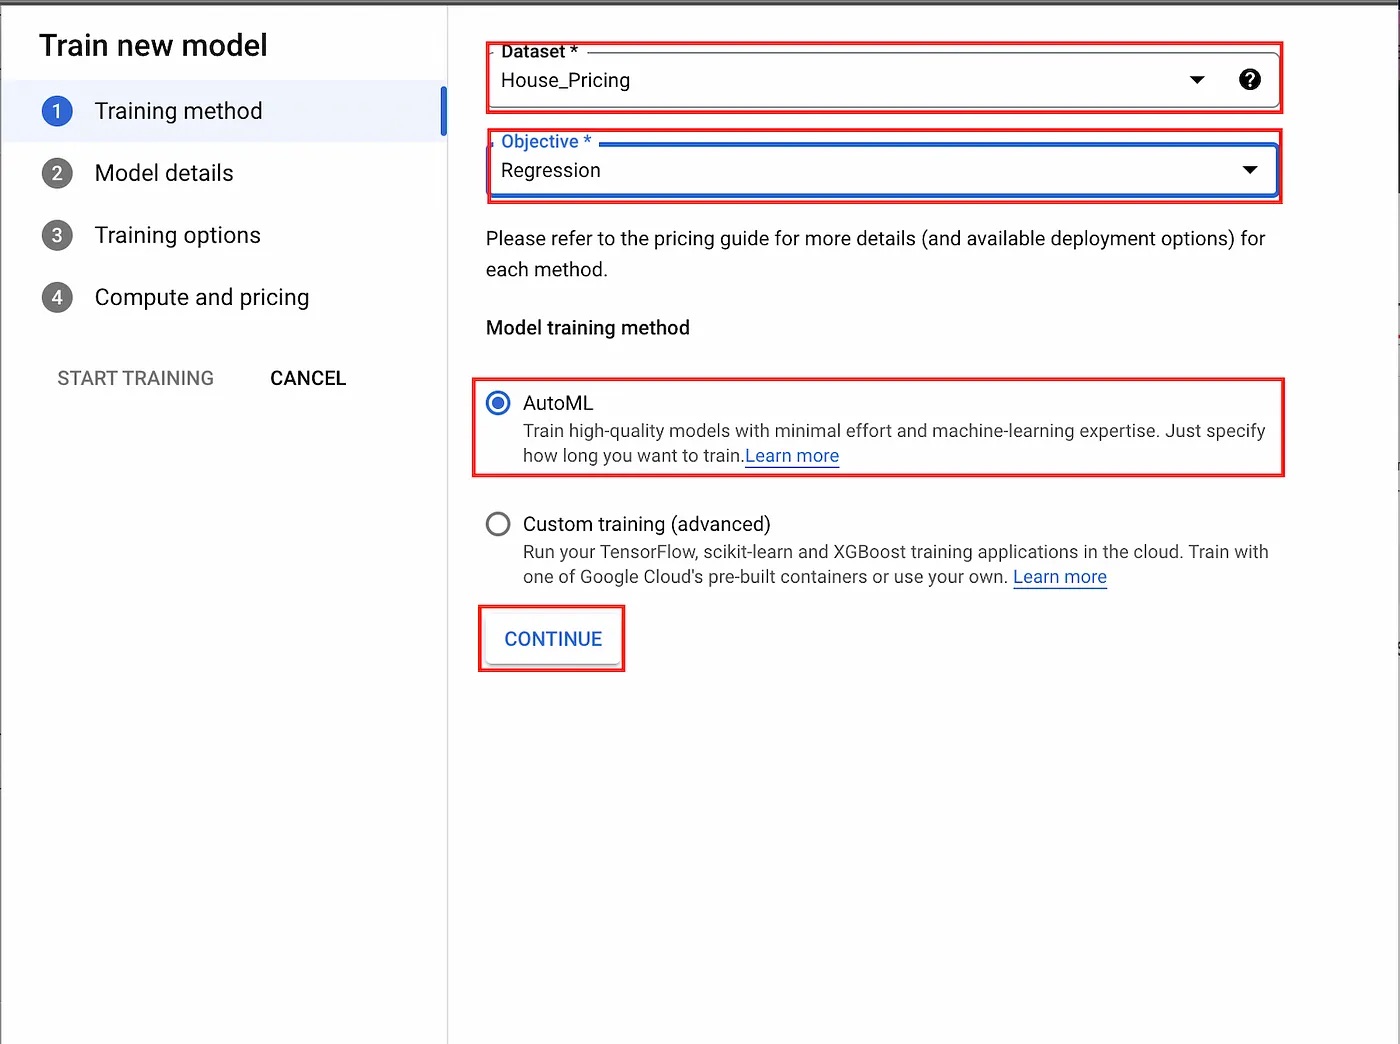
Training objective selection dialogue.
Next, we are asked to select the target variable/column that we want to train our model to predict. Under advanced options, we can also control how the data is split between the training, validation, and test sets.
This split can be done via random assignment, manual assignment, and chronological assignment based on a selected column. For our example, we will select “median_house_value” as the target and leave the advanced options on their defaults.
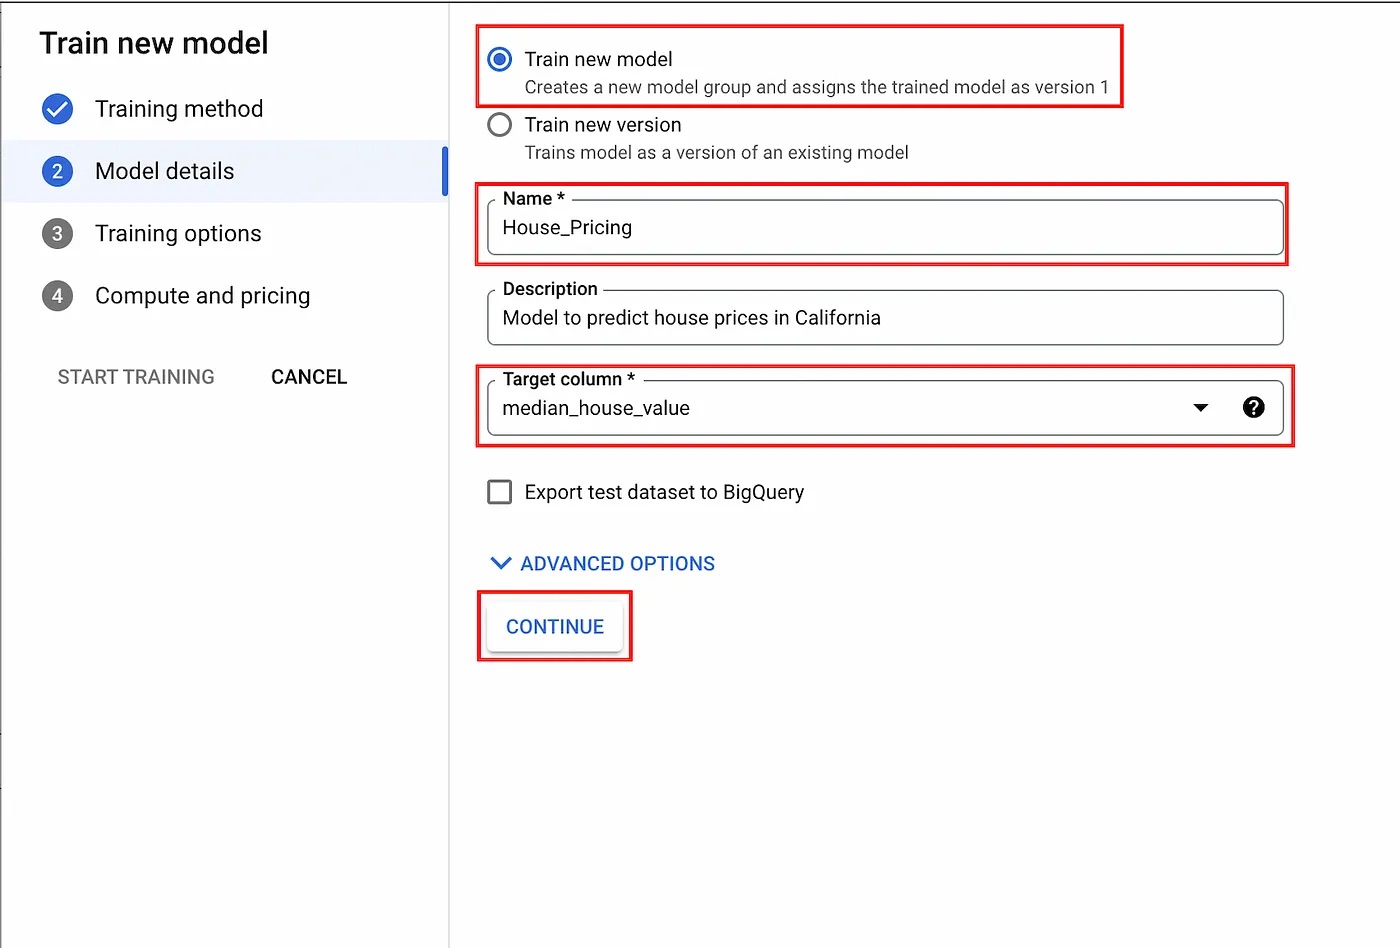
Model details dialogue.
After that, we are prompted to review the data types that AutoML has inferred for our data. For each column, we can select a transformation or data type (categorical, text, timestamp, or numerical), and whether we want it to be included in the training process. Under advanced options, we can also select a column that we want to use as a weight for rows, and an optimization objective. For regression, these objectives include RMSE, MAE, and RMSLE. Any additional pre-processing and/or feature engineering is best left to AutoML.
For our dataset, the inferred data types are correct. We will also include all columns in the training process and leave the advanced options on their defaults.
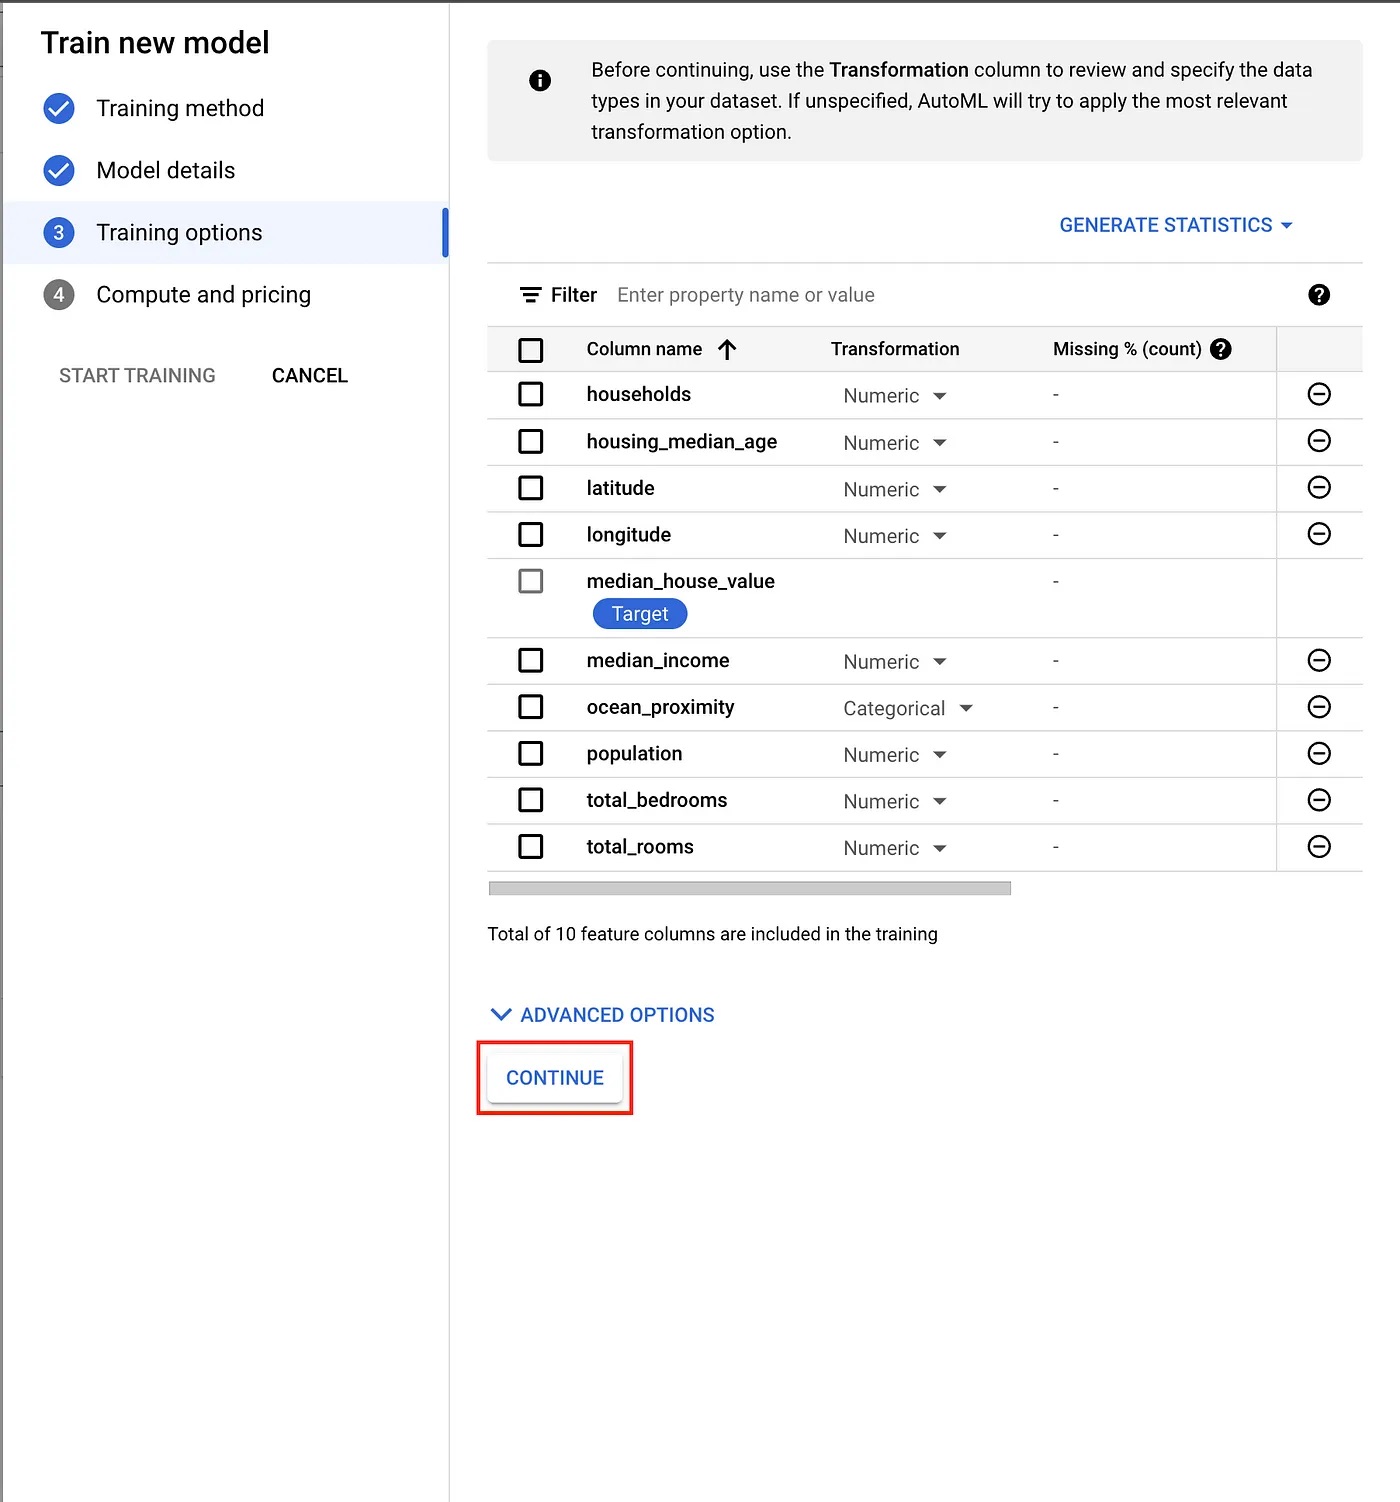
Training options dialogue.
Finally, we are asked to provide a training budget—i.e., a maximum number of node hours to be used for training. Here, we will select our training budget according to Google’s suggested training times. After the training budget has been set, the training process will start and can be monitored via the Training page in the Vertex AI section of GCP.
Training time may take longer than the training budget that was set, but you will only be billed for the actual node hours, which are limited by the budget you’ve set.
Now, click on “START TRAINING” to start training the ML model.
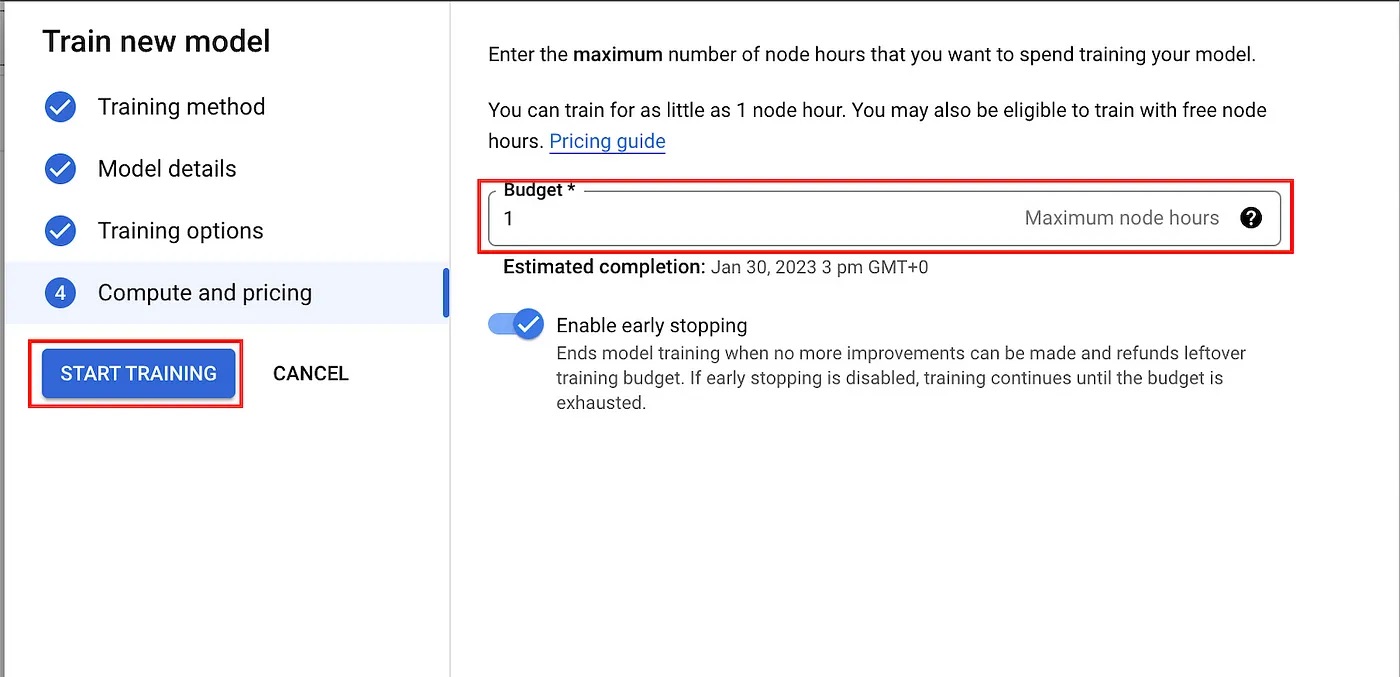
Pricing dialogue.
Once the training process has been completed, the final model will appear on the “Model registry” page in Vertex AI.
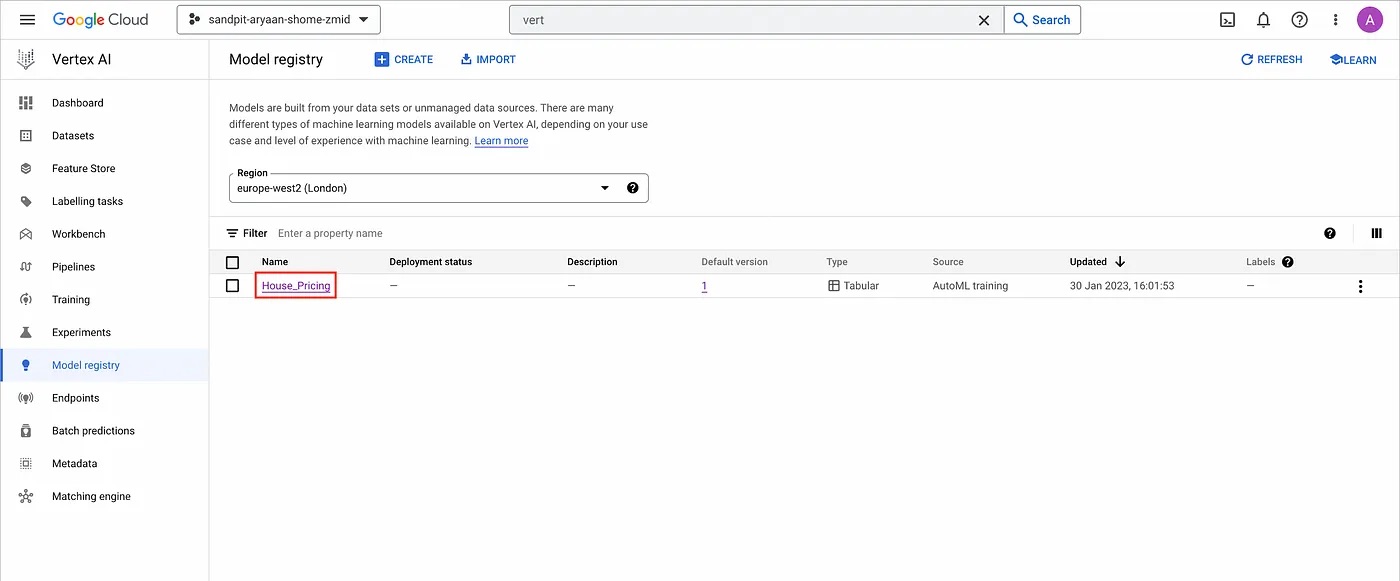
Model registry page.
You also have the option to re-train your ML model, which will create a new version of the model. You can find the list of all of the versions by clicking on the model name, which in our case is “House_Pricing”.

Model versions page.
In addition, if you click on a specific “Version ID” of the model, you will be able to observe, for that version, its feature importance graph and the performance metrics.
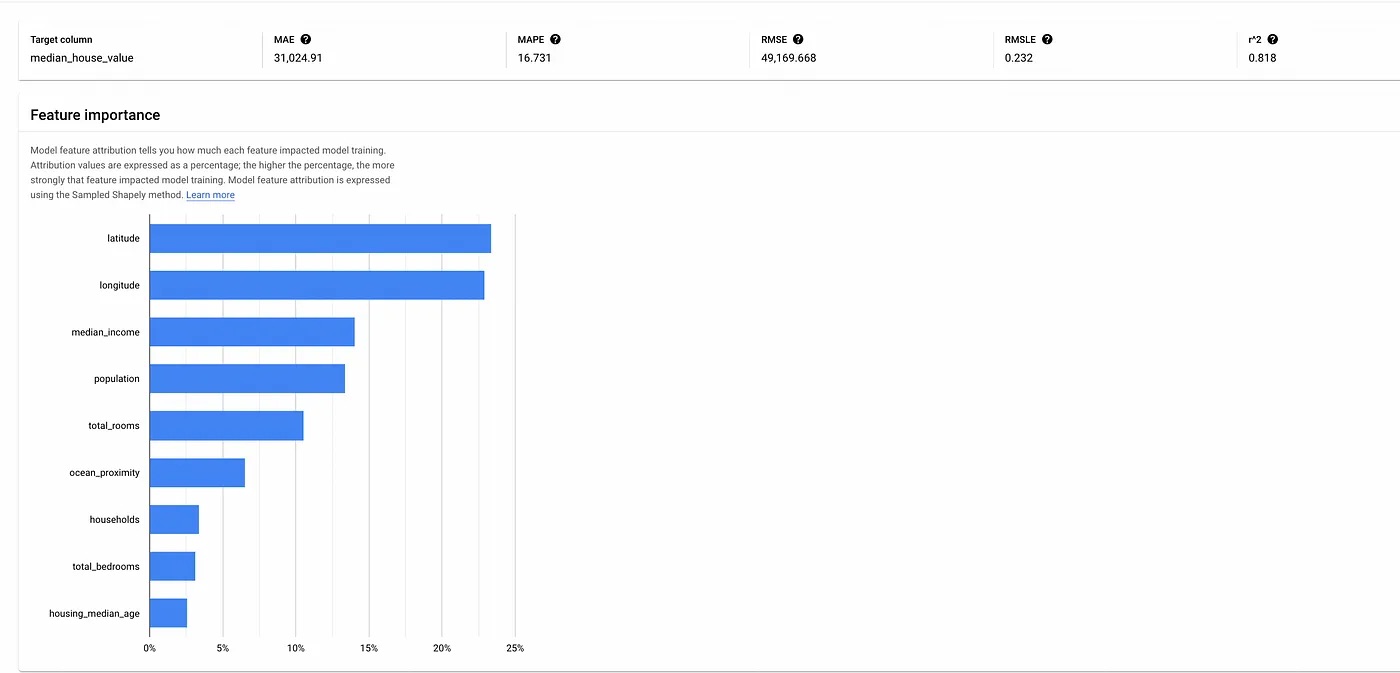
Feature importance graph.
For this model, we can see that “latitude” and “longitude” are the most important features for that version of the model. This is because the location of a house does have a significant effect on the house price.
DEPLOYMENT AND PREDICTIONS
Vertex AI offers two ways to deploy this trained model for prediction. This includes:
Exporting the model as a saved TensorFlow (TF) model, called an edge-optimized model, which we can then serve ourselves in a Docker container.
Deploying the model directly to a GCP endpoint.
For our example, we will choose the second option and do this directly via the GCP console.
To achieve this, simply navigate to the “DEPLOY AND TEST” page and click on “DEPLOY TO ENDPOINT”.
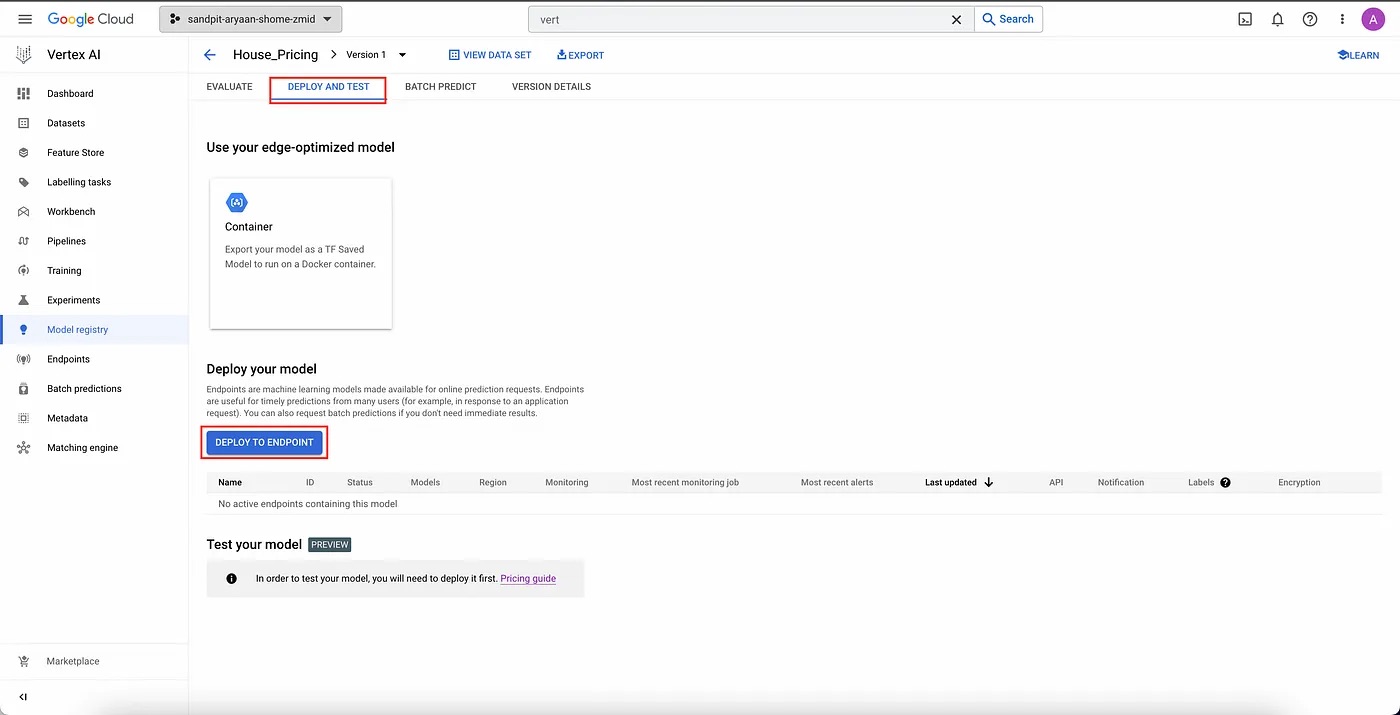
Deploy and test page.
We are then greeted with a dialogue that asks us the name and region of the endpoint, how to access the endpoint, and how to encrypt the endpoint.
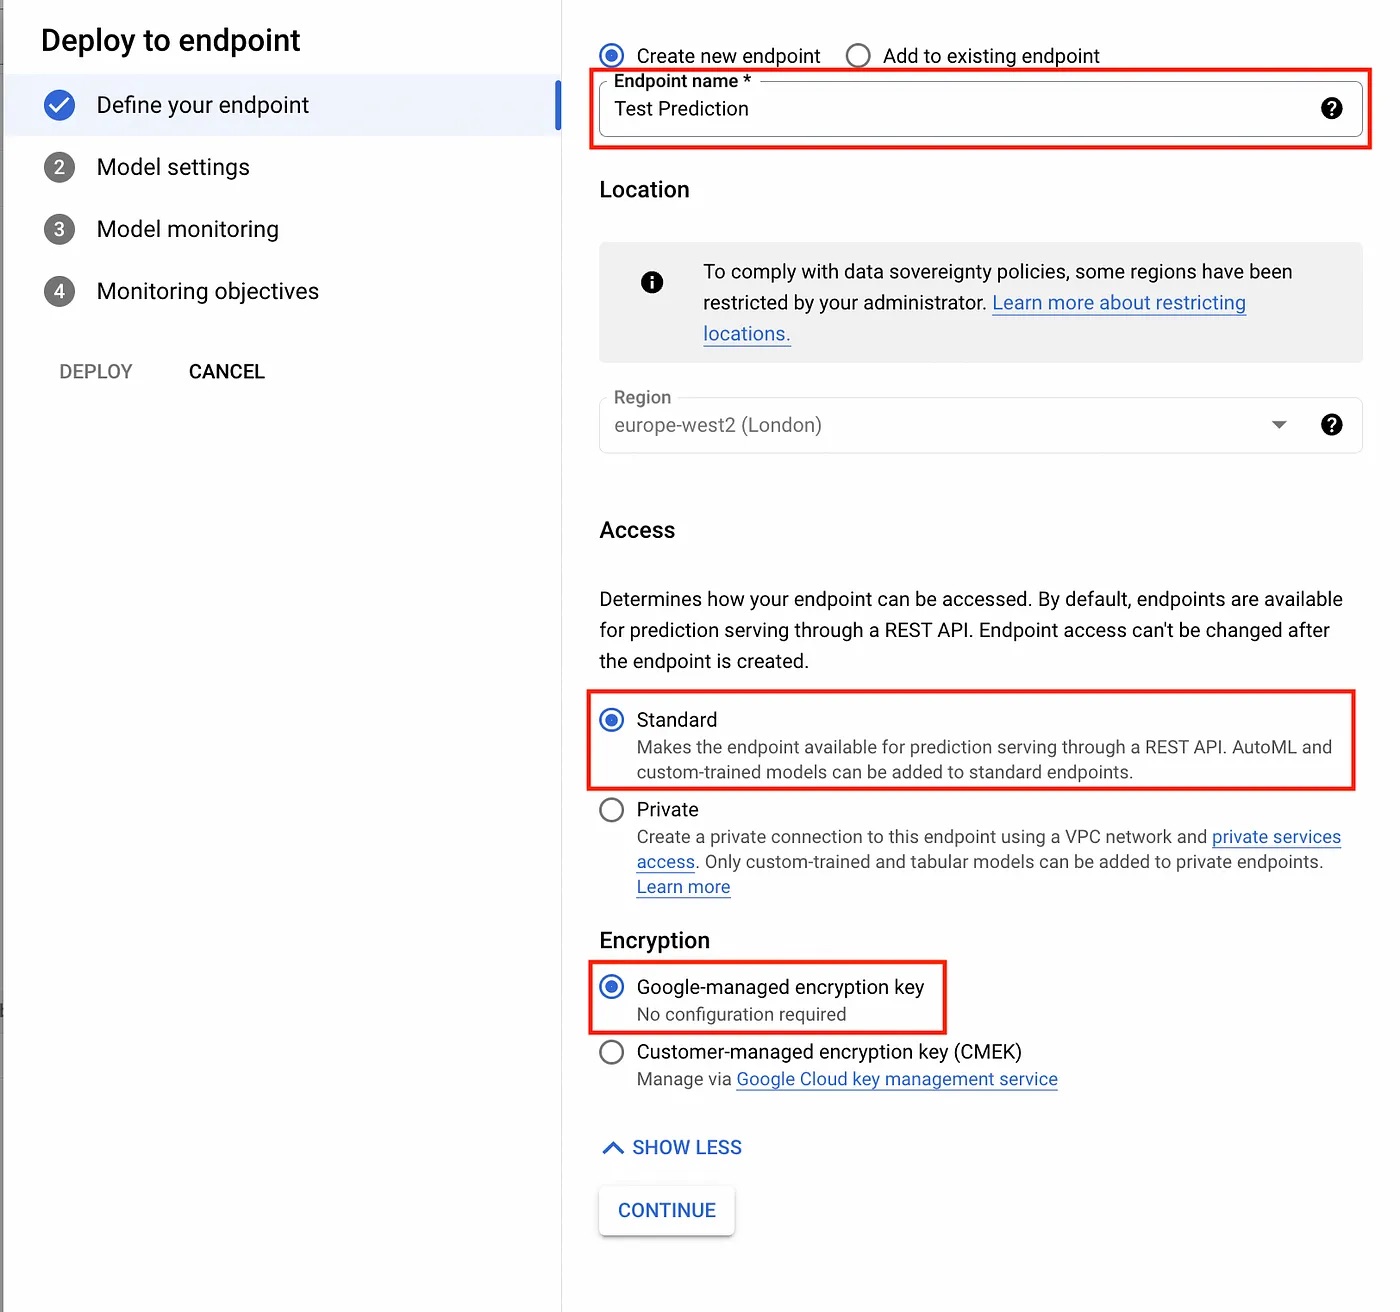
Endpoint details dialogue.
Then, we are asked to fill in the settings for our endpoint, which includes the minimum and maximum number of nodes, machine type (important from cost point-of-view), and whether we want to log or explain our model.
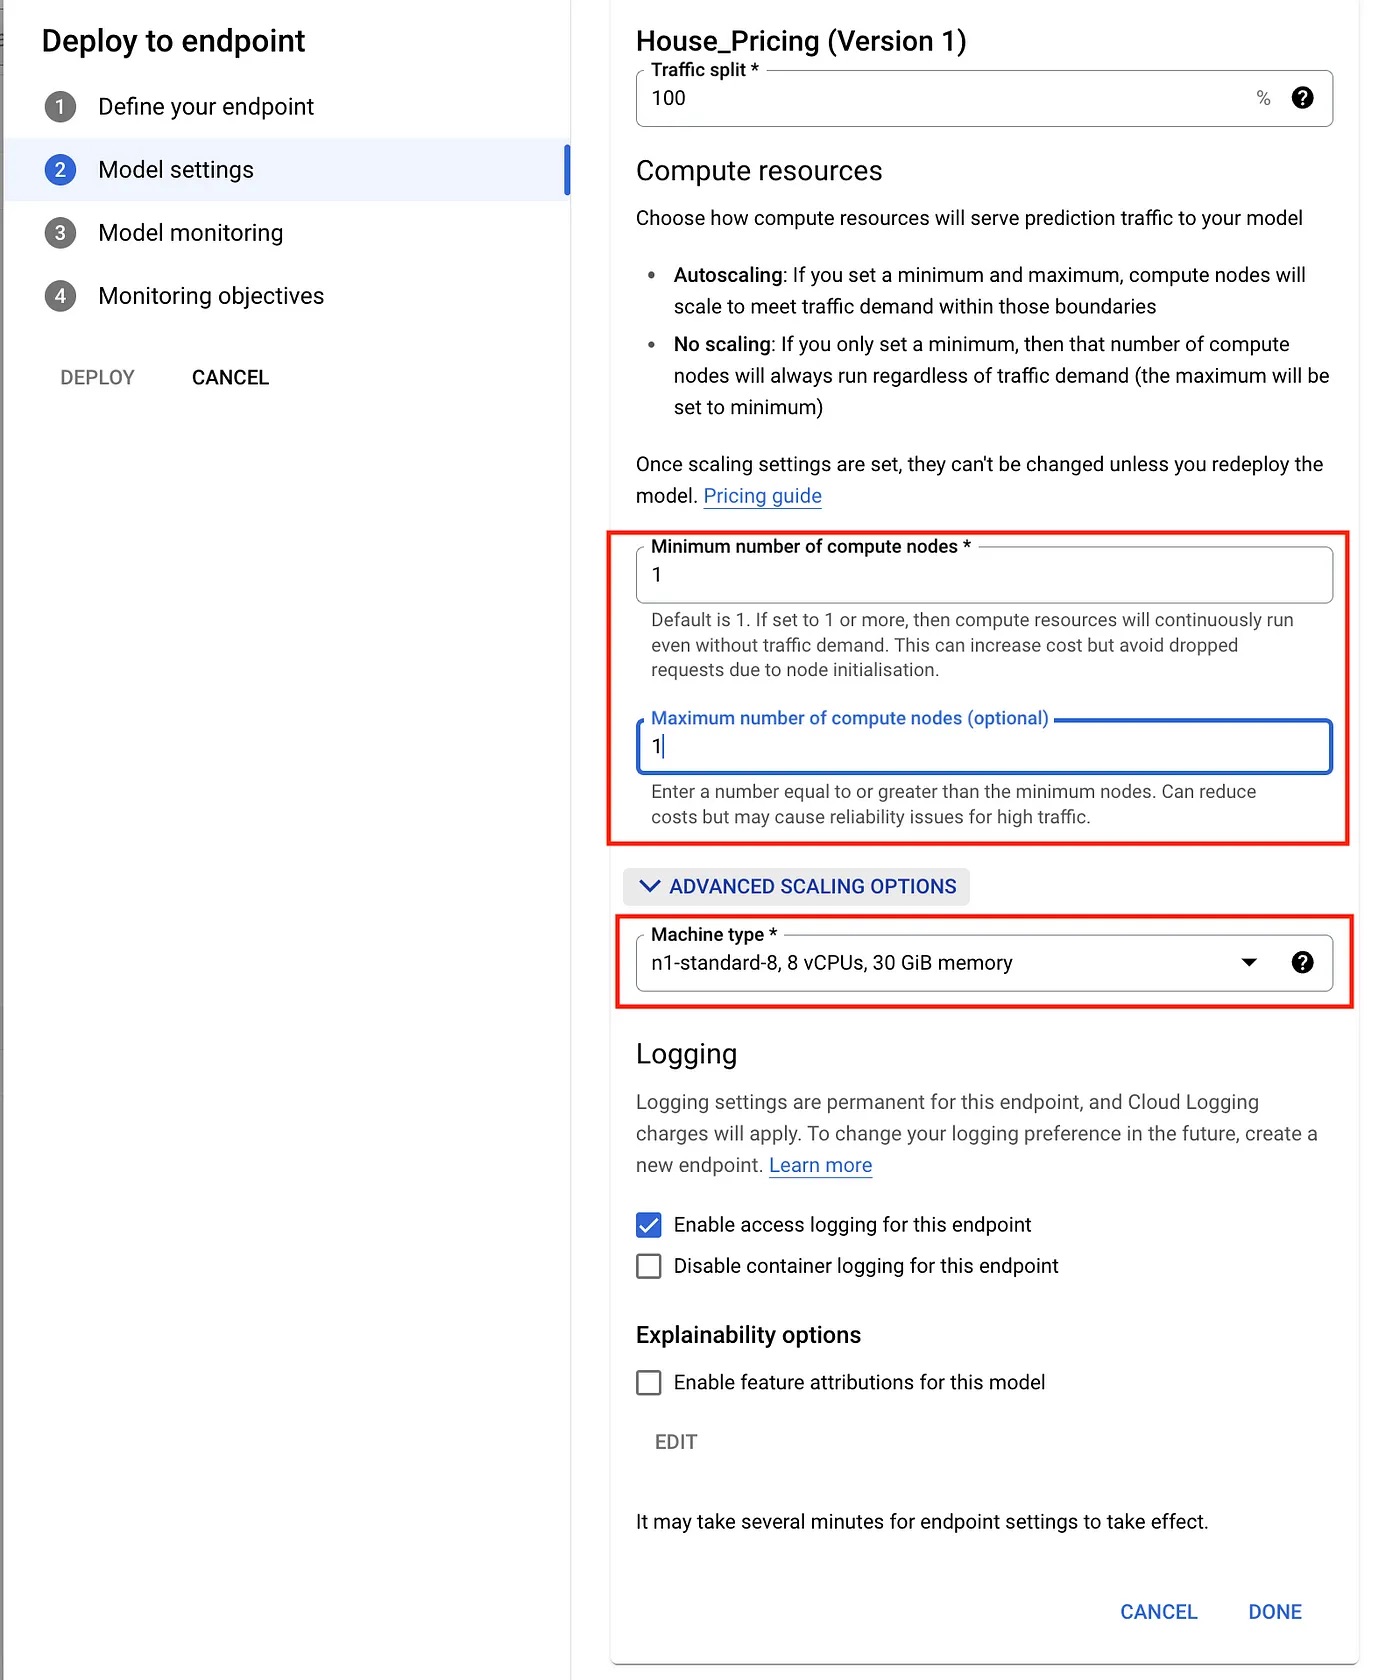
Model settings dialogue.
Next, we are asked whether we want to monitor our model or not. In this example, I have decided not to monitor my model as it will incur additional costs. It is entirely up to you if you want to enable monitoring or not.
Now your model is ready for deployment and making predictions.
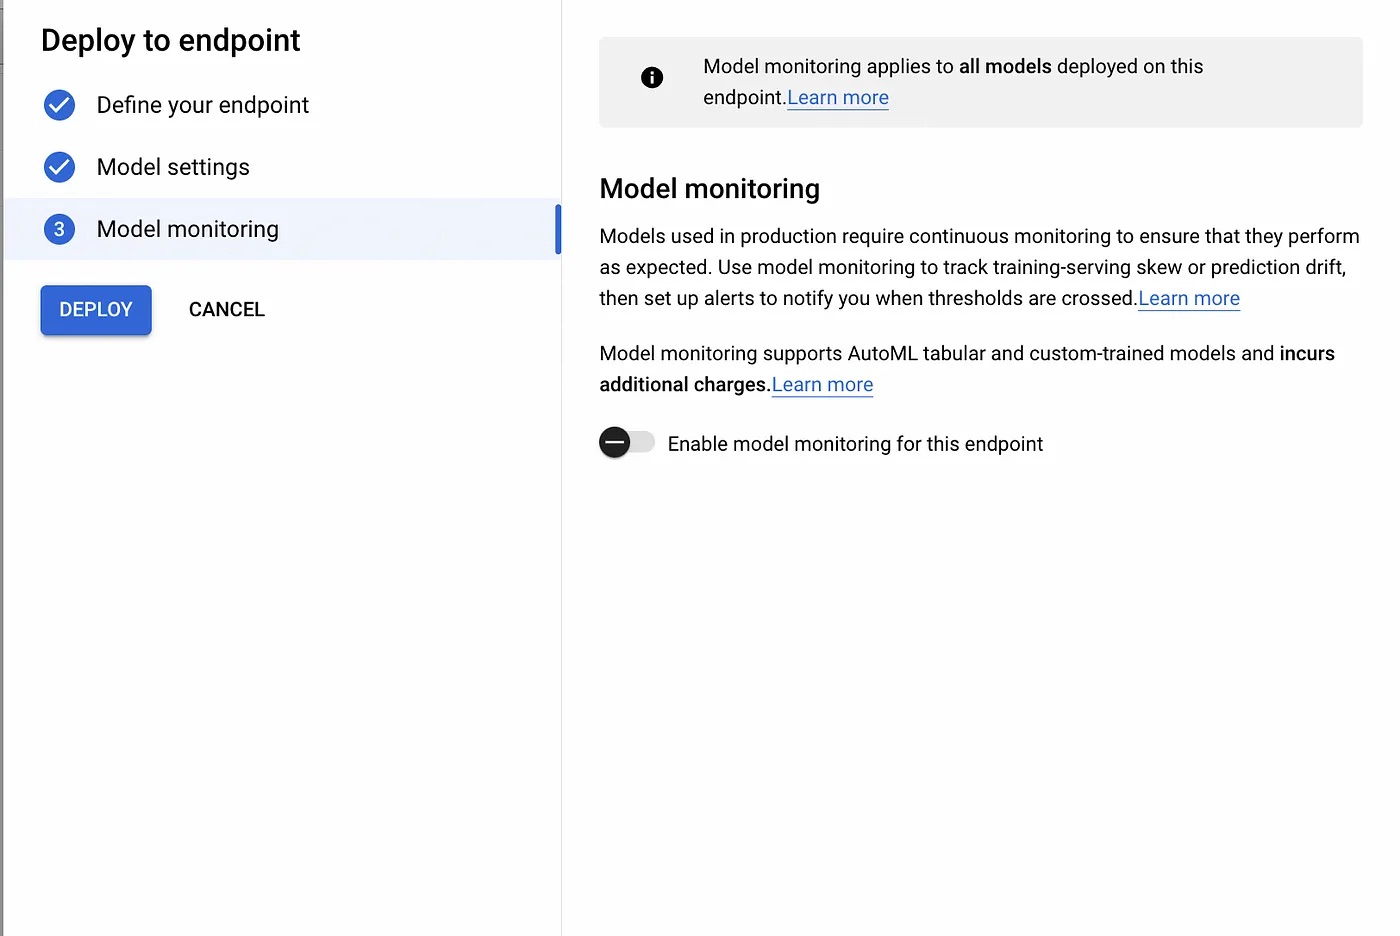
Model monitoring dialogue.
Once your model is deployed, it is ready to make predictions. We can use the web interface provided by the GCP Console, which can be found at the bottom of the “DEPLOY AND TEST” tab. There, we can play with the input values for the model and observe the predictions it makes.
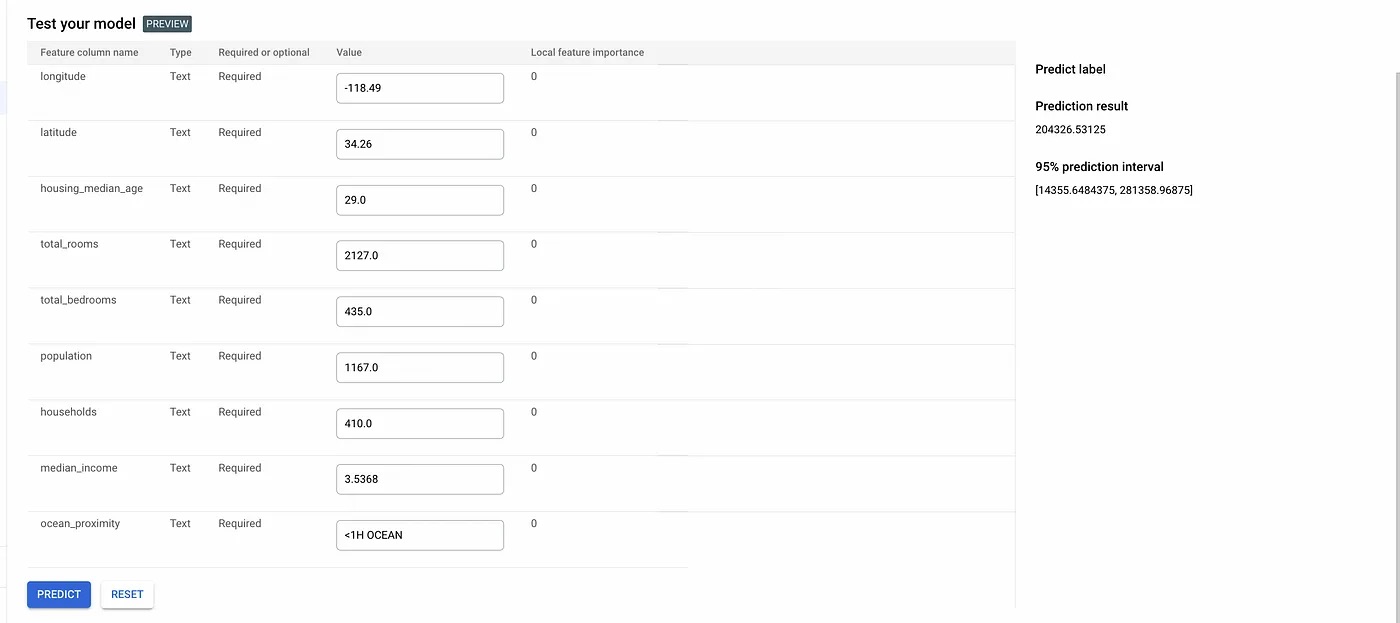
Model predictions.
If you enable the feature attributions for the model in the model setting page, it is also able to show the local feature importance for each of the feature columns. For AutoML tabular (classification and regression) models, these values are computed using the Sampled Shapley method.
Moving forward with GCP Vertex AI
In this article, we have shown how easy it is to train, deploy, and test an ML model via GCP Vertex AI. GCP Vertex AI democratizes ML by allowing individuals with limited ML knowledge to build and deploy ML models that are suited to their needs, while allowing seasoned ML practitioners to play with different configurations and simplify ML workflows.
Interested in learning more? Reach out to us at marketing@credera.com.


Podcast
Apr 19, 2023
Technology Tangents | ChatGPT may have ended the AI winter: What should companies do...
A discussion on recent AI Failures and how organizations can avoid similar mistakes.
Blog
May 5, 2023
Unleash the power of AI-driven document intelligence
We’re explaining the challenges of traditional document processing and how AI-driven document intelligence transforms...


Blog
Dec 14, 2022
How to Implement Marketing Automation: Five Tiers and Where You Fit
Marketing automation helps create seamless and highly personalized cross-channel experiences by delivering relevant and...


Contact Us
Let's talk!
We're ready to help turn your biggest challenges into your biggest advantages.
Searching for a new career?
View job openings