


Windows Azure General Availability
In June 2012, Microsoft introduced a preview of Windows Azure Infrastructure as a Service (IaaS). This was Microsoft’s entry into the Amazon-dominated commodity public Cloud market that allowed customers to host virtual machines in the Windows Azure Cloud. Since that time, customers have been kicking the tires on this new service in anticipation of its go-live.
The wait is finally over! On April 16, 2013, Microsoft announced the general availability of Windows Azure IaaS. This means it is in production, backed by 99.95% uptime SLA, supported by Microsoft Support, and ready for production applications. The platform offers production-ready virtual machines (VM) for Windows Server, SQL Server, SharePoint, and BizTalk, as well as, several Linux distributions. Creating and managing VMs is easily done via the Windows Azure management portal or the Windows Azure PowerShell module. The release also includes built-in load balancing and support for site-to-site VPNs through Virtual Networks.
Why Virtual Network Support Matters
Virtual Networks may seem like a small add-on feature, but the ability to extend your infrastructure into the Windows Azure Cloud through a site-to-site VPN actually opens up a wide-range of hybrid Cloud scenarios that could be invaluable to your organization.
Connecting Windows Azure to your corporate network enables you to leverage on-premise Active Directory in the Cloud, just like a branch office
Compute power on-demand facilitates spinning up application development and test environments quickly in Windows Azure
Web Services can be deployed in the Cloud, even when the SQL databases they query are hosted on-premise
SharePoint 2013 farms can be deployed in the Cloud without leveraging federation
Organizations can implement off-site disaster recovery systems without having to build a second data center or purchase space at a co-location facility
Office 365 customers have found that hosting Active Directory Federation Services (ADFS) and Dirsync on-premise can be the Achilles heel to an otherwise robust service. These organizations may decide that redeploying these federation resources to a Windows Azure VM, in addition to, an Active Directory domain controller from their corporate domain will maximize the availability of their Office 365 Services.
How to Create a Virtual Network
Leveraging Windows Azure Virtual Networks can open a lot of doors for an organization, but how much effort is involved? This blog post provides the steps necessary to get a Virtual Network up and running.
1. From the Windows Azure management console, click New > Networks > Virtual Network > Custom Create
2. Name your Virtual Network, select a region for hosting your Virtual Network, and select or create an associated Affinity Group, which is a designation that enables customers to optimize network performance by ensuring resources are hosted in the same data center
3. Specify on-premise DNS servers to be assigned to servers on this Virtual Network. This is a key setting because Windows Azure VMs will not be able to join a corporate domain without being configured with on-premise DNS servers. Also, check the Configure Site-To-Site VPN box.
4. Define the public IP address of the VPN device hosted on-premise and your on-premise network’s address space
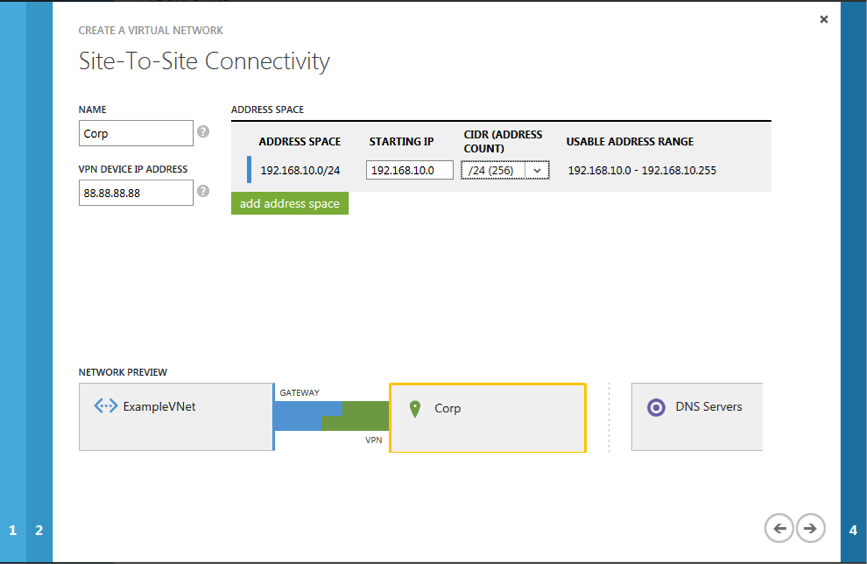

Figure 4: Define the On-premise Network
5. Select a private IP address space for the Virtual Network. Please note that 10.0.0.0 is the default, but you can choose any of the RFC 1918 address spaces from the drop down menu.
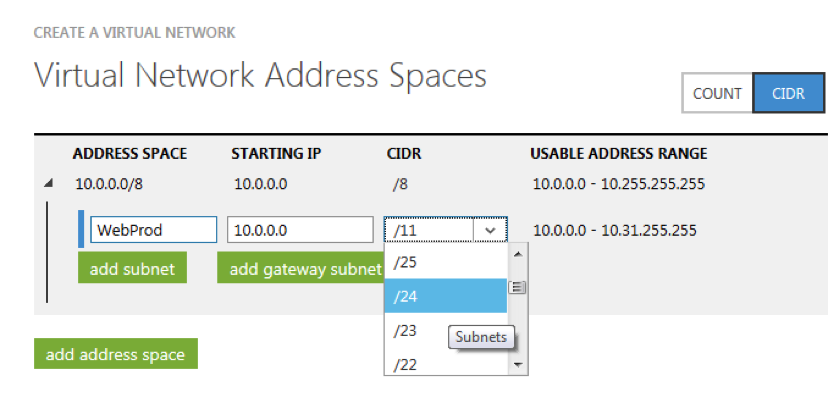
Figure 5: Select the Address Space
6. Once you have selected the overall address space for the Virtual Network, you must allocate one or more smaller subnets within this address space for your VM resources. Click the add gateway subnet button for the VPN Gateway. This button automatically chooses a subnet that falls within the overall address space defined for the Virtual Network, but outside the subnets defined in the previous step.
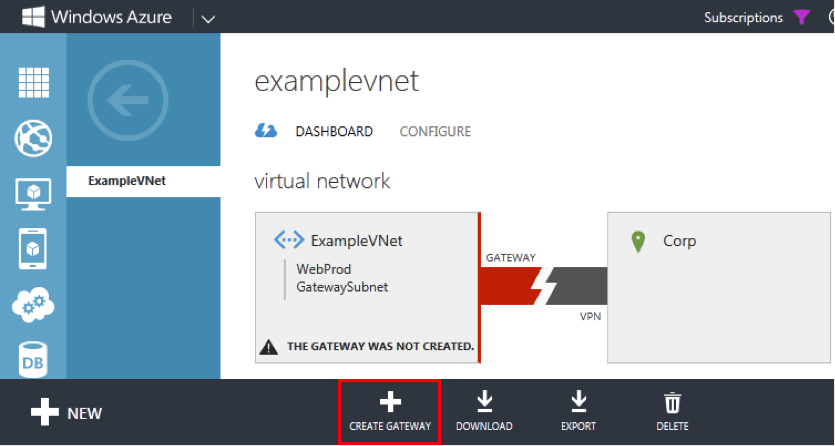
Figure 6: Configure Azure Subnets
After completing the wizard, you have a Virtual Network with a VPN gateway. Click on the “CREATE GATEWAY” button to create the end point to which your on-premise firewall will connect (see Figure 7).
Figure 7: Create the VPN Gateway Hand Off to the Firewall Administrator
At this point, configuration of the Windows Azure side of the Virtual Network is complete and on-premise work can begin. However, you must first gather the information required to configure your on-premise firewall for the IPsec VPN tunnel from the Virtual Network Dashboard screen.
The Gateway IP Address is prominently displayed on this screen
Click the MANAGE KEY button to view and copy the shared secret key
Click the DOWNLOAD button to find the IPsec security association information, which presents the option to download “configuration scripts” for three vendors: Cisco, Juniper, and Microsoft
As of the general availability announcement, Cisco and Juniper Firewalls are the only VPN devices officially supported by Microsoft. Their stance on firewalls from other vendors is that they may work with Windows Azure Virtual Networks, but will not be fully supported and no configuration scripts supplied. The third option introduced with the general availability release is Windows Server 2012 with Routing and Remote Access (RRAS).
In my opinion, a more accurate description for the “configuration scripts” supplied for these VPN devices is configuration templates. These downloaded files do not contain information pulled from your Virtual Network configuration. They are examples of command line interface commands a firewall administrator would use to configure the VPN device or in the case of Windows Server 2012, a PowerShell script. However, these templates leave some important blanks to fill in.
Credera’s experience in working with several of our medium-sized clients during the Windows Azure IaaS preview period has been that they didn’t have Cisco or Juniper Firewalls, but wanted a device supported by Microsoft. In these cases, the dilemma prompted clients to make a change and most went with Cisco since they are the market leader in this space. However, handing an infrastructure generalist a new Cisco ASA Firewall and a configuration template from Windows Azure is typically not a recipe for success.
I Have a New Cisco ASA Firewall, Now What?
My first piece of advice for a new Cisco ASA Firewall administrator is to not unpack the device and plug it into your network. The device’s default configuration from the factory includes a 192.168.1.1 IP address and DHCP service enabled. Connecting the device to your network in this state will cause it to act as a rogue DHCP server and create all sorts of headaches. The best way to interface with the device and complete the initial configuration is over a console connection. This typically requires the purchase of a USB-to-serial adapter (most modern computers don’t have serial interfaces) to use with the RJ45-to-DB9 console cable that comes with the device. Since Windows XP was the last version of Windows to include a HyperTerminal client, downloading a free client such as PuTTY is usually required.
The first task, before doing any Windows Azure related configuration, is to reconfigure the device to fit into your network from the command line interface. From a console cable/terminal connection, begin by going into configure mode and resetting the device back to factory defaults with an IP address from your on-premise network. Below is a list of verbatim commands used to configure a Cisco ASA Firewall for the 192.168.10.0/24 network referenced in the ExampleVNet steps outlined above.
enable
config t
configure factory-default 192.168.10.5 255.255.255.0
In the event DHCP already resides somewhere else on the network, the service needs to be disabled on the firewall.
no dhcpd address 192.168.10.100-192.168.10.150 inside
no dhcpd enable inside
It also makes sense to configure other means of remote device management at this point and set an enable secret password. Secure Shell (SSH) is the preferred method of remote management. Enabling this type of management requires the creation of at least one local user account (I named mine remoteadmin) specifying what IP addresses are permitted SSH access and generating a self-signed certificate to encrypt management traffic.
enable password *******
username remoteadmin password *****
aaa authentication ssh console LOCAL
ssh 192.168.10.0 255.255.255.0 inside
domain-name
domain.com
crypto key generate rsa modulus 1024
ssh timeout 30
You will also need to configure the outside (Internet-facing) port with a public IP address and default gateway given to you by your Internet Service Provider. In my example, I used 88.88.88.88.
interface Vlan2
ip address 88.88.88.88. 255.255.255.0
exit
route outside 0.0.0.0 0.0.0.0 88.88.88.1 1
The device is now ready to be configured for the IPsec VPN with Windows Azure. The remaining commands are derived from the Cisco configuration template downloaded from Microsoft. The first set of commands defines the on-premise network and the Windows Azure remote network.
object-group network OnPremiseNetwork
network-object 192.168.10.0 255.255.255.0
exit
object-group network AzureNetwork
network-object 172.16.0.0 255.255.0.0
exit
The next set of commands creates an access list and NAT statement that define what traffic can go over the tunnel. Please note that these commands only work on ASA version 8.3 and later.
access-list Azure_AccessList extended permit ip object-group OnPremiseNetwork object-group AzureNetwork
nat (inside,outside) source static OnPremiseNetwork OnPremiseNetwork destination static AzureNetwork AzureNetwork
Microsoft does not provide guidance on how to configure previous versions of the ASA because they did not test them. However, it is not always feasible to upgrade an existing firewall to version 8.3 or later. Below are the equivalent commands to be used on firewalls running earlier versions.
access-list Azure_AccessList extended permit ip object-group OnPremiseNetwork object-group
AzureNetwork
access-list NoNAT extended permit ip object-group OnPremiseNetwork object-group AzureNetwork
nat (inside) 0 access-list NoNAT
This set of commands creates an Internet Key Exchange policy. The policy number 10 was randomly chosen.
crypto isakmp enable outside
crypto isakmp policy 10
authentication pre-share
encryption aes
hash sha
group 2
lifetime 28800
exit
Next, these commands create IPsec policy and security association with the Azure Gateway. This is where the Azure Gateway IP address 77.77.77.77 and the shared secret key from the ExampleVNet come into play.
crypto ipsec transform-set ESP-AES-SHA esp-aes esp-sha-hmac
crypto ipsec security-association lifetime seconds 3600
crypto ipsec security-association lifetime kilobytes 102400000
crypto map IPSecCryptoMap 1 match address Azure_AccessList
crypto map IPSecCryptoMap 1 set peer 77.77.77.77
crypto map IPSecCryptoMap 1 set transform-set ESP-AES-SHA
crypto map IPSecCryptoMap interface outside
tunnel-group 77.77.77.77 type ipsec-l2l
tunnel-group 77.77.77.77 ipsec-attributes
pre-shared-key supercalifragilisticexpialidocious
exit
The final step is to set packet size to Microsoft’s specifications and write all of these changes to the devices memory. Failure to configure TCPMSS clamping will result in packet fragmentation and an unstable VPN tunnel that drops intermittently. Also, forgetting to commit running configuration changes to memory will result in all of the changes being lost the next time the device is restarted.
sysopt connection tcpmss 1350
exit
wr mem
Once all of these steps are complete, the Virtual Network in the Windows Azure management portal should look like Figure 9.
Figure 9: Azure VPN Gateway in the Connected State
Avoid the Pitfalls
At this point, any Cloud services or VMs created on the ExampleVNet virtual network will be able to connect to computers on the on-premise network. Please be aware of these common pitfalls when working with Virtual Networks:
Systems with IP addresses outside of those defined for the Virtual Network will be unable to communicate across the VPN tunnel
Previously created Cloud services or VMs cannot be moved onto a Virtual Network; they must be deleted and recreated
Virtual Network configurations cannot be changed after creation; they must be deleted and recreated in order to implement changes
Virtual Networks can only be connected to one remote network, so carefully consider which on-premise location to use as your VPN endpoint
The Windows Azure Virtual Network Dashboard displays counters for Data In and Data Out, but it is important to remember that Microsoft bills customers for the Data Out (egress) portion only
High-Availability Considerations
Cloud-based services offer greater resiliency, but there is still a large dependency on your on-premise Internet connection. One place you can add some High-Availability is at the firewall. Both Cisco and Juniper devices have options for failover pairing. In the event of a hardware failure, the second device can assume the firewall workload. What about the Windows Server 2012 RRAS option? High-Availability can be baked into that option by leveraging virtualization for hardware fault tolerance.
Need a Hand?
Are you considering leveraging Windows Azure and need additional information or real world expertise? Credera has extensive experience in designing, planning, and implementing Cloud solutions. If you have questions about this blog post or general IT infrastructure, please contact us or tweet @CrederaMSFT.
Contact Us
Let's talk!
We're ready to help turn your biggest challenges into your biggest advantages.
Searching for a new career?
View job openings