


The out-of-the-box Content Query Web Part in SharePoint 2013 provides several templates for displaying sourced content, up to a maximum of four fields (depending on the template):
Link
Image
Title
Description
While these fields are reasonably flexible, as they can be configured to pull from any property you want, sometimes they’re not enough. Recently on a SharePoint 2013 Online branding project, I had the requirement to set up a news carousel that displays the title, byline, rollup image, URL, and article date of every internal news article. While the first four of these were easily mapped to the aforementioned fields, there was no out-of-the-box way to retrieve the article date—or any other fields once four are already mapped.
Creating A New XSL Style Sheet
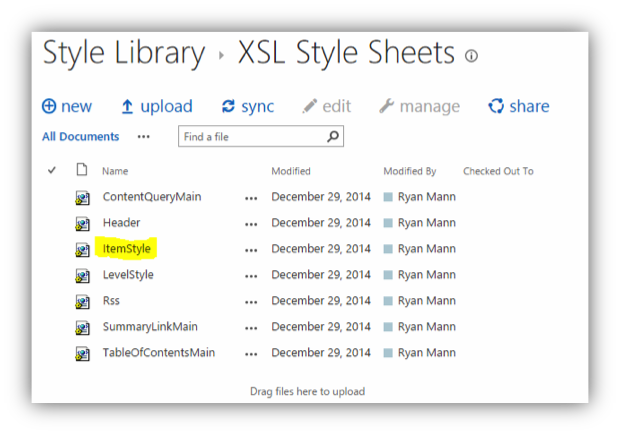
The first step in solving this problem is to understand that all of the templates available in the Content Query Web Part are defined in the ItemStyle XSL style sheet, which can be found by navigating to Site Contents, then Style Library, and finally XSL Style Sheets:

To add new fields to a template, you can either modify the existing ItemStyle.xsl (which will ghost the file) or create a new XSL style sheet, which will be the approach taken here. The following steps detail how to create a new XSL style sheet with a custom template:
1. Open ItemStyle.xsl and copy the contents into a text editor.
2. Copy the entire node beginning with <xsl:template name=”Default” match=”*” mode=”itemstyle”>, and paste immediately after the closing </xsl:template> for that node (alternatively, you can edit an existing node if you don’t need to create a new one).
3. Edit the starting tag of your new template to be:
<xsl:template name=”WithArticleDate” match=”Row[@Style=’WithArticleDate’]” mode=”itemstyle”>. Use whatever name you want, but it’s crucial that the specified names match exactly. A space or capitalization issue will cause the template not to work.
4. Go to the bottom of your new template node and above <div class=”description”>, insert:
<div class=”article-date”> <xsl:value-of select=”@ArticleStartDate” /> </div>
a. The div isn’t strictly necessary, but is provided in order to make to the element easier to select when we style it later.
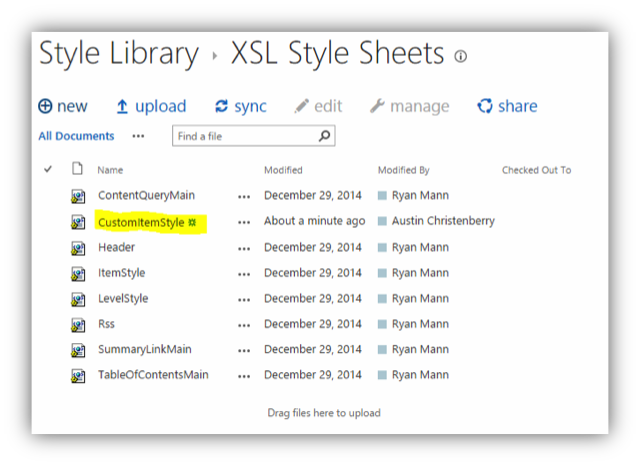
5. Save the file with a name like CustomItemStyle.xsl.
6. Navigate back to the XSL Style Sheets folder (under Site Contents > Style Library) and click “Upload”
7. Select your newly created file and press OK.
8. Check in and publish the new XSL style sheet
Creating A Custom Content Query Web Part
Your new, custom XSL style sheet is complete! In order to use it, you can either edit the markup of the existing Content Query Web Part, or create a custom Content Query Web Part that uses the new XSL style sheet. Like before, I’ll opt to create a custom Web Part.
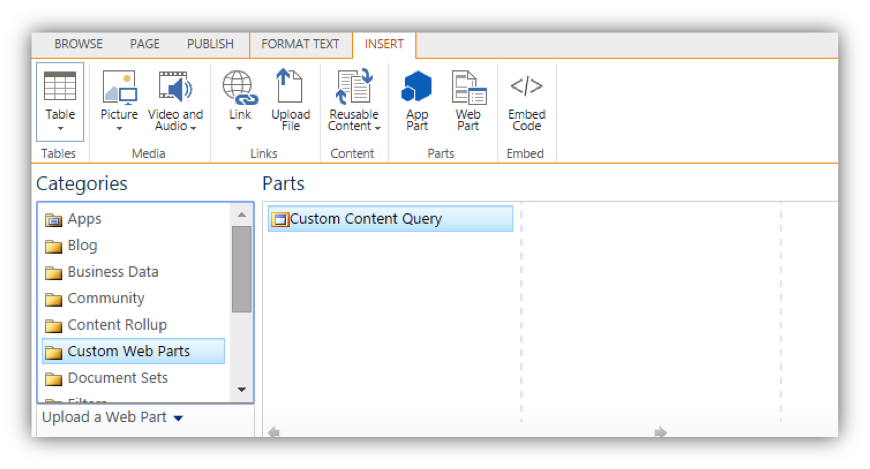
1. Add a Content Query Web Part to your page.
2. Open the toolbar and under Appearance, change the Title to something like Custom Content Query. Make any other changes to the properties that you want to be part of your default properties when creating a new Custom Content Query, and press OK.
3. Click on the arrow to open up the Web Part menu and select Export.
4. Open the downloaded file in a text editor.
5. Edit the <property> node with the name “ItemXslLink” to be <property name=”ItemXslLink” type=”string”>/Style Library/XSL Style Sheets/CustomItemStyle.xsl</property>
Note: this syntax worked correctly in one of my site collections, but in another one, I had to specify /sites/mySiteCollectionName/Style%20Library/XSL%20Style%20Sheets/CustomItemStyle.xsl for it to work properly.
Optional Steps:
If you’d like to have your new field default to a particular site column, then you’ll need to complete steps 6 and 7. If you’re planning on leaving the field empty by default and will manually specify the site column value in the Web Part properties menu, then move on to step 8.
6. Edit the <property> node with the name “CommonViewFields” to the following: <property name=”CommonViewFields” type=”string”>ArticleStartDate, DateTime</property>
a. Make sure you use the site column’s internal name, followed by its type.
i. To find the internal name of a site column, navigate to the properties page for the site column and look at the query string. The value of the field parameter is the internal name of the site column: _layouts/15/fldedit.aspx?field=ArticleStartDate
b. If you’re adding multiple site columns, use a semi-colon as the delimiter (ex: ArticleStartDate, DateTime; Custom_x0020_Field, Text).
7. Find the <property> node with the name “DataMappings” and immediately after the text FileRef,Lookup;| and just before the closing </property> tag, add ArticleDate:{71316cea-40a0-49f3-8659-f0cefdbdbd4f},ArticleStartDate,DateTime;|
a. This is in the format {FieldId},InternalName,Type
b. To find the FieldId, use either SharePoint Manager, or navigate to Site Settings > Site content types, select the content type that includes your site column (in this case, Article Page), and click on the site column. In the query string, look for Fid=, and copy that value. Strip out the preceding %7B and the ending %7D to get the FieldId.
That’s it for optional steps, back to work:
8. In your SharePoint site, go to Site Settings, and then under Web Designer Galleries, click on Web parts.
9. Select the Files tab and click on “Upload Document”.
10. Choose your new custom Web Part and click OK.
11. Specify the title, description, group, and any recommendation settings you want it to have, and then click Save.
12. If your Web Part is not published by default, ensure it is published.
13. Navigate back to the page where you added the original Content Query Web Part and delete it.
14. You should now see the custom Web Part in your Web Part options, under the group that you specified. Select it and press Add.
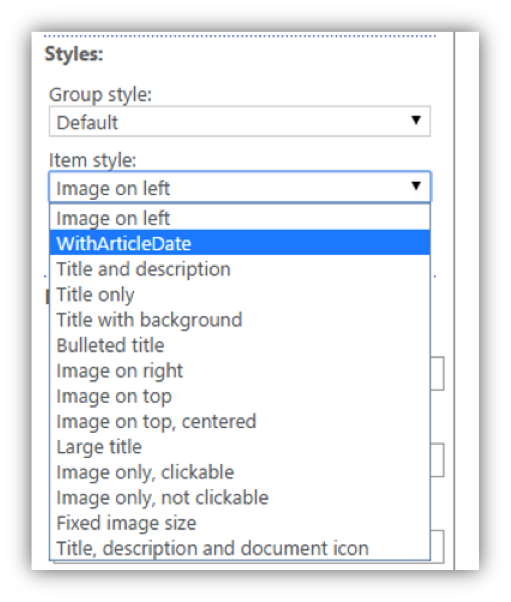
15. Edit the custom Web Part, and under Presentation > Styles, select the new template you created in the custom XSL style sheet.
16. Under “Fields to display”, a new field should now be available for the Article Date.
Specify the appropriate values for each field and click OK.
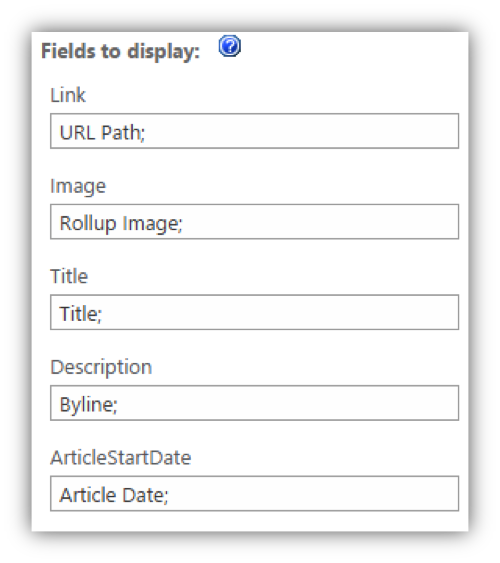
If everything worked correctly, you should now see the fields displayed in the template you created in the XSL
Conclusion
The template shown above is obviously very simple and un-styled (we probably don’t want our dates ISO-formatted, for example), but we now have the tools at our disposal to create all kinds of custom templates—without being limited by the built-in field restrictions of the SharePoint Content Query Web Part.
If you have questions or comments about this blog post, or other aspects of SharePoint development/branding, please leave a comment below, tweet us at @CrederaMSFT, or contact us online.
Contact Us
Let's talk!
We're ready to help turn your biggest challenges into your biggest advantages.
Searching for a new career?
View job openings