Technology
Dec 16, 2011
CRM Mapping – Part 1: Hosting a Silverlight Application in CRM 2011

Overview
A few weeks ago, Credera’s Silverlight guru Kevin King posted a blog detailing the process of creating a Silverlight application using Bing Maps. It was the first in a series of technical blogs that will leverage Microsoft technologies including SharePoint, Dynamics CRM and ASP.NET to demonstrate how your business could benefit from mapping.
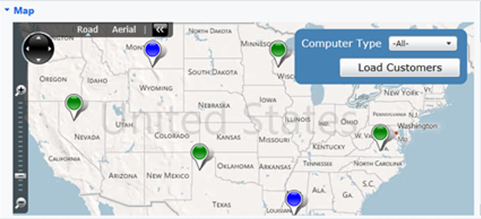
This blog will detail the steps necessary to host that Silverlight application in Microsoft Dynamics CRM 2011 and display it on the Account entity’s form.
Overview of steps:
Create a new Solution in the CRM website
Add the Silverlight application as a Web Resource
Add the Web Resource to Account form
View Account with Silverlight Map
Step 1: Create a new Solution in the CRM website
Using Internet Explorer log into your CRM website and use the navigation on the left to go to the Settings | Solutions screen. You could make the below changes to the default system solution by navigating to Settings | Customization | Customize the System; however we will create a new solution to contain our changes as we will use this solution in future blogs.
On the Solutions screen, click the New button to launch the form. Enter in the information illustrated below and click the Save and Close button.
Step 2: Add the Silverlight application as a Web Resource
Open the Mapping solution we just created and click on Web Resources. Click the New button to launch the form. Enter the information illustrated below and click the Save button then the Publish button.
Step 3: Add the Web Resource to the Account Form
In the Mapping solution, click on Entities in the left navigation then click the Add Existing button. Select the Account entity and click the OK button. When prompted, include required components and click the OK button. Expand Entities in the left navigation and expand Account. Click on Forms and in the list double click on the Main form.
In the Account form, click the Insert tab and click on One Column tab. Move the new tab to the top of the form and name it Map. Double click on the section within Map tab then click on the Formatting tab and set the columns to one. On the Insert tab, click Web Resource to launch the form. Enter the information illustrated below and then move to the Formatting tab. Set the Number of Rows to 15 and click the OK button.
On the Account form, click the Home tab and click the Save button. Then click the Publish button and the Save and Close button.
Step 4: View Account with Silverlight Map
In the main CRM window, click on Sales | Accounts in the left navigation then double click on any Account to view the Silverlight Map.
As I mentioned earlier, this blog is part of a series with the purpose of explaining how to create a Silverlight map application and host it within a variety of systems. For further reading, check out this blog How Virtually Any Business Can Improve through Utilizing Web Mapping Technology.
Over the next few months, we will look at these CRM topics:
CRM Mapping – Part 2: Using jQuery and Bing Services to Geocode CRM Data
CRM Mapping – Part 3: Using a CRM Plugin and Bing Services to Geocode CRM Data
CRM Mapping – Part 4: Using the CRM SDK to Bulk Geocode Existing Location Data
CRM Mapping – Part 5: Using Microsoft Dynamics Xrm Page Context to Extend the Mapping Application
CRM Mapping – Part 6: Using the CRM SDK to Integrate CRM Data into the Mapping Application
Credera has extensive experience in Dynamics CRM 2011 deployments and customizing it as an application framework to meet non-CRM needs. If you have questions about this post, upcoming posts or CRM in general, please contact us.
–
Personalize marketing campaigns and increase revenue with Microsoft Dynamics
Explore Our Microsoft Consulting Services →
–
Contact Us
Ready to achieve your vision? We're here to help.
We'd love to start a conversation. Fill out the form and we'll connect you with the right person.
Searching for a new career?
View job openings