Apr 10, 2019
Best Practices for Workplace Modernization with Microsoft Deployment Toolkit


If you are trying to increase efficiency and reduce costs by automating your Windows 10 imaging process, the Microsoft Deployment Toolkit (MDT) is a great alternative to more heavy-duty solutions like the Systems Center Configuration Manager (SCCM.) MDT is comparatively easy to set up and, more importantly, free. However, there is still a good deal of effort required to tailor your MDT setup to meet the needs of your organization. For maximum automation and minimum stress when it’s finally time to start imaging, you will have to make changes to the customsettings.ini and bootstrap.ini files in MDT, as well as the pre-boot execution environment (PXE) settings on your Windows Deployment Services (WDS) server. Microsoft provides an extensive guide to all of the customization options available, but this guide will take you through the basics and show you a few tricks.
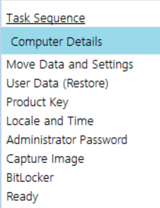

The figure above shows all the wizard pages that will appear in a task sequence for a standard desktop OS installation, not including the steps required to connect to MDT. With the proper custom settings, you can pre-populate these fields or even skip the pages entirely. We’ll talk about each page that appears if you choose to include all of them, and why they should or shouldn’t be skipped. We will note when a change should be made to customsettings.ini versus bootstrap.ini.
‘Welcome’ Page
Since we are targeting employee workstations, there’s no reason you should need to configure a static IP address, which is the only other thing you can do on this page aside from setting a keyboard layout. If standard U.S. QWERTY works for you, then you can skip the welcome page by adding the line below to your bootstrap.ini file.
SkipBDDWelcome=YES
‘Credentials’ Page

Here you will be asked to input credentials for connecting to a deployment share. You won’t actually need to give the name of the deployment share, as that is included by default, but you will need to input the username, password, and domain of an account that has privileges to connect to it. You’ll want to make sure this account also has rights to join the computer to the domain later on in the task sequence. It’s worth noting that this account’s password will be stored in the clear on your MDT server, so please give the account minimal privileges and be cautious about who can log on to your MDT server. To skip this page, add the lines below to your bootstrap.ini file.
UserDomain=YOURDOMAIN UserID= UserPassword=
‘Select a Task Sequence’ Page
We recommend not skipping this page, as you will have multiple task sequences for different deployment scenarios. They might have different applications or even operating system versions. Unless you will always use the same task sequence, let the administrator decide which sequence to use at runtime.
‘Computer Details’ Page
Here, you can really save yourself from a headache down the road. You can domain join the machine and add it to a specific organizational unit, as well as give it a name. To be specific, you can automatically name the computer according to your organization’s machine naming conventions.
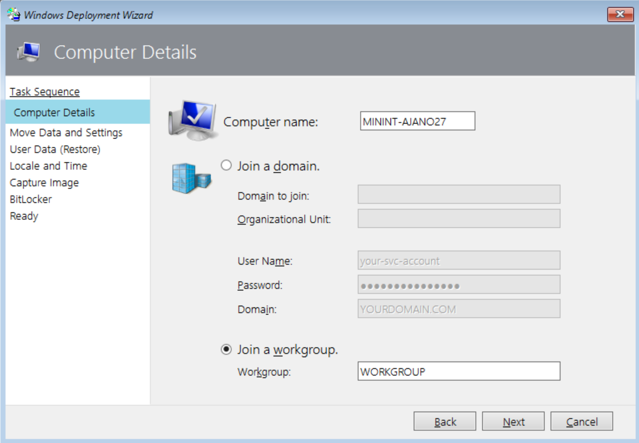
To domain join the machine, add the following lines to customsettings.ini:
JoinDomain=YOURDOMAIN.TLD MachineObjectOU=OU=Parent OU, OU=Child OU, DC=YOURDOMAIN, DC=TLD
Automatic naming is a bit more involved. You may need to set additional properties and subsections. For example, if you want the name to distinguish between laptops and desktops, you would need to add “ByDesktop” and “ByLaptop” to the Priority list at the top of the file. You would also need to add TypeOfMachine to the Properties list. You can then use the format below to automatically give the computer a descriptive name:
[IsALaptop] Subsection=LT-%IsLaptop%
[IsADesktop] Subsection=DT-%IsDesktop%
[LT-True] ComputerTypeName=LT
[DT-True] TypeOfMachine=DT
;Add this line to the [Default] section ;Replace ‘username’ with the actual name at deployment time OSDComputerName=%TypeOfMachine%-username
‘Move Data and Settings,’ ‘Capture Image,’ and ‘Restore User Data’ Pages
Since we are worried about bare metal imaging only, you shouldn’t need to worry about moving or recovering user data, and you definitely won’t be capturing an image from a blank machine. Go ahead and add the settings below to customsettings.ini:
SkipUserData=YES SkipComputerBackup=YES SkipCapture=YES
Skip Product Key Page
If you did not specify a product key or MAK activation key when you created your task sequence in the first place, you can do so in customsettings.ini with the entries below.
SkipProductKey=YES OverrideProductKey=XXX-XXX-XXX-XXX-XXX
Locale and Time
This is another case where it might be helpful not to skip the page. You can add the settings below to customsettings.ini to set a default time zone but give technicians the option to change it for different offices. You can also change the keyboard layout and langauge settings here as well. If you will only ever use one time zone in one country, change the setting below from ‘no’ to ‘yes’.
TimeZoneName=Central Standard Time SkipLocaleSelection=NO
Skip the Local Admin Password Page
This is another setting that should be handled with care. It can save a lot of time and headache if there is a default local administrator password that your organization uses on all machines. However, it will be stored in cleartext on the MDT server, so it’s important to control who can log on. Add it to customsettings.ini.
SkipAdminPassword=YES AdminPassword=
Specify BitLocker Configuration
MDT allows you to configure BitLocker as part of the task sequence, but the mechanism for doing so, at least by default, is geared toward key storage in Active Directory on-prem. We recommend skipping this step entirely and configuring BitLocker through other means, such as Microsoft Intune. Add this to customsettings.ini
SkipBitlocker=YES
Logging & Monitoring
The settings below do not skip any pages in a wizard but can be far more valuable. You can set up a public shared folder and create a file for storing logs. Simply point the SLShare variable to that directory, then point the SLShareDynamicLogging variable to \\path-to-log-file\%Computername%. This will create a separate folder for every computer that MDT upgrades or deploys. This form of centralized logging will be extremely valuable, as you will inevitably run into issues in your deployment that will need troubleshooting. It also gives you more detail than MDT’s built-in monitoring feature.
SLShare=\\vprod-mdt\pubshare\Logs SLShareDynamicLogging =\\vprod-mdt\pubshare\Logs\%ComputerName%
More Automation and Custom Settings
That’s it! If your deployment process is uniform, you can go for extra automation brownie points by skipping all the pages mentioned above and configuring WDS to automatically select a boot image. In a later post, we will talk about how to leverage your custom settings with DFS for a distributed deployment powered by MDT. If you’re interested in more advanced configurations or you want to start a workplace modernization project of your own, don’t hesitate to reach out to marketing@credera.com.
Contact Us
Let's talk!
We're ready to help turn your biggest challenges into your biggest advantages.
Searching for a new career?
View job openings