
Blog
May 17, 2016
Aspect-Oriented Programming in Spring Boot Part 3: Setting up AspectJ Load-Time Weaving


This is the final part in a three-part series on aspect-oriented programming (AOP) with Spring Boot, which covers how to set up AspectJ load-time weaving (LTW). Part one covers how to make your own aspect, and part two details the differences between using Spring for AOP and using AspectJ.
Getting AspectJ load-time weaving working in Spring Boot can be a tricky proposition. Unlike Spring proxies, which Spring Boot uses to support AOP out of the box using the spring-boot-starter-aop dependency (mvnrepository link), AspectJ requires additional configuration across several areas. There are four main components: adding AspectJ-specific configuration, configuring Spring Boot to recognize AspectJ, setting up dependencies, and passing the correct JVM arguments whenever the code executes.
Note that while the spring-aop-aspectj-ltw sample project sets the Java property “spring.aop.proxy-target-class” to true to force Spring proxies to use CGLIB, CGLIB isn’t actually required for Spring to use AspectJ. This was only done so concrete classes that have interfaces can be directly injected with @Autowired for testing purposes to demonstrate how AspectJ behaves under different scenarios (which are covered in part two).
AspectJ Configuration Via aop.xml
The @Aspect, @Around, and other AOP annotations are actually all members of the org.aspectj package. They’re official AspectJ annotations designed to be easily discoverable by the AspectJ compiler extension. Spring proxy-based AOP just happens to hijack the same annotations instead of making their own versions to make it easy to switch between or combine the two AOP approaches (and because there’s no reason to reinvent the wheel).
However, unlike Spring proxy-based AOP (which uses automatic component scanning enabled by Spring Boot), AspectJ can’t automatically find all the @Aspect annotated classes without a little extra help. A file named aop.xml points out which aspects AspectJ should use and which packages it should weave them into. The aop.xml file is required for AspectJ to run, and it must be present inside the META-INF folder in your project’s classpath. This can easily be accomplished using your project’s resources directory. If more than one META-INF/aop.xml file is found (due to being included from multiple dependencies), they will all be used. The sample project’s META-INF/aop.xml file can be found on GitHub and below:
<!DOCTYPE aspectj PUBLIC "-//AspectJ//DTD//EN" "http://www.eclipse.org/aspectj/dtd/aspectj.dtd"><aspectj>
    <weaver options="-verbose -showWeaveInfo">
        <!--            Only weave classes in our application-specific packages.            This should encompass any class that wants to utilize the aspects,            and does not need to encompass the aspects themselves.        -->
        <include within="org.jdw.blog..*" />
    </weaver>
    <aspects>
        <aspect name="org.jdw.blog.common.aspect.HystrixAspect" />
    </aspects>
</aspectj>
aop.xml Options
The <weaver> element’s “options” attribute passes arguments to AspectJ’s compiler extension. This extension, which will be triggered via JDK properties later, is responsible for weaving aspect code directly around the join points it targets as they’re loaded into the classloader (hence the term “load-time weaving”). These options can be used to specify what the extension will log to the console, which can be useful for debugging purposes. There are four arguments that are especially notable:
-verbose
Displays which aspects AspectJ has found (as specified in the <aspects> element).
For example:
[AppClassLoader@14dad5dc] info register aspect
jdw.blog.common.aspect.HystrixAspect
-showWeaveInfo
Outputs messages when an aspect is actually woven into a class’s join point.
For example:
[AppClassLoader@14dad5dc] weaveinfo Join point ‘method-execution(long org.jdw.blog.common.executable.
hystrixWrappedGetCurrentThreadId()
)’ in Type ‘org.jdw.blog.common.executable.ImplForInterfaceWithAnnotation’ (ImplForInterfaceWithAnnotation.java:26)advised by around advice from
‘org.jdw.blog.common.aspect.HystrixAspect’(HystrixAspect.java)
-debug
Displays which classes are eligible for receiving woven code (as specified in the <weaver> element).
For example:
[AppClassLoader@14dad5dc] debug
not weaving
‘org.junit.runner.notification.RunListener’
[AppClassLoader@14dad5dc] debug
weaving
‘org.jdw.blog.common.executable.ImplForInterfaceWithAnnotation‘
Because this argument prints a statement every time the classloader loads a class, it produces a lot of log spam. The debug option should be left off outside of debugging circumstances. The -showWeaveInfo argument should provide enough information to determine if aspects are being woven.
-XmessageHandlerClass:org.springframework.aop.aspectj.AspectJWeaverMessageHandler
Makes AspectJ logs use the Spring logging framework instead of going directly to standard error. This was not enabled in the sample project to make it easier to find the AspectJ log entries.
Additional arguments can be found in the official documentation.
aop.xml Weaver
The <include> element inside the <weaver> element details which packages should be scanned to find join points that match the aspects’ targets (aka pointcuts). The aspect classes themselves don’t need to be part of this scan, but it doesn’t hurt anything if they are.
Restricting which packages are scanned can improve performance. Since the @HystrixWrapper join point annotation is specific to the sample projects, there’s no chance it will occur in a third-party library. As such, it’s safe to restrict the scan to the org.jdw.blog package used by the sample project and its subpackages.
Note that using “..*” indicates that all subpackages should be searched; only using “.*” would act as a wildcard for one package level down. Additional search patterns can be found in the official documentation.
It’s also possible to explicitly exclude packages and classes using the <exclude> element, which uses the same syntax as the <include>. This can be useful if you want to force Spring proxies to be used for AOP instead of AspectJ for certain classes. If you’re adding AspectJ to an existing Spring application, it would be a good idea to exclude any classes that use @Transactional annotations on methods that are called from within the same class to avoid accidentally creating new database transactions where none existed before. This scenario is outlined in part two.
One of the disadvantages of using AspectJ can be duplicating the package filtering already found on the pointcut declarations in your annotations (such as the “org.jdw.blog..*” filter found on the @Around annotation in the HystrixAspect class). However, this redundant configuration is the only way to make it possible to use Spring proxy-based AOP alongside AspectJ AOP, so the extra boilerplate can be worth it in the long run.
aop.xml Aspects
The <aspects> element is used to explicitly declare which @Aspect annotated classes AspectJ should use.
If an @Aspect annotated class is found during Spring Boot’s automatic component scanning, Spring will still pick it up and make it eligible for Spring proxy-based AOP even if it’s also declared in the <aspects> element. However, if AspectJ is both aware of that same aspect via the <aspects> element and actively weaving that aspect in a class covered by the <weaver> element, AspectJ’s weaving will take priority over Spring’s proxy-based weaving (preventing the weaving from happening twice). This is an important fact to remember if you ever encounter a situation where weaving is occurring despite missing the appropriate aop.xml configuration—Spring proxy-based AOP could still be performing the weaving if it was able to component scan the @Aspect classes.
Spring Boot Configuration: @Bean Annotations for @Component Aspects
Remember how part one showed how Spring proxy-based AOP could register @Aspect annotated classes, which also used the @Component annotation as managed beans, making them eligible for receiving injections of other managed beans via the @Autowire annotation? AspectJ can do the exact same thing with a little extra configuration. If an aspect class isn’t also annotated with @Component and using @Autowired (or equivalent) annotations, this next step is not required.
Simply declare the aspect class as a Spring @Bean in a @Configuration file using AspectJ’s “Aspects.aspectOf” method. See this excerpt from the sample project file AspectJConfig.java for an example:
@Configuration
public class AspectJConfig {
  @Bean
  public HystrixAspect hystrixAspect() {
    HystrixAspect aspect = Aspects.aspectOf(HystrixAspect.class);
    return aspect;
  }}
The static “Aspects.aspectOf” method will grab the instance of the aspect that AspectJ made when it found the aspect’s class via the <aspects> element in aop.xml. Returning that instance in a method annotated with @Bean in a component scanned class annotated with @Configuration will pass that aspect instance to Spring to become a managed bean, making it eligible for @Autowired dependency injection. That way you get the best of both worlds! You don’t even need to remove the @Aspect annotated class from Spring’s component scanning—this @Bean declaration will override the component scanned version. The @Component annotation itself isn’t even necessary on the aspect any longer once a @Bean method provides an instance of the aspect directly to Spring, but it doesn’t hurt anything to leave @Component on the aspect for clarity.
Spring Boot Configuration: @EnableLoadTimeWeaving
There’s only one other piece of Spring configuration that’s always required—the @EnableLoadTimeWeaving annotation must be present on at least one component-scanned @Configuration file. The sample program places it on the same AspectJConfig.java file that was partially shown above. As its name implies, this annotation enables AspectJ load-time weaving within the Spring framework. Without this annotation (or the XML equivalent found on its JavaDocs), AspectJ will not run (unless it’s set up for compile-time weaving, which is outside the scope of this series).
By default, the @EnableLoadTimeWeaving annotation will only enable AspectJ if a META-INF/aop.xml file is found on the classpath. To ensure that an error is thrown if an aop.xml file is not found, use:
@EnableLoadTimeWeaving(aspectjWeaving = AspectJWeaving.ENABLED)
There’s very little reason not to use the “AspectJWeaving.ENABLED” argument. If you’re using the @EnableLoadTimeWeaving annotation to enable AspectJ in the first place, you might as well force it to validate that your aop.xml file can be found. If you intended to use AspectJ and made a mistake placing your aop.xml file, it would be better to get an error when booting your application than silently defaulting to Spring proxy-based AOP, which would ignore all the aop.xml settings you spent time creating.
Dependencies
The spring-boot-starter-aop dependency (mvnrepository link) required for Spring Boot to use AOP actually contains all the necessary compile-time dependencies for using AspectJ. As such, if you’re already using Spring proxy-based AOP via that Spring Boot starter, you don’t need to change your dependencies.
However, AspectJ does require two additional JARs to be passed as -javaagent JVM arguments to act as compiler extensions: aspectjweaver-1.8.8.jar (mvnrepository link) and spring-instrument-4.2.5.RELEASE.jar (mvnrepository link).
The aspectjweaver JAR is actually already included as part of the spring-boot-starter-aop dependency since it’s where the “org.aspectj” package comes from (which contains the @Aspect and @Around annotations we’ve been using). That starter dependency only adds it to the classpath for compilation though, so it will still need to be passed separately as a JVM argument. The spring-instrument JAR isn’t necessary for compilation, but it won’t hurt anything to pull it down with Gradle or Maven as a compile-time dependency just to download it.
For convenience, these JARs have been directly uploaded to the sample project’s spring-aop-blog/spring-aop-aspectj-ltw folder. This will make it easier to find them for JVM argument paths without having to dig around in dependency manager caches.
As with any dependency, newer versions of these JARs should also work fine, with a small chance that another dependency’s version might need to be upgraded for compatibility. You can include the spring-instrument JAR in a build.gradle or pom.xml file for transitive dependency resolution if version compatibility becomes an issue. Because the aspectjweaver JAR is already used by the spring-boot-starter-aop dependency, you should ensure the version passed as a JVM argument is the same version that dependency pulls down for compilation. It would be a good thing to double check the aspectjweaver version each time you upgrade your version of Spring Boot.
AspectJ LTW JVM Arguments
The JVM arguments are the trickiest part of using AspectJ. I wasn’t able to find the exact combination needed to make them work in the spring-aop-aspectj-ltw sample project in other tutorials online, making this section arguably the most valuable part of this blog series.
Every time you run the application, you will need to provide these two JVM arguments (customized to the paths and versions of the JARs you’re using) to enhance the Java compiler for AspectJ compatibility using the -javaagent command:
-javaagent:path/to/spring-aop-aspectj-ltw/spring-instrument-4.2.5.RELEASE.jar -javaagent:path/to/spring-aop-aspectj-ltw/aspectjweaver-1.8.8.jar
Most tutorials only mention using either the spring-instrument argument or the aspectjweaver argument, not both. However, if you’re missing the spring-instrument argument, you’ll see errors like this:
java.lang.IllegalStateException: ClassLoader [sun.misc.Launcher$AppClassLoader] does NOT provide an 'addTransformer(ClassFileTransformer)' method. Specify a custom LoadTimeWeaver or start your Java virtual machine with Spring's agent: -javaagent:org.springframework.instrument.jar
And if you’re missing the aspectjweaver argument, you’ll see errors like this:
org.aspectj.lang.NoAspectBoundException: Exception while initializing
org.jdw.blog.common.aspect.HystrixAspect: java.lang.NoSuchMethodException:
org.jdw.blog.common.aspect.HystrixAspect.aspectOf()
  at org.aspectj.lang.Aspects.aspectOf(Aspects.java:52) ~[aspectjweaver-1.8.8.jar:1.8.8]
When AspectJ LTW is working correctly, it will dynamically add the “aspectOf” method to all aspects it finds in the <aspects> element of in aop.xml. However, without the aspectjweaver argument that step never happens, causing the NoSuchMethodError to occur when that method can’t be found.
This error was especially confusing to debug for two reasons. For one, most Spring AspectJ tutorials, including Spring’s own documentation, stated that the Spring Instrument JAR should be sufficient as the only -javaagent argument. Generally, tutorials only recommended using the aspectjweaver argument if the application wasn’t using Spring because the spring-instruments argument was supposed to be sufficient. This clearly isn’t the case, as you can see for yourself by running the spring-aop-aspectj-ltw sample project’s unit tests without the aspectjweaver argument.
Secondly, when the spring-instrument argument was used by itself, AspectJ’s debug messages (using “-verbose -debug -showWeaveInfo” as the options on my aop.xml <weaver> element) indicated that the weaving was occurring before the NoSuchMethod aspectOf() error was thrown:
[AppClassLoader@eed1f14] info register aspect org.jdw.blog.common.aspect.HystrixAspect
[AppClassLoader@eed1f14] debug weaving 'org.jdw.blog.common.aspect.HystrixAspect$1'
[AppClassLoader@eed1f14] weaveinfo Join point 'method-call(long
org.jdw.blog.common.ExecutableMethodsInterfaceWithAnnotations.hystrixWrappedGetCurrentThreadId())'
in Type 'org.jdw.blog.common.CommonTest' (CommonTest.java:12) advised by around advice from 'org.jdw.blog.common.aspect.HystrixAspect' (HystrixAspect.java)
You would think the presence of these logs would indicate that HystrixAspect had been fully woven, but that was clearly not the case, as evidenced by the aspect’s lack of the “aspectOf” method.
If you remember anything from this blog series, remember this—try using aspectjweaver in addition to spring-instrument as your JVM -javaagent arguments if you keep getting NoSuchMethodError aspectOf() exceptions while trying to enable AspectJ LTW in Spring.
Using javaagent in Gradle
Gradle makes it easy to pass the -javaagent JVM arguments to its test task. If you commit the JARs directly to your project like the spring-aop-aspectj-ltw sample project does, you can point to them relative to your build.gradle file:
test.doFirst { jvmArgs = [ '-javaagent:' + projectDir + '/aspectjweaver-1.8.8.jar', '-javaagent:' + projectDir + '/spring-instrument-4.2.5.RELEASE.jar' ] }
If you don’t enhance Gradle’s test task, your “gradle build” and “gradle test” commands will most likely fail with one of the previously discussed exceptions if your unit tests rely on any AspectJ AOP functionality.
Using javaagent in Maven
To add the -javaagent JVM arguments to Maven’s test task, modify your maven-surefire-plugin’s declaration as follows (modifying the path to your JARs if required):
<plugin>
	<groupId>org.apache.maven.plugins</groupId>
	<artifactId>maven-surefire-plugin</artifactId>
	<version>2.19.1</version>
	<configuration>
		<argLine>
			-javaagent:${project.basedir}/aspectjweaver-1.8.8.jar
			-javaagent:${project.basedir}/ spring-instrument-4.2.5.RELEASE.jar
		</argLine>
	</configuration></plugin>
Using javaagent in Eclipse
Follow these steps to make AspectJ work with JUnit tests in Eclipse:
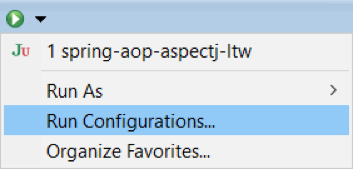
1. Go to the “Run Configurations” or “Debug Configurations” menu.

2. Create a new JUnit configuration, give it a name, and select the spring-aop-aspectj-ltw project (or pick an existing JUnit configuration if you’ve already tried to run spring-aop-aspectj-ltw unit tests).
3. Go to the “Arguments” tab and enter the following VM arguments (modified for your local path) into the “VM arguments” section. Note that they will not work in the “Program arguments” section.
-javaagent:path/to/spring-aop-aspectj-ltw/spring-instrument-4.2.5.RELEASE.jar -javaagent:path/to/spring-aop-aspectj-ltw/aspectjweaver-1.8.8.jar
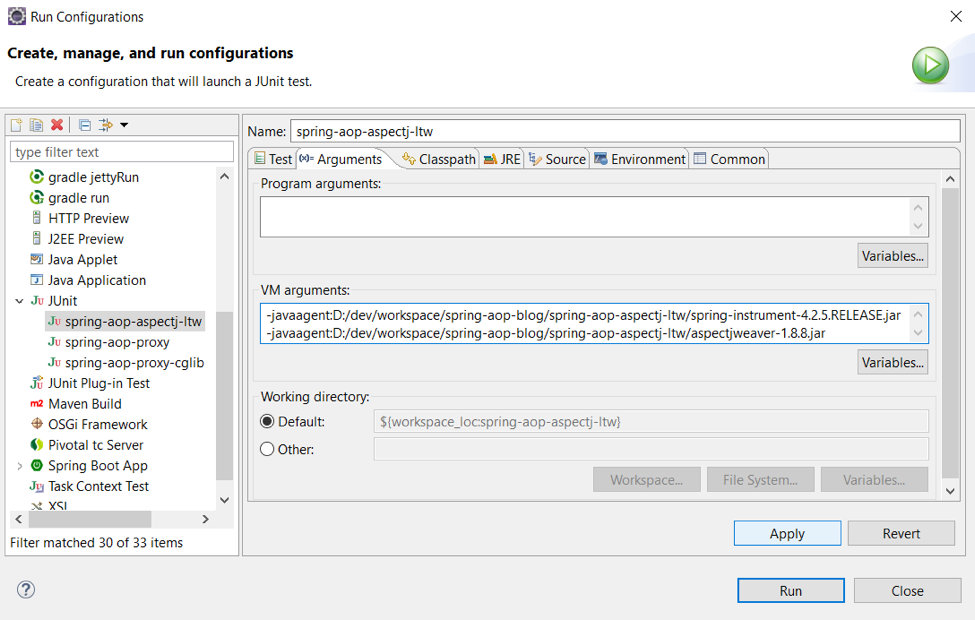
4. Click apply to save the changes, and click run to execute the unit tests.
If you right-click a package, class, or unit test method and select “Run as JUnit test,” Eclipse will look for an existing JUnit configuration for your target. If one isn’t found, Eclipse will automatically make a new configuration that lacks the required JVM arguments. You’ll have to manually go to either the Run or Debug Configurations, find the new entry, and add the JVM arguments as shown above. This can get tedious when trying to run several different unit tests for the first time, which is a small disadvantage of using AspectJ in Eclipse.
Using javaagent in IntelliJ
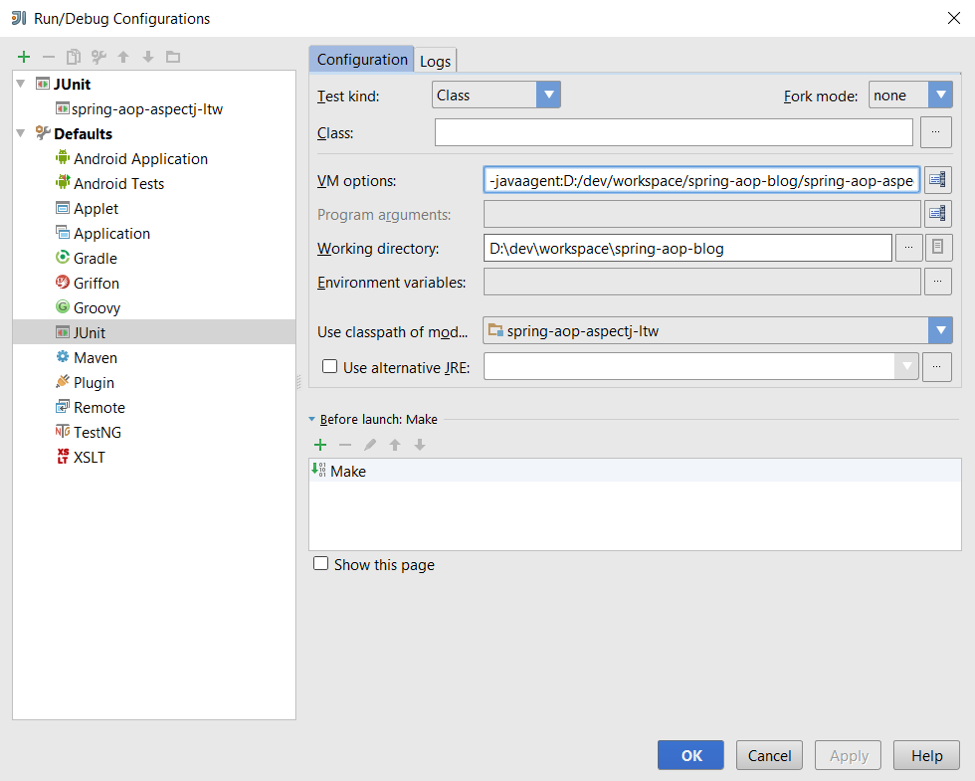
Follow these steps to make AspectJ work with JUnit tests in IntelliJ:
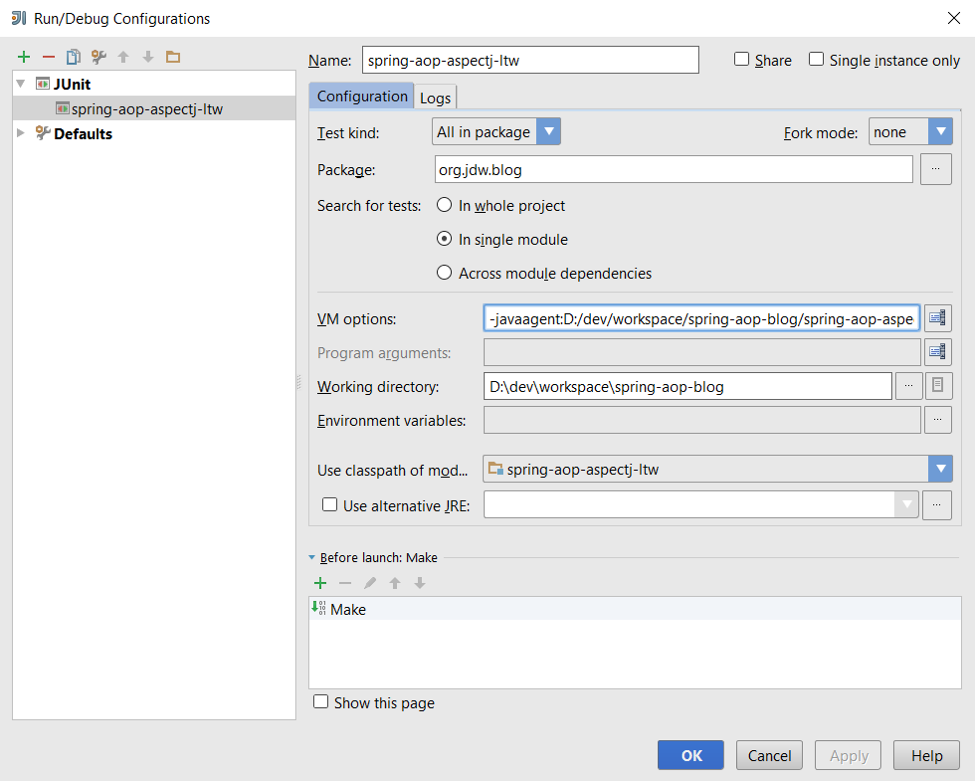
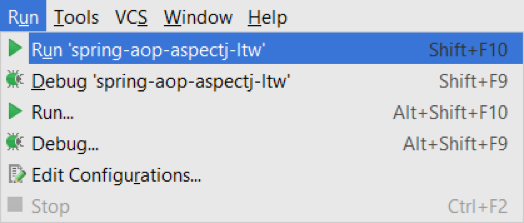
1. Select “Edit Configurations” under the Run menu at the top bar.

2. Create a new JUnit configuration. Give it a name, pick the spring-aop-aspectj-ltw module, set the JVM arguments in the “VM options” section, and click apply.
As a reminder, the JVM arguments are as follows (with modified paths for your local filesystem):
-javaagent:path/to/spring-aop-aspectj-ltw/spring-instrument-4.2.5.RELEASE.jar -javaagent:path/to/spring-aop-aspectj-ltw/aspectjweaver-1.8.8.jar
3. The new configuration will now show up under the Run menu at the top bar and can be clicked to execute the unit tests using those JVM arguments
Unlike Eclipse, you can also set these JVM arguments as defaults for new unit tests by selecting JUnit within the “Defaults” section on the left of step two and adding them to the “VM options” section. This will make new JUnit tests automatically inherit the arguments so you don’t have to manually enter them for each new test configuration, making AspectJ unit testing in IntelliJ much less tedious than in Eclipse
Summary
This concludes the three-part series on using AOP with Spring Boot. As a recap, part one covers how to write your own aspect and inject it around methods using a custom annotation. Part two goes over three different ways to turn the aspect on in Spring Boot: using Spring’s default JDK proxies (which can require duplicate annotation configuration on interfaces), using Spring’s CGLIB proxies (set the “spring.aop.proxy-target-class” property to true for more consistent Spring proxy behavior), and using AspectJ (which can weave code outside of Spring bean boundaries). If you’re going to enable CGLIB on an existing project, ensure your codebase doesn’t place AOP annotations (such as @Transactional) on interfaces without also placing them on concrete classes or they will get ignored.
While AspectJ is the most powerful way of performing AOP, it requires a lot of additional configuration, as evidenced by the entire third part of this series being dedicated to that very task. AspectJ is probably overkill for everyday AOP requirements. It is required for some of the fancier AOP features, such as triggering aspects when a class calls its own methods, and automatically injecting dependencies on objects constructed with the “new” operator using Spring’s @Configurable annotation (which requires the @EnableSpringConfigured annotation from the spring-aspects dependency (mvnrepository link) on a @Configuration bean; see the official Spring documentation for more details). However, most applications won’t need that extra functionality. In fact, if an existing application uses @Transactional, adding AspectJ to it can be dangerous since those aspects might trigger more often than before depending on the aop.xml configuration.
Just remember that if you do want to use AspectJ for its stronger AOP functionality, it can still exist alongside Spring proxy-based AOP—just explicitly tell AspectJ which aspects you want it to manage and which packages you want to include and exclude from its weaving in aop.xml. Every aspect and weaving location pair that the aop.xml file doesn’t explicitly cover will still use Spring proxies for AOP, which can make it safe to add AspectJ to an existing project.
If you have any questions about this blog series, feel free to respond in the comments sections on any of these entries. For additional open technologies insights, be sure to follow @CrederaOpen on Twitter or connect with us on LinkedIn.
Contact Us
Let's talk!
We're ready to help turn your biggest challenges into your biggest advantages.
Searching for a new career?
View job openings