Technology
Sep 17, 2014
Modern Web Development Best Practices Powered by Grunt.js Part 10: Image Sprites


Let’s move on to another performance technique aimed at reducing the amount of HTTP requests, specifically for images and icons used in layouts. The technique of image spriting (or CSS sprites) has been around for a while. The basic concept of a CSS sprite is to take a series of images and instead of referencing them one by one in the CSS (which means multiple HTTP calls), a single image is created that contains all of them. Then we simply reference that one image in the CSS and plot the “coordinates” to the individual images so we can use them in our CSS rules. Implementing CSS sprites has always been tricky in the past, especially when you have to create the sprites manually. Thankfully, the tools have evolved to make the process a lot simpler. To accomplish easy image spriting in our sample project, we will use a handy feature provided by Compass.
TUTORIAL:
“git checkout sprites”
The first step is to add a few images (provided by Flat-UI kit) to the “images/icon/” folder. Then we make some modifications to our main SASS file:
@import "compass/reset";
@import "compass/css3/inline-block";

$baseGutter: 10px;

// Create sprite image for our "icon" folder
$icon-sprite-dimensions: true;
@import "icon/*.png";
@include all-icon-sprites;

body {
background-color: darken(white, 10);
  background-image-height: 10px;
  padding: $baseGutter * 5;
}

h1 {
  padding: ($baseGutter * 2) 0;
}

.logo {
  @include inline-block();

margin-right: $baseGutter * 2;

&.logo-2 {
  @extend .icon-map;
}

}
The key changes are:
$icon-sprite-dimensions: true;
@import "icon/*.png";
@include all-icon-sprites;
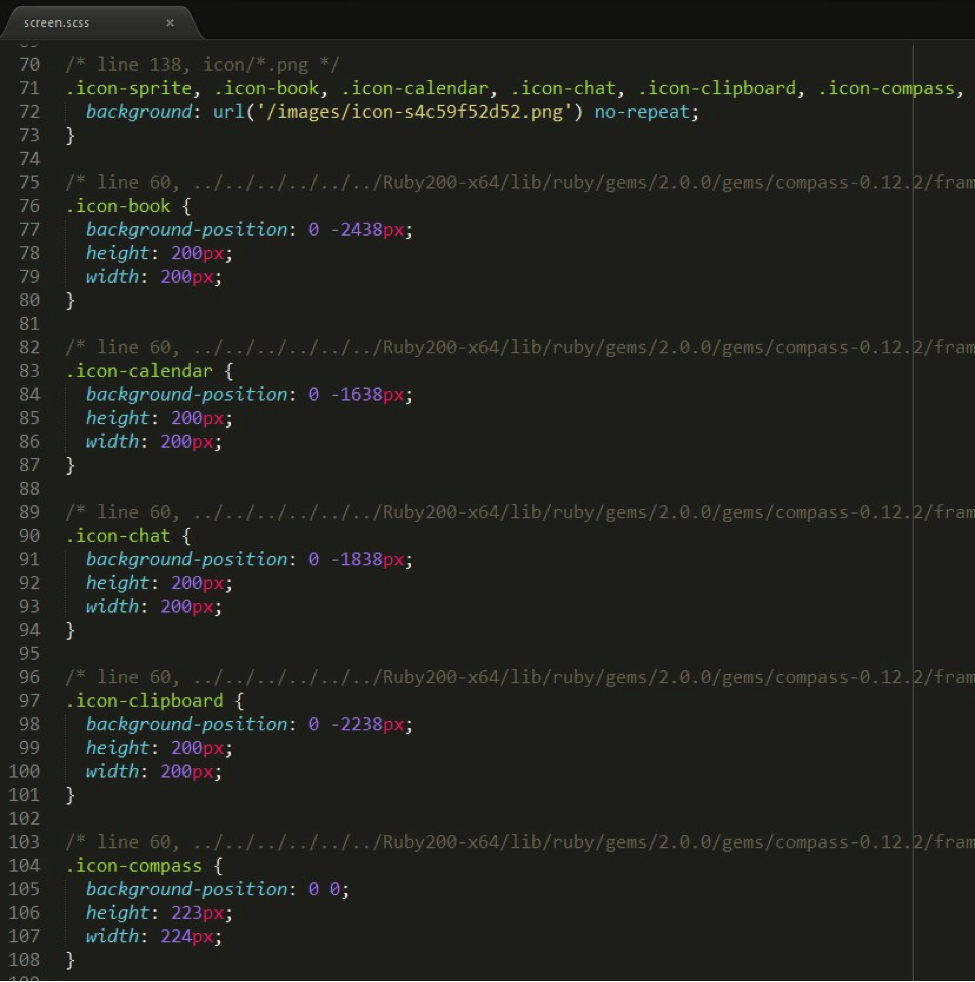
These three lines perform all the magic we need. After making these changes and running “grunt compass,” you’ll see that a sprite image is generated in the “images” folder and given a unique name (mine was “icon-s4c59f52d52.png”). The generated CSS will have a reference to it and a series of classes that correspond to each of the images in the “images/icon/” folder:

To use these classes, you can simply assign them to an element or use SASS to mix it into an existing class, like so:
      <div class="logo logo-1 icon-compass"></div>
      <div class="logo logo-2"></div>

      .logo {
        @include inline-block();

       margin-right: $baseGutter * 2;

       &.logo-2 {
          @extend .icon-map;
       }
      }
Et voila!

This approach works great. It reduces page load time and integrates wonderfully with your development workflow. To add a new image to the sprite, all you need to do is drop it into the folder and run “grunt compass.”
In the rest of this series, we’ll go over some other advanced concepts like Data URI inline images, image optimization, and a few other tricks. We’ll also see how to use more Grunt.js features and plugins and how to implement them. In the meantime, follow @CrederaMSFT on Twitter and Credera on LinkedIn for more great best practices.
To view the rest of the Modern Web Development Best Practices Powered by Grunt.js series click here.
Contact Us
Ready to achieve your vision? We're here to help.
We'd love to start a conversation. Fill out the form and we'll connect you with the right person.
Searching for a new career?
View job openings