


In January 2018, Microsoft made the Azure Active Directory Seamless Single Sign-On feature globally available. You may be saying to yourself, “That’s great – but Single Sign-On (SSO) is not a requirement or feature I’m currently exploring for implementation.” That’s fine, but did you know you can leverage this feature to successfully complete Workplace Join for down-level devices (Non-Windows 10 or Windows Server 2016 devices) without having to use Active Directory Federation Services (ADFS)?
Utilizing this approach will remove the multiple weeks it may take to deploy and configure multiple servers to support an Active Directory Federation Service environment.
Let’s walk through how to configure this for deployment…
1. How does Azure AD SSO actually work?


There are a few key points that we need to establish before we go any further.
If you’re using ADFS already, this is not an option for you (at this time).
You must enable the Single Sign-On feature in Azure AD Connect.
This is a free feature.
This will work with either the Password Synchronization or Pass-Through Authentication Sign-In methods.
Seamless SSO will not work in private browsing mode for Firefox and Edge browsers or Enhanced Protected mode for Internet Explorer.
2. What do I need to make Azure AD SSO work?
For this to work, you must be running Azure Active Directory Connect version 1.1.644.0 or later. If you are not, you will need to upgrade to this version or later to utilize this feature. You’ll also need to ensure that your down-level devices have Workplace Join client version 2.1 or later installed. Finally, you’ll want to ensure a domain administrator is available for each Active Directory forest you want to sync or users you want to enable for SSO.
3. How do I enable SSO in Azure AD Connect?
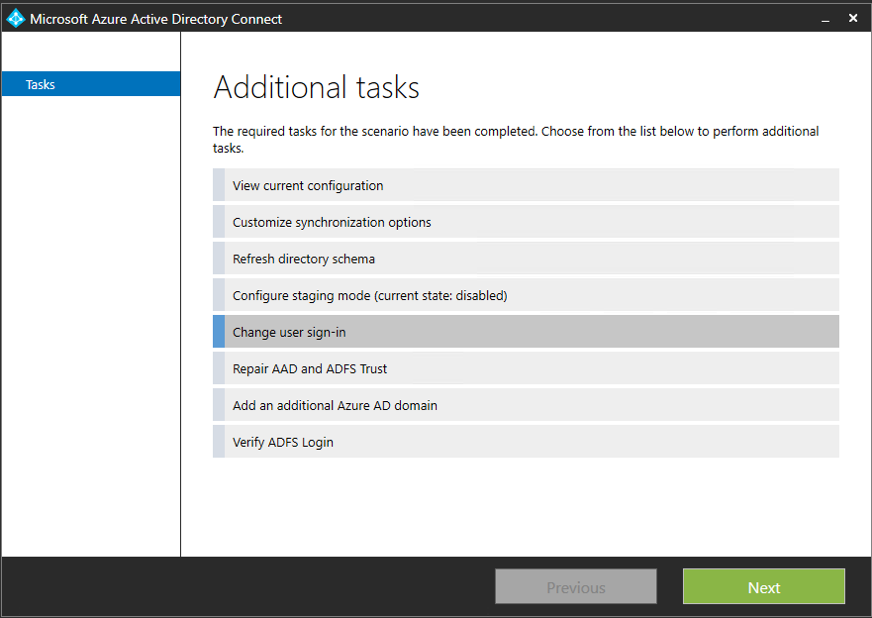
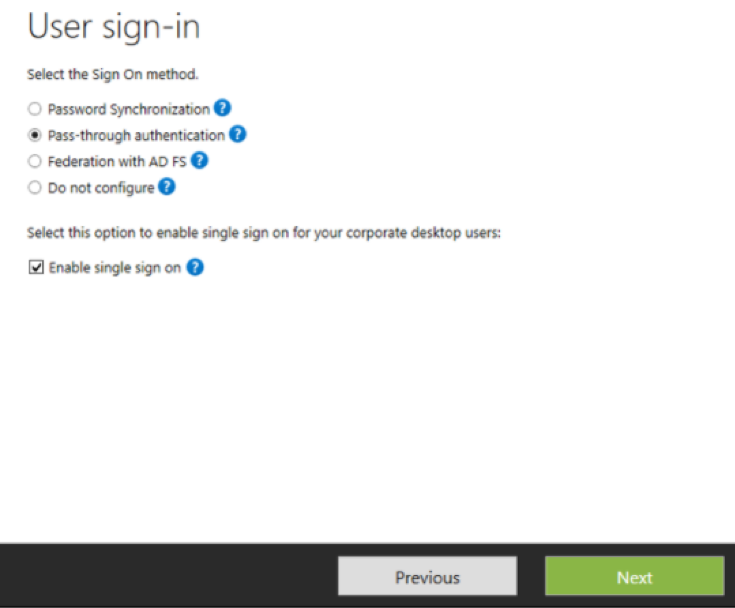
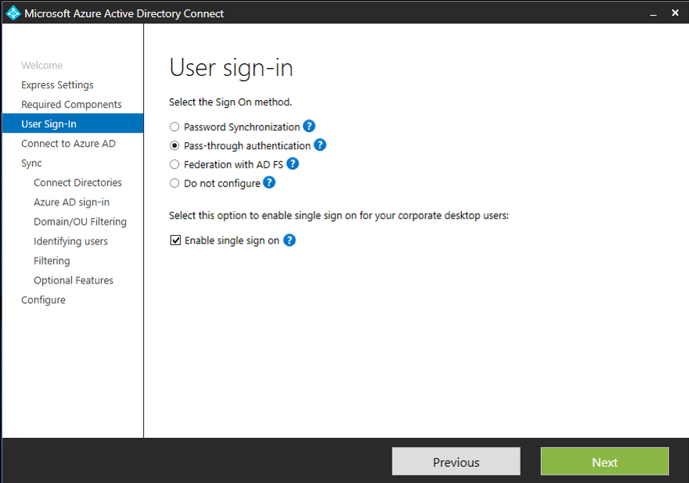
If you’re running a compatible version of Azure AD Connect, click on the ‘Change User Sign-In’ task and check the ‘Enable Single Sign-On’ box and click ‘Next’. Make sure a domain administrator is available to complete the feature enablement for each forest you want to sync or users you want to enable SSO for.
If you have to upgrade to a compatible version, you can enable it while performing the upgrade.
Important note: Make sure you pay attention to the account and password being utilized to run Azure AD Connect—the older account of ‘MSOLUserXXXXXX’ may be migrated with it.
4. I’ve enabled the SSO feature in Azure AD Connect, how can I tell if it’s enabled or completed successfully?
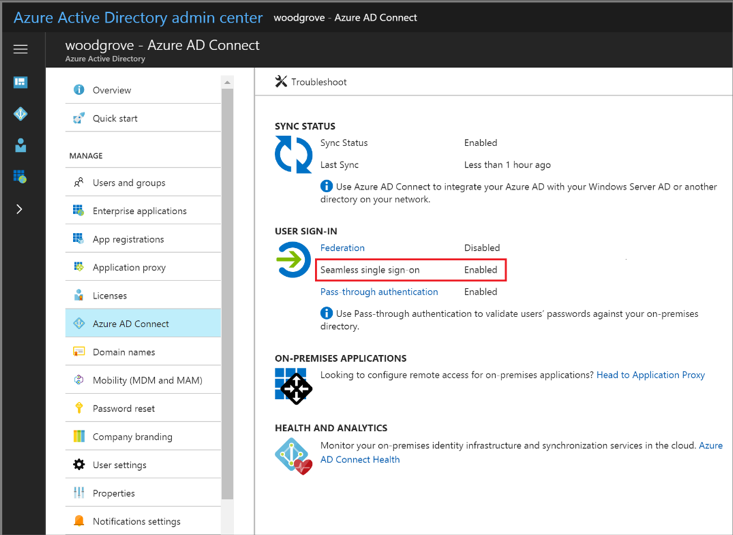
After enabling the feature in Azure AD Connect, navigate to the Azure Active Directory Admin Center in the Azure Portal and verify that Seamless Single Sign-On shows ‘Enabled’ under the User Sign-In area. Also ensure the ‘Users May Join Devices to Azure AD’ setting is set to ‘All’. Another important area of verification is that the AZUREADSSOACC computer object has been created in Active Directory.
Important note: You will want to roll over the Kerberos decryption key of the AZUREADSSOACC computer account at least every 30 days. At this time, this can only be done manually.

Now that Azure AD SSO has been enabled successfully, the following steps detail the remaining specific settings needed to ensure user authentication is successful.
5. Deploy the following URLs and settings to the user’s Intranet zone via Group Policy:
Enable the zone policy setting “Allow updates to status bar via script”
If the requirement exists for the Local Intranet zone to not be managed via Group Policy Object (GPO), you can deploy the URLs as GPOs via registry settings:
https://aadg.windows.net.nsatc.net
Location: HKEY_CURRENT_USER\Software\Microsoft\Windows\CurrentVersion\Internet Settings\ZoneMap\Domains\nsatc.net\aadg.windows.net
Name: https
Type: REG_DWORD
Data/Value: 00000001
https://autologon.microsoftazuread-sso.com
Location: HKEY_CURRENT_USER\Software\Microsoft\Windows\CurrentVersion\Internet Settings\ZoneMap\Domains\microsoftazuread-sso.com\autologon
Name: https
Type: REG_DWORD
Data/Value: 00000001
https://enterpriseregistration.windows.net
Location: HKEY_CURRENT_USER\Software\Microsoft\Windows\CurrentVersion\Internet Settings\ZoneMap\Domains\windows.net\enterpriseregistration
Name: https
Type: REG_DWORD
Data/Value: 00000001
https://login.microsoftonline.com
Location: HKEY_CURRENT_USER\Software\Microsoft\Windows\CurrentVersion\Internet Settings\ZoneMap\Domains\microsoftonline.com\login
Name: https
Type: REG_DWORD
Data/Value: 00000001
https://device.login.microsoftonline.com
Location: HKEY_CURRENT_USER\Software\Microsoft\Windows\CurrentVersion\Internet Settings\ZoneMap\Domains\microsoftonline.com\device.logon
Name: https
Type: REG_DWORD
Data/Value: 00000001
6. Configure the Service Connection PointUsing PowerShell and the Microsoft Azure AD Module, you’ll need to verify if the service connection point (SCP) is already created.
You can run this script to validate:
$scp = New-Object System.DirectoryServices.DirectoryEntry; $scp.Path = "LDAP://CN=62a0ff2e-97b9-4513-943f-0d221bd30080,CN=Device Registration Configuration,CN=Services,CN=Configuration,DC=,DC=com"; $scp.Keywords;
If the service connection point does not exist, you can create it by running the Initialize-ADSyncDomainJoinedComputerSync cmdlet on your Azure AD Connect server.
Important notes:
i. Enterprise Admin credentials are required to run this cmdlet.
ii. Only run this command once!
iii. Active Directory Domain Services must be installed; if not the cmdlet will fail.
Run this script to create the SCP:
Import-Module -Name "C:\Program Files\Microsoft Azure Active Directory Connect\AdPrep\AdSyncPrep.psm1"; $aadAdminCred = Get-Credential; Initialize-ADSyncDomainJoinedComputerSync –AdConnectorAccount [connector account name] -AzureADCredentials $aadAdminCred;
Important note: When running the -AzureADCredentials $aadAdminCred portion of the script, it’s important to note which account and password is running Azure AD Connect. If the legacy MSOLUser account is running it after upgrading, a password will not be set; you will need to set a password and apply it.
If you have the appropriate access, you can navigate to ADSI Edit and look for CN=62a0ff2e-97b9-4513-943f-0d221bd30080,CN=Device Registration Configuration,CN=Services,[Your Configuration Naming Context]
7. Download and Push to End User’s Computer
Now that the service connection point has been created, download the Workplace Join client version 2.1 and push to the end user’s computer.
8. Confirm Success
For good measure, run a gpupdate /force and a reboot on the end user’s computer to ensure all settings are received and applied. When the user logs in, Workplace Join will try to join automatically and should ultimately succeed.
To confirm this successful message, navigate to the Azure Active Directory Admin Portal, then to Devices and confirm the device, owner, and Device ID by clicking on the entry. If the join does not happen automatically, you can manually run the following steps:
Open Command Prompt as an Administrator, navigate to Workplace Join and execute:
Cd C:\Program Files\Microsoft Workplace Join\AutoWorkplace.exe /i
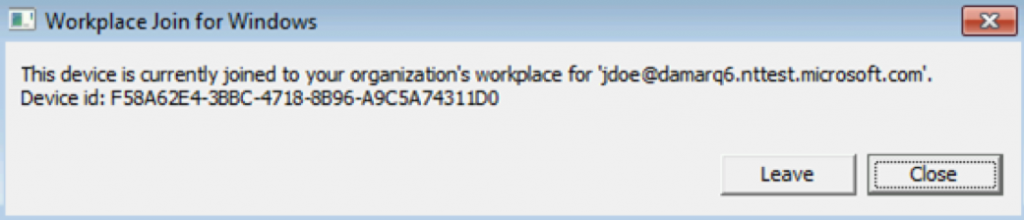
When the Workplace Join client opens, click ‘Join’.
When successfully joined, you will see a successful join message and Object GUID as shown above.
Open the Azure portal, navigate to Azure AD, then Devices, and confirm the successful join of the down-level device by name and Object GUID.
That’s it! You’ve now successfully joined a down-level device to Workplace Join utilizing the Azure Active Directory Seamless Sign-On feature without ADFS. While this is a new feature, there are some limitations and features that are on the roadmap that will really make this feature even better over time. At Credera, we enjoy leveraging new technologies to simplify solutions. Have questions about Azure, Active Directory, or infrastructure modernization? Contact us at findoutmore@credera.com.
Contact Us
Let's talk!
We're ready to help turn your biggest challenges into your biggest advantages.
Searching for a new career?
View job openings