Technology
Jul 15, 2013
Windows 8 App Development Tips & Tricks: Part Two – Scrollbar and Layout Tweaks


Welcome to the second installment of a three part series on improving your Windows 8 application. The series will share some simple ways to enhance functionality and the user’s experience. If you have not yet read the introduction or part one, I recommend it since it gives a quick explanation of the sample project we’ll be using.
Note: If you haven’t already, you will need to have a retail or trial version of Windows 8 and Visual Studio 2012. You can download them here.
Today’s post will focus on a problem more specific to the application I’m working with. While you may not find this problem with apps you’re creating, it will surely teach you something you can implement in your app. In my case, the scroll bar at the bottom of the screen sometimes overlaps the text that is displayed and we’re going to fix that.
Open the starting project created for Part 2 in VS 2012 and let’s dive right in. Also, it is helpful to have Line Numbers turned on in VS 2012, in order to better follow the guide. To turn these on you can go to Tools > Options > Text Editor > All Languages > [Checkbox] Line Numbers.
Topic 3 – Fixing the Scroll Bar Overlay
One of the cool things I want to show you about Visual Studio 2012 is the Simulator. If you click on the down arrow right beside Local Machine in the debug button, you’ll see there is an option for Simulator.
This neat feature helps simulate what your app would look like on tablets with different screen sizes. The template helps auto-adjust a lot of things, like how many rows of articles are displayed depending on the screen size.
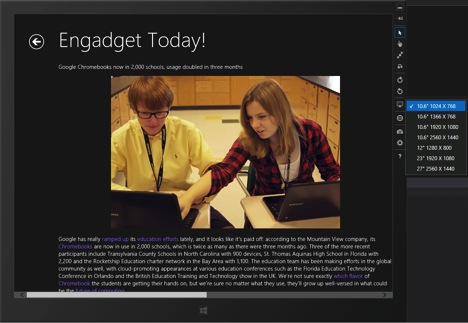
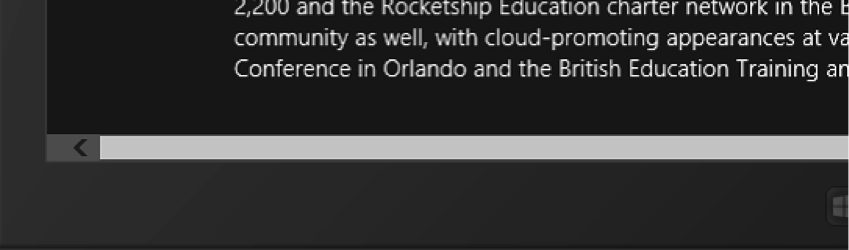
If you click on the right side of the simulator, you can select the screen size. One of the things I started noticing while playing with different sizes is sometimes the scroll bar overlapped the text, as seen below. It was something that really bugged me and I wanted to fix. We will walk through a couple of options I tried to fix the issue, learn a bit about Blend and look at the final solution.
Let’s start trying to fix the issue by using another of the great things about the new Visual Studio 2012 package, Blend. In your Solution Explorer (View → Solution Explorer or shortcut Ctrl+W, S) right click on your Project and click Open in Blend.
We will only be touching on Blend slightly, but there are a few things I want to point out. If you look at the picture below, at the top right of the page is a button that, when hovered over, says Turn on Interactive Mode. If you click that you’ll be able to actually traverse through the application. Click into an article (preferably one where the scroll bar overlaps the text. If none exist by the time you’re reading this article, that’s OK).
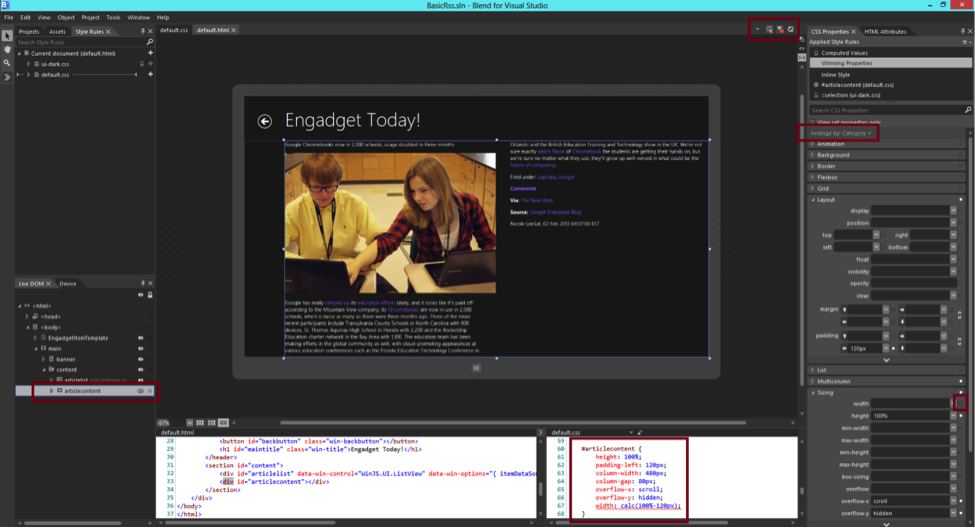
Click on articlecontent in the Live DOM on the left, and you should see that the div called articlecontent is highlighted in the main area of Blend. On the right I have the CSS Properties pane (Window → CSS Properties). About one-fifth down the top of the tab, you can arrange the properties by multiple criteria, but I am using Category at this moment.
If you look at the default.css file, you will see we have given the article content a height of 100% and a width of calc(100%-120px). This is new in HTML5, and even Blend is telling me it’s a bad property, despite it working. The way I ended up inserting that value there originally (apart from just typing it in) was by clicking on the gray square to the right of the width property (refer to the picture above) and selecting Custom Expression.
We chose to give the div a left padding of 120px, then have the width be dynamically generated. We did this so the content div would align itself with the title. One of the things I noticed was when I tried to do the same with the height, the program would just go kaboom and I would get a malformed div. Instead, I set the height to 98% and gave it bottom padding of 20px. This seemed to fix the bar.
Save the files, close Blend, and head back to VS 2012. Debug it in Simulator mode. What used to look like this:
Now looks like this:
I was so happy that I figured it out! Except I then changed the simulator’s screen from 10.6” 1024 x 768 to 27” 2560 x 1440 and I was appalled. My app now did not need any scrolling, because the display area was so big, but the scroll bar was now not touching the bottom part of the screen. Disaster.
The solution? Go back to Blend, or your CSS files, and undo the height and bottom padding to change it back to how it was before. Go to your default.js file and inside the app.onactivated function, at the bottom, add these 3 lines:
var height = $(‘#articlecontent’).height();
articlecontent.style.height = (height – 20) + “px”;
articlecontent.style.paddingBottom = “21px”;
These self-evident lines use JavaScript to dynamically set the div’s height. We could not do it through CSS since the calc function was not working correctly. We also could not set it to static since the screen size the app is used in might change.
Ending Thoughts for Part 2
Today we learned about the Simulator feature and how we need to keep your whole market in mind when designing an app. We got an introduction to Blend, a neat out-of-the-box program can be used to get an immediate look at how styling changes are affecting the page, and we saw how sometimes it is necessary to think out of the box and use JavaScript instead of CSS to create a responsive design.
You can download the end result file here, with comments to show what we changed for Topic 1, Topic 2 (Post 1), and today’s Topic 3.
Whenever people launch a Windows 8 app the first thing they see, even before the app, is a splash screen. We’ll be talking about how to modify your splash screen in the coming post. We’re also going to be discussing a feature that has become more prevalent over the years, to the point that it’s now standard in almost any app and in the Windows 8 interface: sharing. Join us for the last installment of the series next week to learn about these two items. As always, remember to enjoy the journey, not just the destination!
Follow us at @CrederaMSFT for more great tips and tricks to Microsoft development, or if you have questions please use the comment box below.
–
Drive digital transformation with enterprise web and mobile applications through Microsoft Solutions
Explore Our Microsoft Consulting Services →
–
Contact Us
Ready to achieve your vision? We're here to help.
We'd love to start a conversation. Fill out the form and we'll connect you with the right person.
Searching for a new career?
View job openings