
Blog
Feb 24, 2014
SharePoint 2013 Provider Hosted Applications with Windows Azure PAAS


How SharePoint 2013 Overcomes Traditional SharePoint Development Challenges
Custom application development in the SharePoint environment has always been a challenge (that’s the nicest, most professional way I can put it). At the time SharePoint was unveiled, almost any solution you could build in Visual Studio could be executed and viewed in a browser simply by pressing the F5 button.
For SharePoint, not only did you have to do your development in an environment where SharePoint was actually installed, running your application became much more complicated. Before getting started you’d have to:
Author the various XML documents that make up a SharePoint solution.
Compile these documents along with your solution artifacts into a WSP file.
Execute at least three console commands to deploy or update your solution.
Troubleshoot the various Javascript, SharePoint Object Model, or deployment issues that should have worked, but didn’t.
Also, because custom web part code ran alongside the core platform runtime, any developer could create a web part – as humble as a simple image rotator – which could potentially crash the entire farm.
To be fair, SharePoint as a concept was leagues ahead of its time when it was released and operates with virtually no comparable competition even today. The SharePoint team delivered a very innovative CMS and collaboration portal platform which, as a first of its kind and magnitude, necessarily had many challenges to overcome. Indeed, the initial incarnation of SharePoint paved the way, with best practice approaches and pitfalls to avoid, for countless subsequent CMS and portal implementations.
SharePoint 2013, with the associated Visual Studio 2013 development tools, exemplifies Microsoft’s commitment to innovation with the new application model which offers a completely new and improved SharePoint application development experience. The details of this new application model are outside the scope of this post, however, a colleague of mine, Denis Stetsenko, wrote a great primer on the subject.
In the end, the beauty of this new model is that your applications run as true extensions of the SharePoint platform. Your code can run in its own isolated environment without risk of impacting the host SharePoint site’s process. With SharePoint 2013, the SharePoint team has worked hard to surface the majority of the integration functions available in the SharePoint object model as service end points available through the client object model and new SharePoint context. Thus, your application can be completely separate, yet tightly integrated into the host SharePoint portal, including borrowing the primary look and feel elements from the host site via JavaScript.
The SharePoint 2013 SDK provides a Visual Studio SharePoint 2013 application template, which allows you to create an auto- or provider-hosted application that uses local development hosting (i.e., IIS Express) and SharePoint 2013 online as your development environment. All of the necessary environment settings and parameters can be defined when creating the new project from the template. Finally, the moment the project is created it can be debugged in the browser, as an extension of your SharePoint 2013 online environment, simply by pressing F5. That’s right – one finger, pressing one button!
Pushing your solution out of development (i.e., to test or production) basically involves deploying your web application to a production web hosting environment (which takes the place of your development hosting) and telling SharePoint where to find the production-hosted application.
New SharePoint 2013 Provider Hosted Application Challenges When Using Windows Azure PAAS
For my first SharePoint 2013 application, I had a partially developed ASP.NET MVC application designed to run as an Azure Web Role. Initially, the solution was not designed as a SharePoint 2013 application, but once the decision was made to build the application as an extension of SharePoint, I set about implementing the necessary changes. The conversion proved to be pretty simple. After adding the SharePoint application project to my solution, referencing my ASP.NET application as a feature, and making a few small code changes (primarily to create a SharePoint context for the host SharePoint site), I quickly had my new provider hosted application running in IIS Express with integration back to the host SharePoint 2013. Development went along relatively smoothly until I packaged up my Azure project and deployed to my hosted service.
When you launch a provider- or auto-hosted application from your SharePoint 2013 portal, there is a back and forth conversation that occurs between SharePoint and your application, via a series of redirects, which essentially authorizes your application and allows it to create a SharePoint context. Once I deployed my solution to the Azure hosted service, this process stopped working and instead began to throw all sorts of nasty errors.
The remainder of this post is concerned with helping you overcome these not-so-obvious issues and get a provider-hosted application successfully running as a Windows Azure PAAS solution.
Bootstrapping the SharePoint 2013 SDK
The first error was pretty obvious – the SharePoint 2013 SDK is not installed by default when a Windows Azure web or worker role is created. Therefore, when your application starts spinning up SDK objects to communicate with SharePoint, it runs into problems. This can easily be overcome by bootstrapping the SDK to the web or worker role. If you’ve never bootstrapped an external dependency to an Azure role, it’s a simple process, but can be a little confusing until you do it once or twice.
Download the SDK installer. Make sure you are using the Client Components SDK and not the full-blown SDK.
Add the SDK installer to your Visual Studio solution to the root of each web or worker role project where the SDK will be needed. Make sure you set the Copy to Output Directory property for the file to Copy Always.
Add a command (.CMD) file which executes the commands to install the SDK once the role is up and running to the root of each web or worker role project where the SDK will be needed.
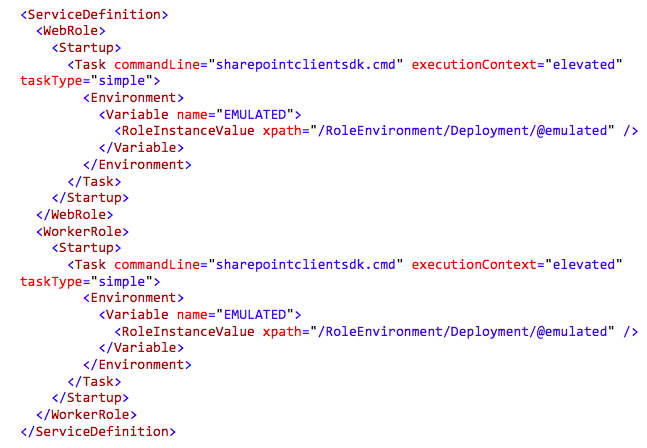
The following sharepointclientsdk.cmd file can be used as a template. Please feel free to modify it to meet your specific needs.
Notice that the command file is essentially a batch file with a series of commands that will execute to install and configure the SDK. Each step of the process outputs information to a log file, sharepointsdk.install.log, in the current directory. Before the SDK will work properly, IIS must be reset – and for some reason, when IIS is reset, the World Wide Web Publishing Service doesn’t automatically restart. So this script also restarts that service here.
4. Finally, configure each web or worker role that needs to install the SDK to execute the bootstrap commands.
The command file can be bootstrapped as a startup activity in the ServiceDefinition.csdef in the Windows Azure project.

Setting the Worker Role Identity
It’s frustrating to overcome one hurdle and be immediately confronted with another. Unfortunately, this is the case here. As soon as you figure out all of this bootstrapping and redeploy your application, you realize that the validation handshake now fails with a vague security/communication error.
Without getting too far into the weeds, the problem is that the SharePoint 2013 SDK requires permissions that your IIS application pool identity doesn’t have. This was a challenging fix to build because the available managed code examples of accomplishing this have changed with each release of Windows Server. At the time of this writing, Windows Azure role instances were running some flavor of Windows Server 2012 R2. I eventually had to install Visual Studio on a Windows Server 2012 R2 VM to build and debug a prototype there. Thankfully for you, if you’re reading this post and this code works with the version of Windows Server powering current role instance, you should be able to more or less copy and paste.
In your WebRole.cs file for your web role application, add the following function which can be invoked from the OnStart function. Make sure to only run this code if RoleEnvironment.IsEmulated is false.
The username and password used here (highlighted in yellow), should be a user that has the permissions required by the SharePoint 2013 SDK. The easiest way to do this is to set these values to the username and password for the remote desktop user configured for the web role.
The HostedAppHostNameOverride Setting
The final issue was a little bit trickier to track down and fix. When you create a new SharePoint 2013 provider-hosted application using the SharePoint project template, some very useful helper classes are added to your application (primarily TokenHelper.cs and SharePointContext.cs). These helper classes handle the handshake between your application and the SharePoint host site as mentioned earlier. This all works fine in development, but unfortunately, when you deploy your provider-hosted application to an Azure web role, this handshake breaks down and fails to create a SharePoint context.
The problem is that when you generate your client secret and client ID using SharePoint’s application registration utility page, you have to tell SharePoint where your provider-hosted application will be hosted. In the case of Windows Azure, it will be hosted at a URL that resembles https://yourapp.cloudapp.net. When SharePoint attempts to handshake with your application it will expect the remote host to verify that it is indeed running at the provided cloudapp.net URL. However, the cloudapp.net URL is actually pointed at the load balancer which resides in front of your web role instances, while the actual web role instances have been named after semi-random strings. Therefore, when you put all of this together, you get a handshake that looks like this.
User: Launches provider-hosted application from the SharePoint host web.
SharePoint to Provider Hosted Application: Are you https://yourapp.cloudapp.net?
Provider Hosted Application to SharePoint: No. I am ANCG43D (or something like that).
Provider Hosted Application: Explode!
The actual exception is “ANCG43D” is not the intended audience “yourapp.cloudapp.net”
Thankfully, the author of the TokenHelper.cs class, added a loop hole for situations just like this one. When the token helper is performing its validation, it compiles a list of valid host names using information from the host environment. By setting the HostedAppNameOverride application setting in the project’s web.config, the developer can specify a host name to be added to the list of valid names. So in the case of a Windows Azure PAAS web role, you would add the following setting to your web.config.
Conclusions
The new SharePoint 2013 application model solves a lot of really big problems that have historically plagued the SharePoint platform. Likewise, as it necessarily happens with innovation, a few new problems have been introduced. With a little research and community support, these challenges are being overcome on a daily basis, resulting in a much more robust, secure, stable, and flexible development experience and hosting paradigm than was offered by SharePoint 2010.
I hope this post offers some guidance on these new issues to help you quickly get up and running with your Windows Azure provider-hosted SharePoint 2013 application. If you have ideas on other SharePoint 2013 topics that would be useful to you – leave a comment. Looking for additional information on SharePoint 2013? Check out Credera’s other SharePoint-related blog posts or follow @CrederaMSFT on Twitter.
Contact Us
Let's talk!
We're ready to help turn your biggest challenges into your biggest advantages.
Searching for a new career?
View job openings