Strategy
Mar 21, 2019
How to Create a Product Onboarding Video to Drive User Adoption and Engagement


You’ve created a product. Great, but your work doesn’t end there. If you are a project manager or a product owner, you may also be responsible for training and onboarding your users. Ensuring users are self-sufficient is a crucial part of post-live care and change management. After all, projects are only successful when they are adopted.
But how can you encourage users to try and adopt your new product? We use several tools in our projects, but one of our favorites is the onboarding video. At Credera, we’ve created onboarding videos for marketing tools we implemented at a major airline, the guest services department of a leading theater chain, and a training program at a multinational biopharmaceutical company, to name a few examples. This is because onboarding videos effectively communicate the value a product provides to users, while also demonstrating how best to use it. More specifically, onboarding videos are great because:
Humans are visual learners (we process visual information 60,000 times faster than written information).
Visual instruction minimizes miscommunication because you can explicitly demonstrate actions instead of describing them in a way that can be misinterpreted.
Videos are easier to hand off to users and can be reused, unlike live training sessions.
In-app training features represent scope and budget that may not be deemed as essential as the product itself.
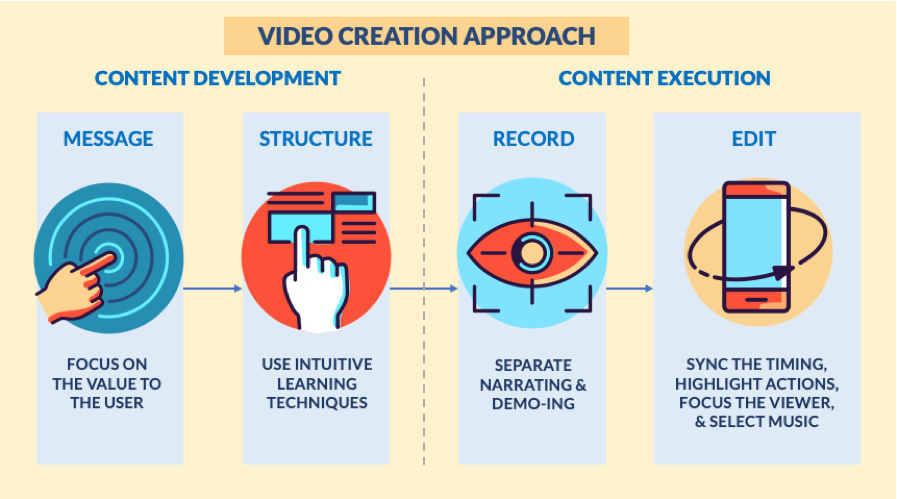
Now that we have explored why onboarding videos are effective, we want to demystify the process of making one. We’ll break the video down into four steps:
Determine the message.
Apply structure.
Record the narration and the demo.
Edit it all together.

Content: Determine and Deliver the Message
Onboarding videos should create buy-in from the audience and display key features useful to the user. Your script should boil down to answering these two questions for the user: 1) Why is this useful to me? and 2) How do I do this useful thing?
1. Message
Your message should focus on the value your product brings to your user. There should be no mystery or extra work involved for the user to understand how your product will help them. Instead of focusing on features and capabilities, emphasize how these offerings benefit the user.
What we mean by this is to switch your mindset from: “You should use our product because of feature X, Y, Z” to “Do action A, B, or C faster or easier with our product.”
2. Structure
Now that we have established the primary message of the onboarding pitch, we need to explain how to use this new product by highlighting specific actions and features. Think of it as if you’re having a conversation with your users. What are the big things they would care about? How do they complete these actions?
Start by listing the features of your product and the associated use cases. Now prioritize those that align with your key message and ensure you have mock data and success criteria available so you can demonstrate them.
When you begin writing scripts for the onboarding video, remember these best practices for effective communication:
Follow the natural flow of how a user would navigate the app__.__ It’s tempting to cover each product feature in the order they were developed, but this order may not be the most intuitive to users.
A new LinkedIn user would want to know how to set up their profile and make connections before knowing how to follow influencers or watch skills tutorials.
Answer “How do I…?” questions. When explaining product features, be sure to think about them as actionable outcomes from the user’s perspective.
“How do I add a friend?”
“How do I search for an article?”
“How do I store this information?”
Start your answers with outcomes, not explanations. When listening to instructions, your users will want to know the “what” before the “how.”
“Send a message to a friend by clicking on the mail icon” vs. “Click on the mail icon on the bottom left to send a message to someone.”
Incorporating these best practices in your onboarding video ensures better app adoption because they apply intuitive learning techniques.
Execution: Tying It All Together
Now that you’ve determined your message and written your script, it’s time for action. We’ll walk through how to record the onboarding video, edit it all together, and add some final polish to create an effective onboarding tool.
3. Recording
There are two different components of the recording—the narration and the demo, or audio and video. Let’s start with the narration; here are a few tips to help you out:
Record the narration and the demo separately, then edit the demo to fit the timing of the narration. This is easier than recording both at the same time.
Record the narration in sections. This decreases the likelihood of mistakes and makes it easier to re-record if there are any errors.
Record in a quiet room with few distractions. If you can’t find a quiet room, try putting a jacket or other thick cloth behind the recording device.
There are many great options for recording audio. The Voice Memos app on iPhone is a convenient option, but external microphones will provide the best quality. If you have access to a mic, be sure to check out free recording tools like Audacity or GarageBand.
Now it’s time to record the demo. Since you’ll be editing this footage to match the timing of the narration, record both the actions on your list and the rests in between those actions, a technique courtesy of Nick LaClair from SproutVideo. He defines actions as “one smooth motion from point A to B” and rests as the downtime between those actions. For example, if you were showing a form that required you to make a selection in a dropdown and then fill out a text field, your actions and rests would be the following:
Action: Click the dropdown to open it.
Rest
Action: Select the desired option.
Rest
Action: Click into the text field.
Rest
Action: Type the desired text.
You can then expand or shorten these rests when editing to make sure the actions line up with the narration.
Here’s how to screen record on an iPhone, Android, Mac, or Windows.
4. Editing
Editing tends to be the most intimidating part of creating an onboarding video, but once you get started it will quickly begin to feel natural. You can use pretty much any video editing software, such as Adobe Premiere or iMovie. For this type of video, the editing process has three steps—timing, highlighting, and focusing.
Timing – Once your video recording and narration audio is imported, you need to sync up the recorded actions with the narration:
Move through the demo video, identifying all the actions. When you find an action, make a cut before and after it. Now you have a distinct clip for this action. Repeat until you’ve separated all the actions from the rests. Here’s how to cut and arrange clips in Premiere and iMovie.
Line up each of your clips of the actions to the associated segment of the narration, then fill the gaps with the appropriate rest. The links above cover this as well.
At this point, you should have a full video for your product, where the demo video lines up with the narration audio. However, the next two steps are crucial in effectively communicating how to use your product and what you can do with it.
Highlighting – On a desktop, the viewer can see the cursor and anticipate the next interaction, so this step is optional. However, there is no cursor on a mobile device, so you’ll need another way to show the viewer what actions you are taking. Position a semi-transparent box over your screen recording for a few seconds before the action takes place to draw the viewer’s eye, like in the example below. Here’s how to do that in Premiere and iMovie.
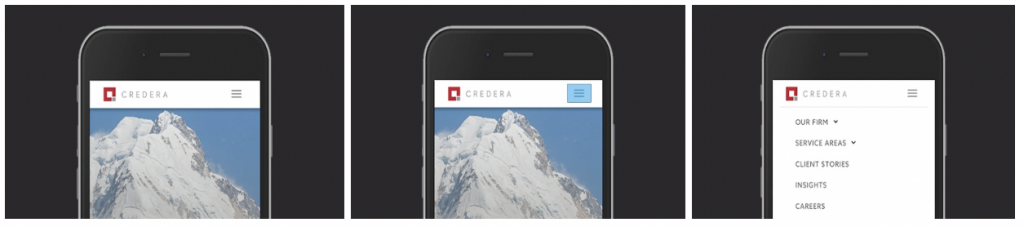
Three frames, displaying an example of highlighting and focusing. You can see how the hamburger menu is highlighted to illustrate someone tapping that part of the phone screen.
Lastly, you can add a few final touches using tools such as Biteable and Envato to generate title animations and mockups. While optional, these animations will elevate the video quality with minimal effort. It’s as easy as uploading screenshots of your app to the site, typing in your titles, and downloading the video.
A mockup animation of the Credera corporate website, generated with Biteable.
For background music, choose songs that fit the mood, do not distract from the narration, and are licensed for commercial use. Be sure to lower the volume (here’s how to do it in Premiere and iMovie) so the music does not overpower the narration.
Don’t worry if these extra bells and whistles seem overwhelming to you now, they won’t once you begin editing the video and become familiar with your particular tool.
Ensuring Adoption
Lack of adoption is every project manager’s worst nightmare. But you don’t have to fall into this trap, because you realize that change management and adoption are crucial elements of any successful project. You know the value of the onboarding video in ensuring users are well equipped to get the most value out of your product. Remember, creating an onboarding video isn’t as daunting as you may think—as long as you focus on the user’s perspective, tackle the development in phases, and add a little polish at the end.
Now that you’re fully equipped, go forth and improve the lives of your users! Thanks for reading our crash course on producing onboarding videos.
Works Cited
Chen, Andrew. “Losing 80% of Mobile Users Is Normal, and Why the Best Apps Do Better.” Linked In. June 9, 2015. Accessed December 20, 2018. https://www.linkedin.com/pulse/losing-80-mobile-users-normal-why-best-apps-do-better-andrew-chen/.
Marrs, Megan. “App Onboarding 101: 7 Tips for Creating Engaged, Informed Users.” Localytics Blog. April 27, 2016. Accessed December 20, 2018. http://info.localytics.com/blog/app-onboarding-101.
Nick Babich. “Best Practices for Onboarding – UX Planet.” UX Planet. January 13, 2017. Accessed December 20, 2018. https://uxplanet.org/best-practices-for-onboarding-92f3a9f0b21a.
Schrock, Dottie. “5 App Onboarding Best Practices for Savvy Marketers.” Leanplum. August 27, 2018. Accessed December 20, 2018. https://www.leanplum.com/blog/app-onboarding-best-practices/.
Contact Us
Ready to achieve your vision? We're here to help.
We'd love to start a conversation. Fill out the form and we'll connect you with the right person.
Searching for a new career?
View job openings